Перейти к основному содержанию

Dell Alienware 13 R2 Memory Modules Replacement

  1. Dell Alienware 13 R2 Memory Modules Replacement, Popping up the Memory Module: шаг 1, изображение 1 из 1
    • WARNING: Before working inside your computer, read the safety information that shipped with your computer and follow the steps in Before Working Inside Your Computer. After working inside your computer, follow the instructions in After Working Inside Your Computer.

    • Using your fingertips, carefully spread apart the securing clips on each end of the memory-module slot until the memory module pops up.

  2. Dell Alienware 13 R2 Memory Modules Replacement, Removing the Memory Module: шаг 2, изображение 1 из 1
    • Slide and remove the memory module from the memory-module slot.

  3. Dell Alienware 13 R2 Memory Modules Replacement, Align the notches: шаг 3, изображение 1 из 1
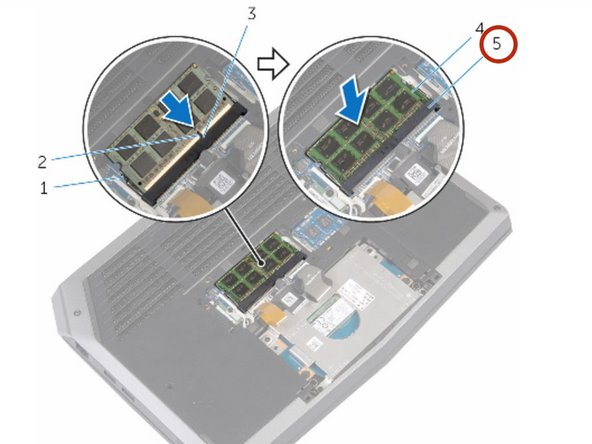
    • Using the new memory module, align the notch on the memory module with the tab on the memory-module slot.

  4. Dell Alienware 13 R2 Memory Modules Replacement, Sliding the Memory Module: шаг 4, изображение 1 из 2 Dell Alienware 13 R2 Memory Modules Replacement, Sliding the Memory Module: шаг 4, изображение 2 из 2
    • Slide the memory module firmly into the slot at an angle and press the memory module down until it clicks into place.

Заключение

To reassemble your device, follow these instructions in reverse order.

Terrence15

Участник с: 12/18/17

79 121 Репутация

Автор 441 руководств

Команда

RampUP America, Inc. Участник RampUP America, Inc.

Community

42 членов

Автор 1 985 руководств

0 Комментариев

Добавить комментарий

Просмотр статистики:

За последние 24часов: 1

За последние 7 дней: 4

За последние 30 дней: 7

За всё время: 126