Перейти к основному содержанию

Dell Alienware 14 Memory Module Replacement

Выберете то, что вам нужно

  1. Dell Alienware 14 Memory Module Replacement, Close the Display: шаг 1, изображение 1 из 1
    • WARNING: Before working inside your computer, read the safety information that shipped with your computer and follow the steps in Before You Begin. . After working inside your computer, follow the instructions in "After Working Inside Your Computer".

    • Close the display, and turn the computer over.

  2. Dell Alienware 14 Memory Module Replacement, Remove the Screws: шаг 2, изображение 1 из 2 Dell Alienware 14 Memory Module Replacement, Remove the Screws: шаг 2, изображение 2 из 2
    • Remove the screws that secure the base cover to the computer base.

  3. Dell Alienware 14 Memory Module Replacement, Slide and Lift the Base Cover: шаг 3, изображение 1 из 1
    • Slide and lift the base cover off the computer base.

  4. Dell Alienware 14 Memory Module Replacement, Align the Tabs: шаг 4, изображение 1 из 1
    • Align the tabs on the NEW base cover with the slots on the computer base and slide the base cover into place.

  5. Dell Alienware 14 Memory Module Replacement, Replace the Screws: шаг 5, изображение 1 из 1
    • Replace the screws that secure the base cover to the computer base.

  6. Dell Alienware 14 Memory Module Replacement, Turn the Computer Over: шаг 6, изображение 1 из 1
    • Turn the computer over and open the display.

  7. Dell Alienware 14 Memory Module Replacement, Disconnecting the Battery Cable: шаг 7, изображение 1 из 1
  8. Dell Alienware 14 Memory Module Replacement, Remove the Screws: шаг 8, изображение 1 из 1
    • Remove the screws that secure the battery to the computer base.

  9. Dell Alienware 14 Memory Module Replacement, Using the Battery Cable: шаг 9, изображение 1 из 1
    • Using the battery cable, lift the battery and release it from the tabs on the computer base.

  10. Dell Alienware 14 Memory Module Replacement, Turn the Computer Over: шаг 10, изображение 1 из 1
    • Turn the computer over and open the display as far as possible.

  11. Dell Alienware 14 Memory Module Replacement, The Power Button: шаг 11, изображение 1 из 1
    • Press and hold the power button for five seconds to ground the system board.

    • Close the display and turn the computer over.

  12. Dell Alienware 14 Memory Module Replacement, Align the Tabs: шаг 13, изображение 1 из 1
    • Align the tabs on the NEW battery with the slots on the computer base.

  13. Dell Alienware 14 Memory Module Replacement, Align the Screw Holes: шаг 14, изображение 1 из 1
    • Align the screw holes on the battery with the screw holes on the computer base.

  14. Dell Alienware 14 Memory Module Replacement, Replace the Screws: шаг 15, изображение 1 из 1
    • Replace the screws that secure the battery to the computer base.

  15. Dell Alienware 14 Memory Module Replacement, Connect the Battery Cable: шаг 16, изображение 1 из 1
    • Connect the battery cable to the system-board connector.

  16. Dell Alienware 14 Memory Module Replacement, Popping up the Memory Module: шаг 17, изображение 1 из 3 Dell Alienware 14 Memory Module Replacement, Popping up the Memory Module: шаг 17, изображение 2 из 3 Dell Alienware 14 Memory Module Replacement, Popping up the Memory Module: шаг 17, изображение 3 из 3
    • WARNING: Before working inside your computer, read the safety information that shipped with your computer and follow the steps in Before Working Inside Your Computer. After working inside your computer, follow the instructions in After Working Inside Your Computer.

    • CAUTION: To prevent damage to the memory-module connector, do not use tools to spread the memory-module securing clips.

    • Using your fingertips, carefully spread apart the securing clips on each end of the memory-module connector until the memory module pops up.

  17. Dell Alienware 14 Memory Module Replacement, Remove the Memory Module: шаг 18, изображение 1 из 2 Dell Alienware 14 Memory Module Replacement, Remove the Memory Module: шаг 18, изображение 2 из 2
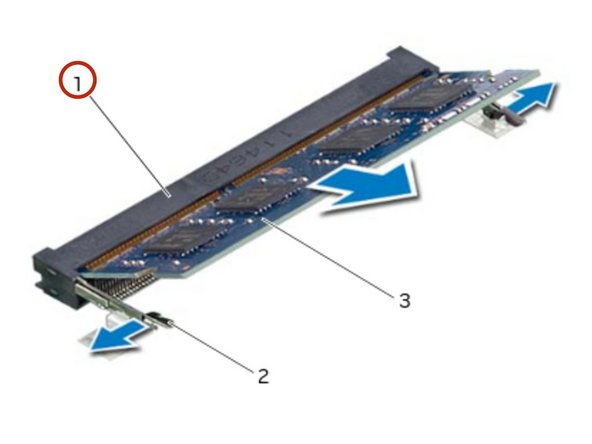
    • Remove the memory module from the memory-module connector.

  18. Dell Alienware 14 Memory Module Replacement, Align the Notch: шаг 19, изображение 1 из 2 Dell Alienware 14 Memory Module Replacement, Align the Notch: шаг 19, изображение 2 из 2
    • Align the notch on the NEW memory module with the tab on the memory-module connector.

  19. Dell Alienware 14 Memory Module Replacement, Slide the Memory Module: шаг 20, изображение 1 из 1
    • Slide the memory module firmly into the slot at a 45-degree angle, and press the memory module down until it clicks into place. If you do not hear the click, remove the memory module and reinstall it.

    • NOTE: If the memory module is not installed properly, the computer may not boot.

Заключение

To reassemble your device, follow these instructions in reverse order.

Terrence15

Участник с: 12/18/17

79 091 Репутация

Автор 441 руководств

Команда

RampUP America, Inc. Участник RampUP America, Inc.

Community

42 членов

Автор 1 985 руководств

0 Комментариев

Добавить комментарий

Просмотр статистики:

За последние 24часов: 0

За последние 7 дней: 0

За последние 30 дней: 1

За всё время: 223