Перейти к основному содержанию

Dell DJ Front Panel Buttons Replacement

Выберете то, что вам нужно

  1. Dell DJ Front Panel Buttons Replacement, Front Panel Buttons: шаг 1, изображение 1 из 3 Dell DJ Front Panel Buttons Replacement, Front Panel Buttons: шаг 1, изображение 2 из 3 Dell DJ Front Panel Buttons Replacement, Front Panel Buttons: шаг 1, изображение 3 из 3
    • Disassemble the device. See the disassembly guide for further directions. Slide the internal circuit board out of the protective device shell.

    • Use the metal spudger to remove the device's center toggle button.

    • Inspect contacts on the device. Also, inspect the device buttons (front and back) for damage. Damage may include broken or missing prongs that will interrupt the devices circuit.

  2. Dell DJ Front Panel Buttons Replacement: шаг 2, изображение 1 из 3 Dell DJ Front Panel Buttons Replacement: шаг 2, изображение 2 из 3 Dell DJ Front Panel Buttons Replacement: шаг 2, изображение 3 из 3
    • Inspect and clean device buttons with appropriate materials.

    • Wipe down the circuit board and the buttons with a disposable wipe. Then, use a cotton swab to remove dirt and grime in the crevices of the device.

    • Disposable wipes designed for cleaning devices are most appropriate for cleaning device circuit board. Other appropriate materials include: water dampened cotton cloth, microfiber cloth, cotton swabs, and disposable wipes made for electronic devices.

  3. Dell DJ Front Panel Buttons Replacement: шаг 3, изображение 1 из 2 Dell DJ Front Panel Buttons Replacement: шаг 3, изображение 2 из 2
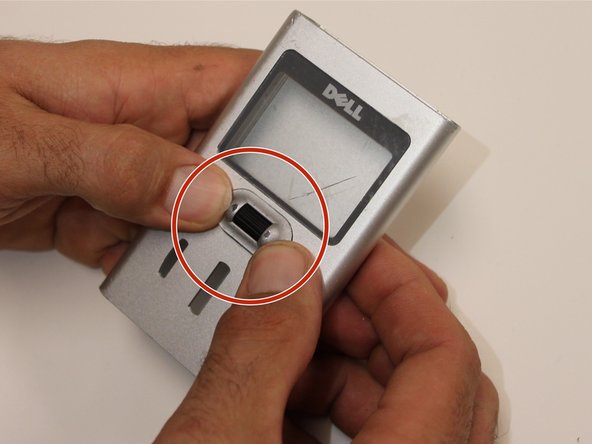
    • Inspect the shell of the device before placing the button pad and center toggle back into the device.

    • Look for cracks in the device's shell and identify whether the device shell is obstructing the button connection.

    • Clean the shell thoroughly using a cotton swab into the creases of the the device shell. Use a water dampened cloth to wipe down the device shell inside and out.

    • The center toggle (circled in red) button snaps into place. Be sure the center button is placed in correctly.

  4. Dell DJ Front Panel Buttons Replacement: шаг 4, изображение 1 из 1
    • After the device is assembled, power the device on. The issue with the unresposnive/sticky buttons should be repaired.

    • If the device buttons are still defective, an issue greater than the device button connection is the cause.

Заключение

To reassemble your device, follow these instructions in reverse order.

Brittany Abate

Участник с: 01/03/16

407 Репутация

Автор 4 руководств

Команда

USF Sarasota-Manatee, Team 1-1, Stewart Spring 2016 Участник USF Sarasota-Manatee, Team 1-1, Stewart Spring 2016

USFSM-STEWART-S16S1G1

3 членов

Автор 5 руководств

0 Комментариев

Добавить комментарий

Просмотр статистики:

За последние 24часов: 1

За последние 7 дней: 2

За последние 30 дней: 4

За всё время: 246