Перейти к основному содержанию

Dell Inspiron 13-5368 Webcam Replacement

Выберете то, что вам нужно

  1. Dell Inspiron 13-5368 Webcam Replacement, Battery: шаг 1, изображение 1 из 2 Dell Inspiron 13-5368 Webcam Replacement, Battery: шаг 1, изображение 2 из 2
    • Remove the nine 6mm Phillips #0 screws that secure the back cover of the laptop.

  2. Dell Inspiron 13-5368 Webcam Replacement: шаг 2, изображение 1 из 2 Dell Inspiron 13-5368 Webcam Replacement: шаг 2, изображение 2 из 2
    • Use a spudger to pry up and remove the back cover.

  3. Dell Inspiron 13-5368 Webcam Replacement: шаг 3, изображение 1 из 1
    • Remove the four 3mm Phillips #0 screws at the corners of the battery that secure it to the laptop.

  4. Dell Inspiron 13-5368 Webcam Replacement: шаг 4, изображение 1 из 1
    • Pull the battery cable's black tab towards the battery to disconnect it from the motherboard.

    • Pull the tab parallel to the motherboard, not straight up.

  5. Dell Inspiron 13-5368 Webcam Replacement: шаг 5, изображение 1 из 2 Dell Inspiron 13-5368 Webcam Replacement: шаг 5, изображение 2 из 2
    • Remove the battery.

  6. Dell Inspiron 13-5368 Webcam Replacement, Screen Display: шаг 6, изображение 1 из 3 Dell Inspiron 13-5368 Webcam Replacement, Screen Display: шаг 6, изображение 2 из 3 Dell Inspiron 13-5368 Webcam Replacement, Screen Display: шаг 6, изображение 3 из 3
    • Unscrew the 2mm screw that holds the WLAN card. Then carefully remove the WLAN card from the motherboard.

  7. Dell Inspiron 13-5368 Webcam Replacement: шаг 7, изображение 1 из 1
    • Detach the black and white antenna cables from the WLAN card.

  8. Dell Inspiron 13-5368 Webcam Replacement: шаг 8, изображение 1 из 1
    • Unplug the two display cables.

  9. Dell Inspiron 13-5368 Webcam Replacement: шаг 9, изображение 1 из 1
    • Unscrew the screws that are securing the laptop's hinges.

  10. Dell Inspiron 13-5368 Webcam Replacement: шаг 10, изображение 1 из 1
    • Detach the display from the base.

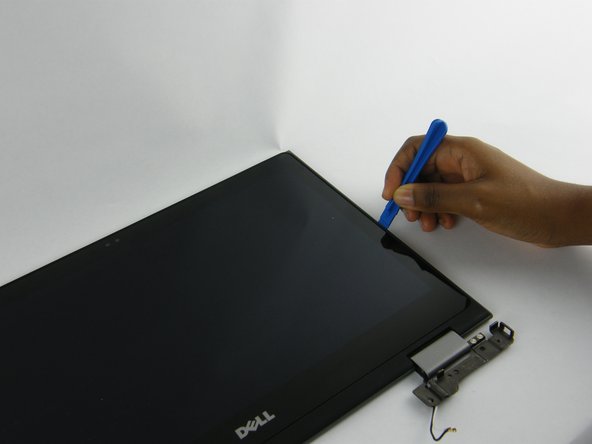
  11. Dell Inspiron 13-5368 Webcam Replacement, Webcam: шаг 11, изображение 1 из 1
    • Use your plastic opening tool to pry the LCD back cover from the display panel.

  12. Dell Inspiron 13-5368 Webcam Replacement: шаг 12, изображение 1 из 2 Dell Inspiron 13-5368 Webcam Replacement: шаг 12, изображение 2 из 2
    • Carefully separate the back cover from the LCD screen.

    • Carefully remove the ribbon cable that holds the webcam to the screen, then unplug the webcam from the ribbon cable.

Заключение

To reassemble your device, follow these instructions in reverse order.

Matt Sugrim

Участник с: 09/27/17

1 042 Репутация

Автор 6 руководств

Команда

USF Tampa, Team S14-G6, Boczar Fall 2017 Участник USF Tampa, Team S14-G6, Boczar Fall 2017

USFT-BOCZAR-F17S14G6

4 членов

Автор 13 руководств

0 Комментариев

Добавить комментарий

Просмотр статистики:

За последние 24часов: 0

За последние 7 дней: 3

За последние 30 дней: 8

За всё время: 1,211