Перейти к основному содержанию

Dell Inspiron 13-7353 Palmrest Keyboard Replacement

Выберете то, что вам нужно

  1. Dell Inspiron 13-7353 Palmrest Keyboard Replacement, Palmrest Keyboard and Touchpad: шаг 1, изображение 1 из 3 Dell Inspiron 13-7353 Palmrest Keyboard Replacement, Palmrest Keyboard and Touchpad: шаг 1, изображение 2 из 3 Dell Inspiron 13-7353 Palmrest Keyboard Replacement, Palmrest Keyboard and Touchpad: шаг 1, изображение 3 из 3
    • Remove the 10 - M2.5 x 8mm screws located on the bottom of the device.

    • Detach and remove the Bottom Base Cover using an opening tool to pry it off.

  2. Dell Inspiron 13-7353 Palmrest Keyboard Replacement: шаг 2, изображение 1 из 3 Dell Inspiron 13-7353 Palmrest Keyboard Replacement: шаг 2, изображение 2 из 3 Dell Inspiron 13-7353 Palmrest Keyboard Replacement: шаг 2, изображение 3 из 3
    • Unplug and gently pull the hard drive cable to loosen it.

    • Remove the 2 - M2 x 3mm screws.

    • Remove the Battery.

  3. Dell Inspiron 13-7353 Palmrest Keyboard Replacement: шаг 3, изображение 1 из 3 Dell Inspiron 13-7353 Palmrest Keyboard Replacement: шаг 3, изображение 2 из 3 Dell Inspiron 13-7353 Palmrest Keyboard Replacement: шаг 3, изображение 3 из 3
    • Remove the 2 - M2 x 3mm hard drive screws.

    • Remove the Hard Drive.

  4. Dell Inspiron 13-7353 Palmrest Keyboard Replacement: шаг 4, изображение 1 из 2 Dell Inspiron 13-7353 Palmrest Keyboard Replacement: шаг 4, изображение 2 из 2
    • Unplug the speaker cable.

    • Remove the Speakers.

  5. Dell Inspiron 13-7353 Palmrest Keyboard Replacement: шаг 5, изображение 1 из 2 Dell Inspiron 13-7353 Palmrest Keyboard Replacement: шаг 5, изображение 2 из 2
    • Unplug the fan cable.

    • Unplug and remove the daughter board cable.

  6. Dell Inspiron 13-7353 Palmrest Keyboard Replacement: шаг 6, изображение 1 из 3 Dell Inspiron 13-7353 Palmrest Keyboard Replacement: шаг 6, изображение 2 из 3 Dell Inspiron 13-7353 Palmrest Keyboard Replacement: шаг 6, изображение 3 из 3
    • Unplug the antenna cables.

    • Unplug the power button cable.

  7. Dell Inspiron 13-7353 Palmrest Keyboard Replacement: шаг 7, изображение 1 из 2 Dell Inspiron 13-7353 Palmrest Keyboard Replacement: шаг 7, изображение 2 из 2
    • Remove the 1 - M2 x 3mm screw.

    • Remove the USB / SD Card Circuit Board.

  8. Dell Inspiron 13-7353 Palmrest Keyboard Replacement: шаг 8, изображение 1 из 3 Dell Inspiron 13-7353 Palmrest Keyboard Replacement: шаг 8, изображение 2 из 3 Dell Inspiron 13-7353 Palmrest Keyboard Replacement: шаг 8, изображение 3 из 3
    • Remove the 1 - M2 x 3mm and 1 - M2 x 2mm Wafer screw.

    • Remove the Cooling Fan.

  9. Dell Inspiron 13-7353 Palmrest Keyboard Replacement: шаг 9, изображение 1 из 3 Dell Inspiron 13-7353 Palmrest Keyboard Replacement: шаг 9, изображение 2 из 3 Dell Inspiron 13-7353 Palmrest Keyboard Replacement: шаг 9, изображение 3 из 3
    • Loosen the screws.

    • Remove the Heatsink.

  10. Dell Inspiron 13-7353 Palmrest Keyboard Replacement: шаг 10, изображение 1 из 2 Dell Inspiron 13-7353 Palmrest Keyboard Replacement: шаг 10, изображение 2 из 2
    • Remove the 2 - M2 x 3mm bracket screws.

    • Remove the LCD cable bracket.

  11. Dell Inspiron 13-7353 Palmrest Keyboard Replacement: шаг 11, изображение 1 из 2 Dell Inspiron 13-7353 Palmrest Keyboard Replacement: шаг 11, изображение 2 из 2
    • Unplug the LCD cable.

    • Unplug the touchscreen cable.

  12. Dell Inspiron 13-7353 Palmrest Keyboard Replacement: шаг 12, изображение 1 из 3 Dell Inspiron 13-7353 Palmrest Keyboard Replacement: шаг 12, изображение 2 из 3 Dell Inspiron 13-7353 Palmrest Keyboard Replacement: шаг 12, изображение 3 из 3
    • Open the screen.

    • Loosen the LCD cable and peel it off of the base (highlighted with arrow).

    • Remove the 3 - M2.5 x 8mm hinge screws.

  13. Dell Inspiron 13-7353 Palmrest Keyboard Replacement: шаг 13, изображение 1 из 2 Dell Inspiron 13-7353 Palmrest Keyboard Replacement: шаг 13, изображение 2 из 2
    • Remove the screen assembly.

    • You may need to pull the hinges up.

  14. Dell Inspiron 13-7353 Palmrest Keyboard Replacement: шаг 14, изображение 1 из 3 Dell Inspiron 13-7353 Palmrest Keyboard Replacement: шаг 14, изображение 2 из 3 Dell Inspiron 13-7353 Palmrest Keyboard Replacement: шаг 14, изображение 3 из 3
    • Unplug the cable.

    • Remove the 1 - M2 x 3mm screw.

    • Remove the DC Jack.

  15. Dell Inspiron 13-7353 Palmrest Keyboard Replacement: шаг 15, изображение 1 из 2 Dell Inspiron 13-7353 Palmrest Keyboard Replacement: шаг 15, изображение 2 из 2
    • Loosen the keyboard cable tape.

    • Loosen the keyboard cable latches.

    • Unplug the keyboard cable.

  16. Dell Inspiron 13-7353 Palmrest Keyboard Replacement: шаг 16, изображение 1 из 1
    • Unplug the keyboard backlight cable.

    • Unplug the touchpad cable.

  17. Dell Inspiron 13-7353 Palmrest Keyboard Replacement: шаг 17, изображение 1 из 2 Dell Inspiron 13-7353 Palmrest Keyboard Replacement: шаг 17, изображение 2 из 2
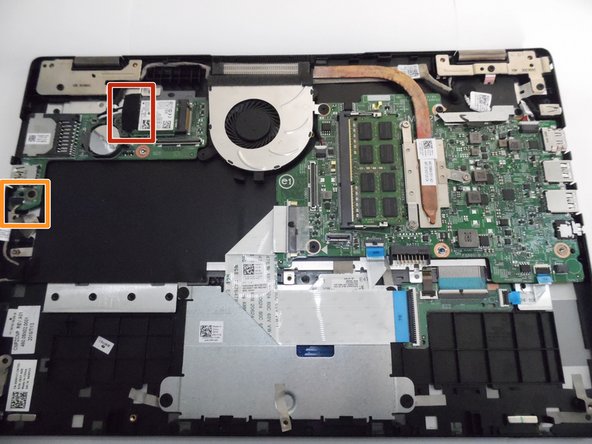
    • Remove the 1 - M2 x 2mm Wafer screw.

    • Remove the Motherboard.

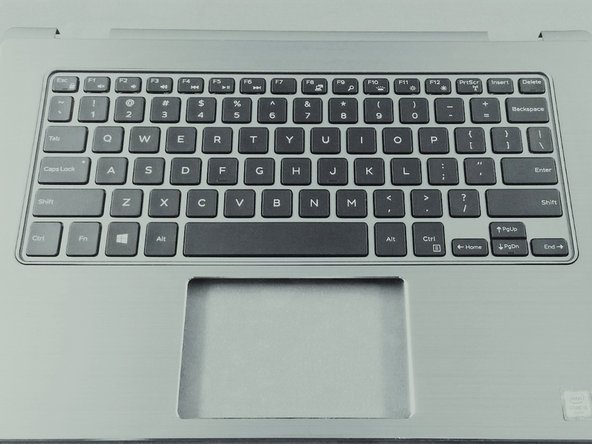
    • The piece remaining is the Palmrest Keyboard.

  18. Dell Inspiron 13-7353 Palmrest Keyboard Replacement: шаг 18, изображение 1 из 1
    • You can further disassemble by removing the touchpad.

    • Unplug the touchpad cable.

  19. Dell Inspiron 13-7353 Palmrest Keyboard Replacement: шаг 19, изображение 1 из 3 Dell Inspiron 13-7353 Palmrest Keyboard Replacement: шаг 19, изображение 2 из 3 Dell Inspiron 13-7353 Palmrest Keyboard Replacement: шаг 19, изображение 3 из 3
    • Unscrew the 4 - 2x2mm wafer screws.

    • Peel back any tape holding the back plate on.

    • Lift and remove back plate.

  20. Dell Inspiron 13-7353 Palmrest Keyboard Replacement: шаг 20, изображение 1 из 3 Dell Inspiron 13-7353 Palmrest Keyboard Replacement: шаг 20, изображение 2 из 3 Dell Inspiron 13-7353 Palmrest Keyboard Replacement: шаг 20, изображение 3 из 3
    • Peel back under-button tape.

    • Remove touchpad.

    • You have now stripped the keyboard! It is ready to be replaced.

Заключение

To reassemble your device, follow these instructions in reverse order.

5 участников успешно повторили данное руководство.

Прикрепленные документы

Taylor Hunter

Участник с: 04/01/17

149 Репутация

1 руководство автора

Команда

University of Memphis, Team S2-G2, Kim Spring 2017 Участник University of Memphis, Team S2-G2, Kim Spring 2017

UM-KIM-S17S2G2

4 членов

Автор 1 руководств

0 Комментариев

Добавить комментарий

Просмотр статистики:

За последние 24часов: 1

За последние 7 дней: 8

За последние 30 дней: 30

За всё время: 7,105