Перейти к основному содержанию

Dell Inspiron 14 7460 Hard Drive Replacement

Выберете то, что вам нужно

  1. Dell Inspiron 14 7460 Hard Drive Replacement, Disconnecting the Hard-Drive Cable: шаг 1, изображение 1 из 1
    • WARNING: Before working inside your computer, read the safety information that shipped with your computer and follow the steps in Before Working Inside Your Computer. After working inside your computer, follow the instructions inAfter Working Inside Your Computer.

    • CAUTION: Hard drives are fragile. Exercise care when handling the hard drive.

    • CAUTION: To avoid data loss, do not remove the hard drive while the computer is in sleep or on state.

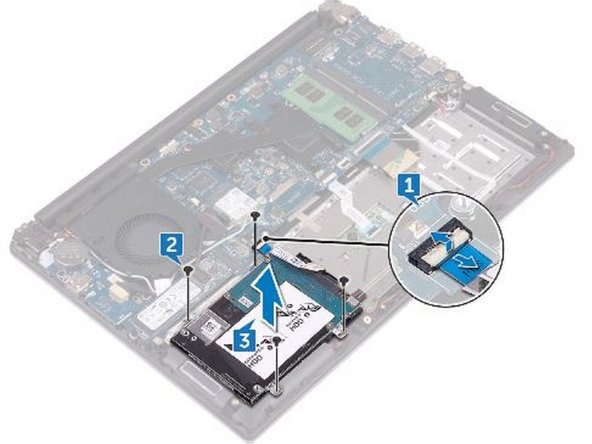
    • Open the latch and disconnect the hard-drive cable from the system board.

  2. Dell Inspiron 14 7460 Hard Drive Replacement, Remove the Screws: шаг 2, изображение 1 из 1
    • Remove the four screws (M2x3) that secure the hard-drive assembly to the palm rest and keyboard assembly.

  3. Dell Inspiron 14 7460 Hard Drive Replacement, Lifting the Hard-Drive Assembly: шаг 3, изображение 1 из 1
    • Lift the hard-drive assembly off the palm rest and keyboard assembly.

  4. Dell Inspiron 14 7460 Hard Drive Replacement, Disconnecting the Interposer: шаг 4, изображение 1 из 1
    • Disconnect the interposer from the hard-drive assembly.

  5. Dell Inspiron 14 7460 Hard Drive Replacement, Remove the Screws: шаг 5, изображение 1 из 1
    • Remove the four screws (M3x3) that secure the hard-drive bracket to the hard drive.

  6. Dell Inspiron 14 7460 Hard Drive Replacement, Lifting the Hard-Drive: шаг 6, изображение 1 из 1
    • Lift the hard-drive bracket off the hard drive.

  7. Dell Inspiron 14 7460 Hard Drive Replacement, Align the Screw Holes: шаг 7, изображение 1 из 1
    • Align the screw holes on the hard-drive bracket with the screw holes on the NEW hard drive.

  8. Dell Inspiron 14 7460 Hard Drive Replacement, Replace the Screws: шаг 8, изображение 1 из 1
    • Replace the four screws (M3x3) that secure the hard-drive bracket to the hard drive.

  9. Dell Inspiron 14 7460 Hard Drive Replacement, Connecting the Interposer: шаг 9, изображение 1 из 1
    • Connect the interposer to the hard-drive assembly.

  10. Dell Inspiron 14 7460 Hard Drive Replacement, Align the Screw Holes: шаг 10, изображение 1 из 1
    • Align the screw holes on the hard-drive assembly with the screw holes on the palm rest and keyboard assembly.

  11. Dell Inspiron 14 7460 Hard Drive Replacement, Replace the Screws: шаг 11, изображение 1 из 1
    • Replace the four screws (M2x3) that secure the hard-drive assembly to the palm rest and keyboard assembly.

  12. Dell Inspiron 14 7460 Hard Drive Replacement, Connecting the Hard-Drive Cable: шаг 12, изображение 1 из 1
    • Connect the hard-drive cable to the system board.

Заключение

To reassemble your device, follow these instructions in reverse order.

Terrence15

Участник с: 12/18/17

79 121 Репутация

Автор 441 руководств

Команда

RampUP America, Inc. Участник RampUP America, Inc.

Community

42 членов

Автор 1 985 руководств

0 Комментариев

Добавить комментарий

Просмотр статистики:

За последние 24часов: 0

За последние 7 дней: 4

За последние 30 дней: 16

За всё время: 2,183