Перейти к основному содержанию

Dell Inspiron 14-7437 Thermal Cooling Fan Replacement

Выберете то, что вам нужно

  1. Dell Inspiron 14-7437 Thermal Cooling Fan Replacement, Base Cover: шаг 1, изображение 1 из 2 Dell Inspiron 14-7437 Thermal Cooling Fan Replacement, Base Cover: шаг 1, изображение 2 из 2
    • Power off your Dell Inspiron 14-7437 before disassembling.

    • Remove the eight 4.5 mm screws on the back panel of the device using the Phillips 1 Screwdriver.

    • The two 4.5 mm screws in the center under the rubber mount cannot be removed, but can be loosened.

  2. Dell Inspiron 14-7437 Thermal Cooling Fan Replacement: шаг 2, изображение 1 из 2 Dell Inspiron 14-7437 Thermal Cooling Fan Replacement: шаг 2, изображение 2 из 2
    • Pry open the back cover using a spudger and slide it along the under the cover.

  3. Dell Inspiron 14-7437 Thermal Cooling Fan Replacement, Battery: шаг 3, изображение 1 из 2 Dell Inspiron 14-7437 Thermal Cooling Fan Replacement, Battery: шаг 3, изображение 2 из 2
    • Remove the two 2.5 mm screws holding the battery in place using the J000 Phillips Head Screwdriver.

  4. Dell Inspiron 14-7437 Thermal Cooling Fan Replacement: шаг 4, изображение 1 из 1
    • Disconnect the ribbon cables from the motherboard.

  5. Dell Inspiron 14-7437 Thermal Cooling Fan Replacement: шаг 5, изображение 1 из 1
    • Lift up and remove the Lithium-Polymer Battery.

  6. Dell Inspiron 14-7437 Thermal Cooling Fan Replacement, Speaker: шаг 6, изображение 1 из 1
    • Disconnect wires from Motherboard by gently pulling up.

  7. Dell Inspiron 14-7437 Thermal Cooling Fan Replacement: шаг 7, изображение 1 из 3 Dell Inspiron 14-7437 Thermal Cooling Fan Replacement: шаг 7, изображение 2 из 3 Dell Inspiron 14-7437 Thermal Cooling Fan Replacement: шаг 7, изображение 3 из 3
    • Remove the speakers from the case.

  8. Dell Inspiron 14-7437 Thermal Cooling Fan Replacement, Coin Cell Battery: шаг 8, изображение 1 из 1
    • Lift the coin cell battery wire, and carefully remove from motherboard.

    • There are little hooks that the wire is hooked under.

  9. Dell Inspiron 14-7437 Thermal Cooling Fan Replacement: шаг 9, изображение 1 из 2 Dell Inspiron 14-7437 Thermal Cooling Fan Replacement: шаг 9, изображение 2 из 2
    • Remove the Coin-Cell Battery from the case.

    • There is a small amount of adhesive on the bottom of the coin cell battery.

  10. Dell Inspiron 14-7437 Thermal Cooling Fan Replacement, Cooling Fan: шаг 10, изображение 1 из 2 Dell Inspiron 14-7437 Thermal Cooling Fan Replacement, Cooling Fan: шаг 10, изображение 2 из 2
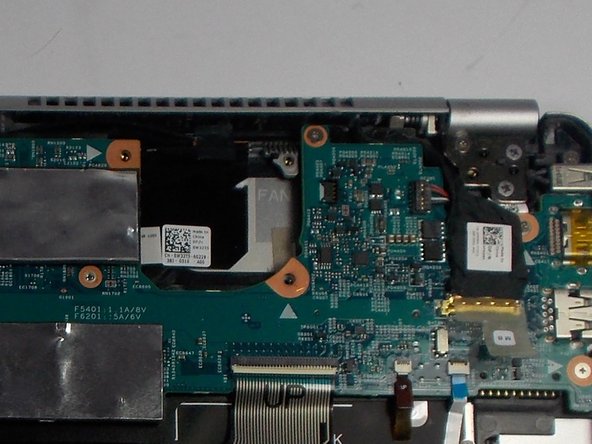
    • Remove the two 2.5 mm screws using a J000 Phillips Head Screwdriver.

  11. Dell Inspiron 14-7437 Thermal Cooling Fan Replacement: шаг 11, изображение 1 из 2 Dell Inspiron 14-7437 Thermal Cooling Fan Replacement: шаг 11, изображение 2 из 2
    • Pull up on the wire and remove the Cooling Fan.

  12. Dell Inspiron 14-7437 Thermal Cooling Fan Replacement, Thermal-Cooling Assembly: шаг 12, изображение 1 из 3 Dell Inspiron 14-7437 Thermal Cooling Fan Replacement, Thermal-Cooling Assembly: шаг 12, изображение 2 из 3 Dell Inspiron 14-7437 Thermal Cooling Fan Replacement, Thermal-Cooling Assembly: шаг 12, изображение 3 из 3
    • Disconnect cables connected to the motherboard by lifting the flaps up and pulling out.

    • This is a ZIF connector and needs to have the side flaps flipped up before removal.

    • The ZIF connector has small clips that need to be pulled up before being pulled out.

  13. Dell Inspiron 14-7437 Thermal Cooling Fan Replacement: шаг 13, изображение 1 из 3 Dell Inspiron 14-7437 Thermal Cooling Fan Replacement: шаг 13, изображение 2 из 3 Dell Inspiron 14-7437 Thermal Cooling Fan Replacement: шаг 13, изображение 3 из 3
    • Remove the eight 2.5 mm screws using a J000 Phillips Head Screwdriver.

  14. Dell Inspiron 14-7437 Thermal Cooling Fan Replacement: шаг 14, изображение 1 из 2 Dell Inspiron 14-7437 Thermal Cooling Fan Replacement: шаг 14, изображение 2 из 2
    • Flip the motherboard.

  15. Dell Inspiron 14-7437 Thermal Cooling Fan Replacement: шаг 15, изображение 1 из 2 Dell Inspiron 14-7437 Thermal Cooling Fan Replacement: шаг 15, изображение 2 из 2
    • Loosen the three 2.5 mm screws using the J000 Phillips Head Screwdriver.

    • These three 2.5 mm screws cannot be removed from the Thermal Cooling assembly.

  16. Dell Inspiron 14-7437 Thermal Cooling Fan Replacement: шаг 16, изображение 1 из 1
    • Remove the Thermal-Cooling Assembly from the motherboard.

Заключение

To reassemble your device, follow these instructions in reverse order.

Katelyn Remy

Участник с: 03/10/16

449 Репутация

Автор 4 руководств

Команда

UMass Dartmouth, Team 7-8, Catania Spring 2016 Участник UMass Dartmouth, Team 7-8, Catania Spring 2016

UMASSD-CATANIA-S16S7G8

3 членов

Автор 12 руководств

0 Комментариев

Добавить комментарий

Просмотр статистики:

За последние 24часов: 0

За последние 7 дней: 1

За последние 30 дней: 5

За всё время: 1,060