Перейти к основному содержанию

Dell Inspiron 1425 Hard-Drive Assembly Replacement

Выберете то, что вам нужно

  1. Dell Inspiron 1425 Hard-Drive Assembly Replacement, Remove the Screw: шаг 1, изображение 1 из 1
    • WARNING: Before working inside your computer, read the safety information that shipped with your computer. Follow the instructions in "Before You Begin".

    • CAUTION: To avoid electrostatic discharge, ground yourself by using a wrist grounding strap or by periodically touching an unpainted metal surface (such as a connector on your computer).

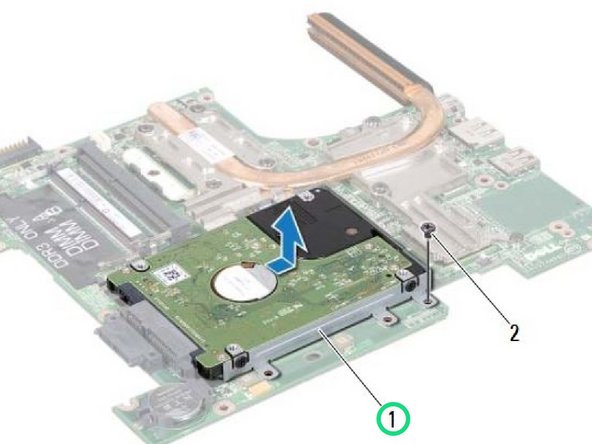
    • Remove the screw that secures the hard-drive assembly to the system board.

  2. Dell Inspiron 1425 Hard-Drive Assembly Replacement, Sliding the Hard Drive Assembly: шаг 2, изображение 1 из 1
    • Slide the hard-drive assembly in the direction shown in the illustration to disconnect it from the connector on the system board.

  3. Dell Inspiron 1425 Hard-Drive Assembly Replacement, Lifting the Hard-Drive Assembly: шаг 3, изображение 1 из 1
    • Lift the hard-drive assembly off the system board.

  4. Dell Inspiron 1425 Hard-Drive Assembly Replacement, Remove the Screws: шаг 4, изображение 1 из 1
    • Remove the four screws that secure the hard-drive bracket to the hard drive.

  5. Dell Inspiron 1425 Hard-Drive Assembly Replacement, Lifting the Hard Drive: шаг 5, изображение 1 из 2 Dell Inspiron 1425 Hard-Drive Assembly Replacement, Lifting the Hard Drive: шаг 5, изображение 2 из 2
    • Lift the hard drive away from the hard-drive bracket.

  6. Dell Inspiron 1425 Hard-Drive Assembly Replacement, Placing the Hard Drive: шаг 6, изображение 1 из 1
    • Place the hard drive in the hard-drive bracket.

  7. Dell Inspiron 1425 Hard-Drive Assembly Replacement, Replace the Screws: шаг 7, изображение 1 из 1
    • Replace the four screws that secure the hard-drive bracket to the hard drive.

  8. Dell Inspiron 1425 Hard-Drive Assembly Replacement, Placing the Hard Drive Assembly: шаг 8, изображение 1 из 1
    • Place the NEW hard-drive assembly on the system board.

  9. Dell Inspiron 1425 Hard-Drive Assembly Replacement, Slding the Hard-Drive Assembly: шаг 9, изображение 1 из 1
    • Slide the hard-drive assembly to connect it to the connector on the system board.

  10. Dell Inspiron 1425 Hard-Drive Assembly Replacement, Replace the Screw: шаг 10, изображение 1 из 1
    • Replace the screw that secures the hard-drive assembly to the system board.

Финишная черта

Terrence15

Участник с: 12/18/17

79 121 Репутация

Автор 441 руководств

Команда

RampUP America, Inc. Участник RampUP America, Inc.

Community

42 членов

Автор 1 985 руководств

0 Комментариев

Добавить комментарий

Просмотр статистики:

За последние 24часов: 0

За последние 7 дней: 3

За последние 30 дней: 3

За всё время: 115