Перейти к основному содержанию

Dell Inspiron 15-3567 Fan Replacement

Выберете то, что вам нужно

  1. Dell Inspiron 15-3567 Fan Replacement, Equipment and tool - Screws: шаг 1, изображение 1 из 1
    • Three types of screws are used in Inspiron 15 3567. Be sure to keep the screws in a safe and organized place so you don't lose them.

    • M2.5 x 8mm screw.

    • M2.5 hinge screw.

    • M2 x 5mm screw.

  2. Dell Inspiron 15-3567 Fan Replacement, Warning - Shut Down and Unplug: шаг 2, изображение 1 из 1
    • Make sure your laptop is completely shut down and unplugged from any power source before beginning the repair process.

  3. Dell Inspiron 15-3567 Fan Replacement, Remove the Battery: шаг 3, изображение 1 из 3 Dell Inspiron 15-3567 Fan Replacement, Remove the Battery: шаг 3, изображение 2 из 3 Dell Inspiron 15-3567 Fan Replacement, Remove the Battery: шаг 3, изображение 3 из 3
    • Slide the lock to the unlocked position, and carefully remove the battery from the laptop.

  4. Dell Inspiron 15-3567 Fan Replacement, Remove the Screws - Battery: шаг 4, изображение 1 из 2 Dell Inspiron 15-3567 Fan Replacement, Remove the Screws - Battery: шаг 4, изображение 2 из 2
    • Carefully remove the screws.

    • 2 M2 x 5 mm screws under the battery.

  5. Dell Inspiron 15-3567 Fan Replacement, Remove Screws - Bottom Case Left: шаг 5, изображение 1 из 1
    • Carefully remove the screws.

    • 4 M2.5 x 8mm screws are located at the left side of the bottom case (the side with the battery lock).

  6. Dell Inspiron 15-3567 Fan Replacement, Remove Screws - Bottom Case Right: шаг 6, изображение 1 из 1
    • Carefully remove the screws.

    • 4 M2.5 x 8mm screws are located at the right side of the case (the side with the DVD plastic cover).

  7. Dell Inspiron 15-3567 Fan Replacement, Remove the DVD Plastic Cover: шаг 7, изображение 1 из 3 Dell Inspiron 15-3567 Fan Replacement, Remove the DVD Plastic Cover: шаг 7, изображение 2 из 3 Dell Inspiron 15-3567 Fan Replacement, Remove the DVD Plastic Cover: шаг 7, изображение 3 из 3
    • Carefully remove an M2.5 x 8mm screw located in the middle of the bottom case.

    • Slide or pull the DVD plastic cover from the case.

  8. Dell Inspiron 15-3567 Fan Replacement, Remove the Screws - DVD Plastic Cover: шаг 8, изображение 1 из 1
    • Carefully remove the screws

    • 3 M2.5 hinge screws under the DVD plastic cover.

  9. Dell Inspiron 15-3567 Fan Replacement, Remove the Keyboard - Release the Tabs: шаг 9, изображение 1 из 2 Dell Inspiron 15-3567 Fan Replacement, Remove the Keyboard - Release the Tabs: шаг 9, изображение 2 из 2
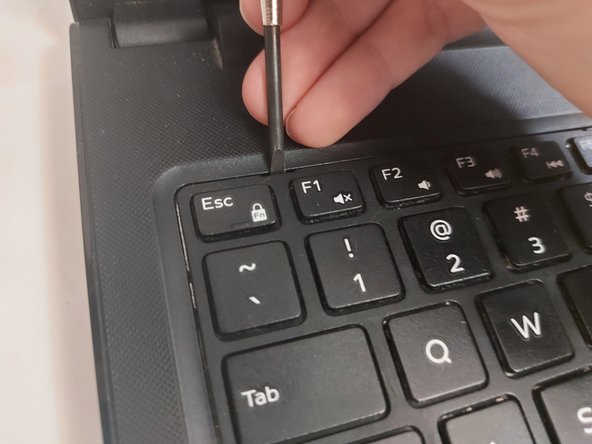
    • 5 little tabs are located on the keyboard.

    • Use a flat-head screwdriver to poke into those tabs.

  10. Dell Inspiron 15-3567 Fan Replacement, Remove the Keyboard - Lift the Keyboard: шаг 10, изображение 1 из 3 Dell Inspiron 15-3567 Fan Replacement, Remove the Keyboard - Lift the Keyboard: шаг 10, изображение 2 из 3 Dell Inspiron 15-3567 Fan Replacement, Remove the Keyboard - Lift the Keyboard: шаг 10, изображение 3 из 3
    • After all 5 tabs are pushed, you should be able to lift the keyboard up a litte

    • Slowly pull the keyboard up toward the screen.

    • A cable is connected between the laptop and the keyboard, so be very careful while lifting the keyboard up.

  11. Dell Inspiron 15-3567 Fan Replacement, Remove the Keyboard - Disconnect the Cable: шаг 11, изображение 1 из 3 Dell Inspiron 15-3567 Fan Replacement, Remove the Keyboard - Disconnect the Cable: шаг 11, изображение 2 из 3 Dell Inspiron 15-3567 Fan Replacement, Remove the Keyboard - Disconnect the Cable: шаг 11, изображение 3 из 3
    • A cable is connected between the laptop and the keyboard.

    • Carefully open the connector.

    • Carefully remove the cable from the connector.

  12. Dell Inspiron 15-3567 Fan Replacement, Remove Screws - Keyboard: шаг 12, изображение 1 из 1
    • Carefully remove the screws.

    • 5 M2 x 5mm screws are located under the keyboard.

  13. Dell Inspiron 15-3567 Fan Replacement, Remove the Bottom Case: шаг 13, изображение 1 из 3 Dell Inspiron 15-3567 Fan Replacement, Remove the Bottom Case: шаг 13, изображение 2 из 3 Dell Inspiron 15-3567 Fan Replacement, Remove the Bottom Case: шаг 13, изображение 3 из 3
    • Slowly press the bottom case down using the hole on the upper case.

    • You should be able to hear some cracking sounds and have some gaps between the upper and bottom case.

    • Using those gaps, slowly separate the left part of your laptop.

  14. Dell Inspiron 15-3567 Fan Replacement, Overview of the Cases: шаг 14, изображение 1 из 1
    • The upper case is connected to the screen, and the bottom case could be completely separated from it.

  15. Dell Inspiron 15-3567 Fan Replacement, Remove Old Fan: шаг 15, изображение 1 из 2 Dell Inspiron 15-3567 Fan Replacement, Remove Old Fan: шаг 15, изображение 2 из 2
    • Carefully remove the fan cable from the connector.

    • It is possible that the cable and the connector are tight.

  16. Dell Inspiron 15-3567 Fan Replacement, Remove Screws - Fan: шаг 16, изображение 1 из 2 Dell Inspiron 15-3567 Fan Replacement, Remove Screws - Fan: шаг 16, изображение 2 из 2
    • Carefully remove the screws.

    • 2 M2.5 x 8mm screws on the fan.

    • You can then pick the old fan up after the screws and the cable are disconnected.

  17. Dell Inspiron 15-3567 Fan Replacement, Replace with a New Fan: шаг 17, изображение 1 из 3 Dell Inspiron 15-3567 Fan Replacement, Replace with a New Fan: шаг 17, изображение 2 из 3 Dell Inspiron 15-3567 Fan Replacement, Replace with a New Fan: шаг 17, изображение 3 из 3
    • Screw 2 M2.5 x 8mm screws back into the blue circle.

    • Connect the fan cable back into the connector.

  18. Dell Inspiron 15-3567 Fan Replacement, Put Things Back Together: шаг 18, изображение 1 из 2 Dell Inspiron 15-3567 Fan Replacement, Put Things Back Together: шаг 18, изображение 2 из 2
    • Follow the guide in reverse order, carefully reassembling the components, securing the cases, and tightening the screws back into place. Once you've completed the reassembly, it's time to power on your laptop and enjoy the benefits of your new fan!

Финишная черта

2 участников успешно повторили данное руководство.

Ka Him Poon

Участник с: 04/13/23

307 Репутация

1 руководство автора

0 Комментариев

Добавить комментарий

Просмотр статистики:

За последние 24часов: 0

За последние 7 дней: 3

За последние 30 дней: 11

За всё время: 177