Перейти к основному содержанию

Dell Inspiron 15-5552 Hard Drive Replacement

Выберете то, что вам нужно

  1. Dell Inspiron 15-5552 Hard Drive Replacement, Battery: шаг 1, изображение 1 из 1
    • Make sure the laptop is powered down before you remove the battery.

  2. Dell Inspiron 15-5552 Hard Drive Replacement: шаг 2, изображение 1 из 1
    • Locate the battery release switch on the bottom of the laptop.

  3. Dell Inspiron 15-5552 Hard Drive Replacement: шаг 3, изображение 1 из 1
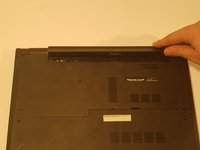
    • Slide the battery release switch away from the lock symbol towards the “unlock” position.

    • You can tell that the battery is unlocked once you hear a "click."

  4. Dell Inspiron 15-5552 Hard Drive Replacement: шаг 4, изображение 1 из 2 Dell Inspiron 15-5552 Hard Drive Replacement: шаг 4, изображение 2 из 2
    • Rotate the battery outward by lifting the bottom lip that pops out.

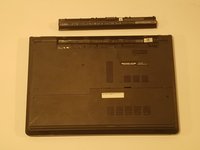
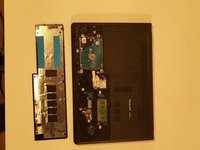
    • Continue rotating the battery towards the top of the laptop until the battery is completely removed.

  5. Dell Inspiron 15-5552 Hard Drive Replacement, Hard Drive: шаг 5, изображение 1 из 2 Dell Inspiron 15-5552 Hard Drive Replacement, Hard Drive: шаг 5, изображение 2 из 2
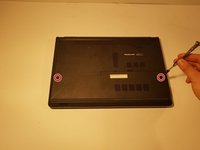
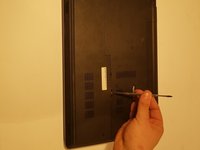
    • Use a JIS #0 screwdriver to unscrew the two 6 mm screws from the back panel.

    • Make sure your device is powered down and unplugged before beginning the replacement.

  6. Dell Inspiron 15-5552 Hard Drive Replacement: шаг 6, изображение 1 из 2 Dell Inspiron 15-5552 Hard Drive Replacement: шаг 6, изображение 2 из 2
    • Using a spudger, lightly lift the RAM cover up and at an angle, away from the computer.

  7. Dell Inspiron 15-5552 Hard Drive Replacement: шаг 7, изображение 1 из 1
    • Remove the four 6 mm JIS #0 screws from the hard drive.

  8. Dell Inspiron 15-5552 Hard Drive Replacement: шаг 8, изображение 1 из 1
    • Lift hard drive out of the computer slightly.

    • Be careful not to tear the ribbon that attaches the hard drive to the computer when lifting it.

  9. Dell Inspiron 15-5552 Hard Drive Replacement: шаг 9, изображение 1 из 2 Dell Inspiron 15-5552 Hard Drive Replacement: шаг 9, изображение 2 из 2
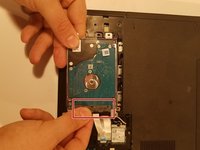
    • Using two fingers, grab the black connector on the ribbon, and pull until detached.

Заключение

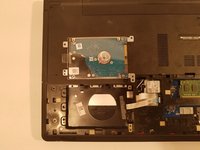
To reassemble your device, follow these instructions in reverse order.

2 участников успешно повторили данное руководство.

Mitchell Roberts

Участник с: 01/23/18

321 Репутация

Автор 2 руководств

Команда

Western Carolina University, Team S1-G4, Virtue Spring 2018 Участник Western Carolina University, Team S1-G4, Virtue Spring 2018

WCU-VIRTUE-S18S1G4

4 членов

Автор 5 руководств

0 Комментариев

Добавить комментарий

Просмотр статистики:

За последние 24часов: 0

За последние 7 дней: 0

За последние 30 дней: 0

За всё время: 393