Перейти к основному содержанию

Dell Inspiron 15-7547 CPU Fan Replacement

Выберете то, что вам нужно

  1. Dell Inspiron 15-7547 CPU Fan Replacement, Bottom Cover: шаг 1, изображение 1 из 1
    • Before you begin, be sure to turn off your laptop and unplug it from the outlet.

    • Close the display and flip the laptop on its back.

    • Loosen the ten 5.0 mm-long Phillips #0 screws.

    • The four screws marked with orange will remain captive to the cover.

  2. Dell Inspiron 15-7547 CPU Fan Replacement: шаг 2, изображение 1 из 1
    • Use a spudger to pry up and loosen the back cover.

    • Remove the back cover.

  3. Dell Inspiron 15-7547 CPU Fan Replacement, CPU Fan: шаг 3, изображение 1 из 2 Dell Inspiron 15-7547 CPU Fan Replacement, CPU Fan: шаг 3, изображение 2 из 2
    • Remove the two 5.0 mm-long Philips #0 screws from the fan.

    • The screw marked in orange will remain captive to the fan.

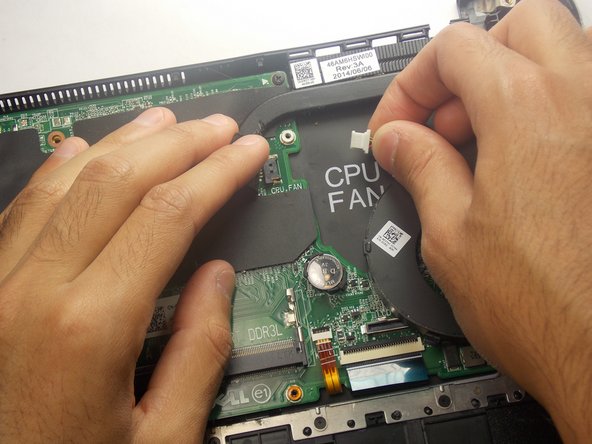
  4. Dell Inspiron 15-7547 CPU Fan Replacement: шаг 4, изображение 1 из 2 Dell Inspiron 15-7547 CPU Fan Replacement: шаг 4, изображение 2 из 2
    • Disconnect the wire that connects the fan to the motherboard. This can be found under the flap directly to the left of the fan.

  5. Dell Inspiron 15-7547 CPU Fan Replacement: шаг 5, изображение 1 из 1
    • Lift the fan out of the chassis.

Заключение

To reassemble your device, follow these instructions in reverse order.

Isaac Brooks

Участник с: 09/10/18

355 Репутация

Автор 3 руководств

Команда

Appalachian State University, Team S2-G4, Menagarishvili Fall 2018 Участник Appalachian State University, Team S2-G4, Menagarishvili Fall 2018

APSU-MENAGARISHVILI-F18S2G4

3 членов

Автор 10 руководств

0 Комментариев

Добавить комментарий

Просмотр статистики:

За последние 24часов: 0

За последние 7 дней: 1

За последние 30 дней: 3

За всё время: 514