Перейти к основному содержанию

Dell Inspiron 15-7547 Speakers Replacement

Выберете то, что вам нужно

  1. Dell Inspiron 15-7547 Speakers Replacement, Bottom Cover: шаг 1, изображение 1 из 1
    • Before you begin, be sure to turn off your laptop and unplug it from the outlet.

    • Close the display and flip the laptop on its back.

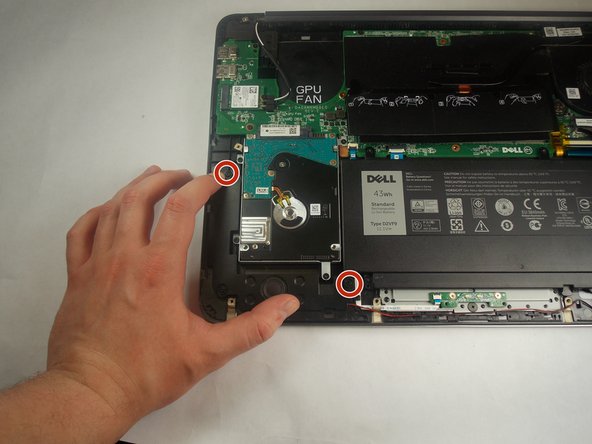
    • Loosen the ten 5.0 mm-long Phillips #0 screws.

    • The four screws marked with orange will remain captive to the cover.

  2. Dell Inspiron 15-7547 Speakers Replacement: шаг 2, изображение 1 из 1
    • Use a spudger to pry up and loosen the back cover.

    • Remove the back cover.

  3. Dell Inspiron 15-7547 Speakers Replacement, Speakers: шаг 3, изображение 1 из 3 Dell Inspiron 15-7547 Speakers Replacement, Speakers: шаг 3, изображение 2 из 3 Dell Inspiron 15-7547 Speakers Replacement, Speakers: шаг 3, изображение 3 из 3
    • Orient the computer so that the hinge for the display facing away from you.

    • Start removing the speaker on the left by pushing the speaker in the direction of the tick mark on the 2 outer pegs, then upwards

    • The tick marks on the two marked pegs should indicate the speaker needs to be pushed towards the center of the front of the chassis.

  4. Dell Inspiron 15-7547 Speakers Replacement: шаг 4, изображение 1 из 2 Dell Inspiron 15-7547 Speakers Replacement: шаг 4, изображение 2 из 2
    • Remove the left speaker by pushing the speaker in the direction of the tick mark on the center peg, then upwards

    • The tick mark should indicate towards the middle of the back of the chassis.

  5. Dell Inspiron 15-7547 Speakers Replacement: шаг 5, изображение 1 из 2 Dell Inspiron 15-7547 Speakers Replacement: шаг 5, изображение 2 из 2
    • Remove the wire connecting the left speaker to the right speaker.

    • The wire is secured by small notches, be careful not to break these.

  6. Dell Inspiron 15-7547 Speakers Replacement: шаг 6, изображение 1 из 2 Dell Inspiron 15-7547 Speakers Replacement: шаг 6, изображение 2 из 2
    • Start removing the right speaker by pushing the speaker in the direction of the tick marks on the 2 pegs closest to the front of the device, and then upwards.

    • These tick marks should indicate towards the middle of the back of the chassis.

  7. Dell Inspiron 15-7547 Speakers Replacement: шаг 7, изображение 1 из 1
    • Remove the right speaker by pushing in the direction of the tick mark on the final peg, and then upwards.

    • This tick mark should point towards the center of the right side of the chassis.

  8. Dell Inspiron 15-7547 Speakers Replacement: шаг 8, изображение 1 из 2 Dell Inspiron 15-7547 Speakers Replacement: шаг 8, изображение 2 из 2
    • Remove the cable connecting the right speaker to the motherboard by pulling towards the front of the device.

Заключение

To reassemble your device, follow these instructions in reverse order.

Еще один человек закончил это руководство.

Claro

Участник с: 09/10/18

591 Репутация

Автор 5 руководств

Команда

Appalachian State University, Team S2-G4, Menagarishvili Fall 2018 Участник Appalachian State University, Team S2-G4, Menagarishvili Fall 2018

APSU-MENAGARISHVILI-F18S2G4

3 членов

Автор 10 руководств

0 Комментариев

Добавить комментарий

Просмотр статистики:

За последние 24часов: 0

За последние 7 дней: 0

За последние 30 дней: 2

За всё время: 556