Перейти к основному содержанию

Dell Inspiron 17-3721 Fan Replacement

Выберете то, что вам нужно

  1. Dell Inspiron 17-3721 Fan Replacement, Keyboard: шаг 1, изображение 1 из 2 Dell Inspiron 17-3721 Fan Replacement, Keyboard: шаг 1, изображение 2 из 2
    • Use a plastic opening tool or a metal spudger to pry out the tabs on top of the keyboard.

    • After prying the tabs up, carefully pull the keyboard out of the laptop.

    • Use caution when prying the tabs up or lifting the keyboard up, as the plastic material and the strip on the keyboard can easily break.

  2. Dell Inspiron 17-3721 Fan Replacement: шаг 2, изображение 1 из 2 Dell Inspiron 17-3721 Fan Replacement: шаг 2, изображение 2 из 2
    • Once the keyboard is lifted, locate the release tab.

    • Using a plastic opening tool or your finger, lift the tab so that it opens .

    • Once the tab is open, the strip on the keyboard can be removed.

  3. Dell Inspiron 17-3721 Fan Replacement, Optical Drive: шаг 3, изображение 1 из 3 Dell Inspiron 17-3721 Fan Replacement, Optical Drive: шаг 3, изображение 2 из 3 Dell Inspiron 17-3721 Fan Replacement, Optical Drive: шаг 3, изображение 3 из 3
    • Remove the four 6 mm PH1 Philips head screws under the keyboard.

    • Carefully pop off the cover using the plastic opening tools and your hands.

  4. Dell Inspiron 17-3721 Fan Replacement: шаг 4, изображение 1 из 3 Dell Inspiron 17-3721 Fan Replacement: шаг 4, изображение 2 из 3 Dell Inspiron 17-3721 Fan Replacement: шаг 4, изображение 3 из 3
    • Remove the 4 mm PH1 Philips head screw holding down the optical drive.

    • Use your hand to slide the drive out of the device.

  5. Dell Inspiron 17-3721 Fan Replacement, Fan: шаг 5, изображение 1 из 1
    • Remove the seven 6mm PH1 Philips head screws from the motherboard.

    • There may be more or less screws in your motherboard as the laptops do vary.

  6. Dell Inspiron 17-3721 Fan Replacement: шаг 6, изображение 1 из 2 Dell Inspiron 17-3721 Fan Replacement: шаг 6, изображение 2 из 2
    • Located on the lower left of the motherboard, disconnect the wire that connects the speaker by pushing it or pulling it away from the white box.

  7. Dell Inspiron 17-3721 Fan Replacement: шаг 7, изображение 1 из 1
    • Located on the lower right of the motherboard, flip up the black hatch and remove the ribbon cable by gently tugging it outwards.

    • Ribbon cables are very fragile and can tear easily. Handle with care.

  8. Dell Inspiron 17-3721 Fan Replacement: шаг 8, изображение 1 из 1
    • Remove the 4mm PH1 Philips screw to the right of the fan.

  9. Dell Inspiron 17-3721 Fan Replacement: шаг 9, изображение 1 из 1
    • Remove the 4mm PH1 Philips screw to the top of the fan.

  10. Dell Inspiron 17-3721 Fan Replacement: шаг 10, изображение 1 из 1
    • Remove the motherboard from the USB sockets to the left by first pulling the motherboard to the right and then flip the motherboard up against the screen.

  11. Dell Inspiron 17-3721 Fan Replacement: шаг 11, изображение 1 из 1
    • Located on the lower left, remove the 4mm PH1 Philips screw to the top of the fan.

  12. Dell Inspiron 17-3721 Fan Replacement: шаг 12, изображение 1 из 2 Dell Inspiron 17-3721 Fan Replacement: шаг 12, изображение 2 из 2
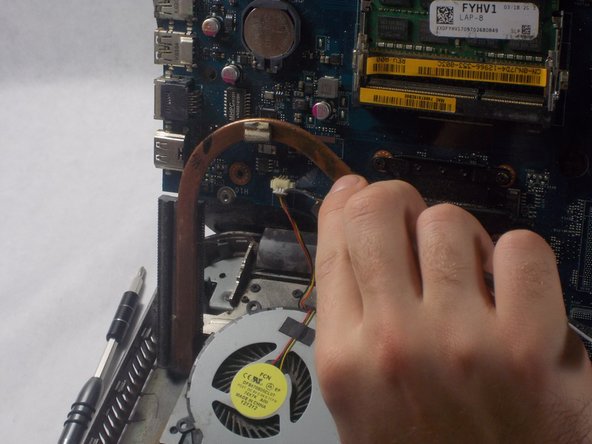
    • Remove the wire for the fan by pulling or pushing the white tab from the white box.

Заключение

To reassemble your device, follow these instructions in reverse order.

Kevin Prairie

Участник с: 03/20/18

445 Репутация

Автор 4 руководств

Команда

UMass Dartmouth, Team S5-G3, Peak Spring 2018 Участник UMass Dartmouth, Team S5-G3, Peak Spring 2018

UMASSD-PEAK-S18S5G3

3 членов

Автор 7 руководств

0 Комментариев

Добавить комментарий

Просмотр статистики:

За последние 24часов: 0

За последние 7 дней: 2

За последние 30 дней: 7

За всё время: 985