Перейти к основному содержанию

Dell Latitude D520 disassembly and power jack repair

Выберете то, что вам нужно

  1. Dell Latitude D520 disassembly and power jack repair, Dell Latitude D520 disassembly and power jack repair: шаг 1, изображение 1 из 1
    • 1. unplug laptop

    • 2. remove battery

    • 3. remove screw

    • Remove disk drive by pressing in the pull mechanism, causing it to extend outwards, then use the pull handle to pull out disk drive.

  2. Dell Latitude D520 disassembly and power jack repair: шаг 2, изображение 1 из 1
    • remove 2 retention screws

    • slide HD carriage out

  3. Dell Latitude D520 disassembly and power jack repair: шаг 3, изображение 1 из 1
    • open laptop

    • with a small screwdriver carefully pry plastic cover

    • it helps to open the laptop all the way

    • be careful not to break these clips

    • The clips found under here were specially tricky
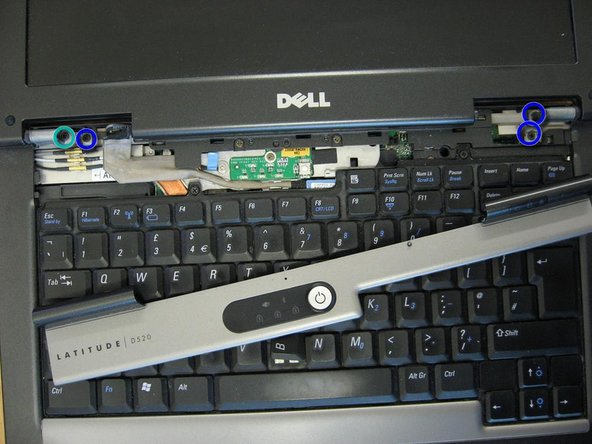
  4. Dell Latitude D520 disassembly and power jack repair: шаг 4, изображение 1 из 3 Dell Latitude D520 disassembly and power jack repair: шаг 4, изображение 2 из 3 Dell Latitude D520 disassembly and power jack repair: шаг 4, изображение 3 из 3
    • remove screws X 2

    • carefully lift keyboard, being careful not to damage the flat cable.

    • lift up tab to release flat cable and remove keyboard

  5. Dell Latitude D520 disassembly and power jack repair: шаг 5, изображение 1 из 3 Dell Latitude D520 disassembly and power jack repair: шаг 5, изображение 2 из 3 Dell Latitude D520 disassembly and power jack repair: шаг 5, изображение 3 из 3
    • disconnect the three wires

    • disconnect video connector
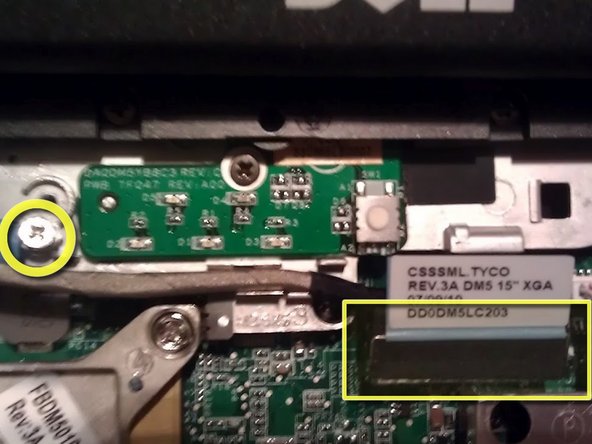
    • remove ground screw

    • remove 3 screws

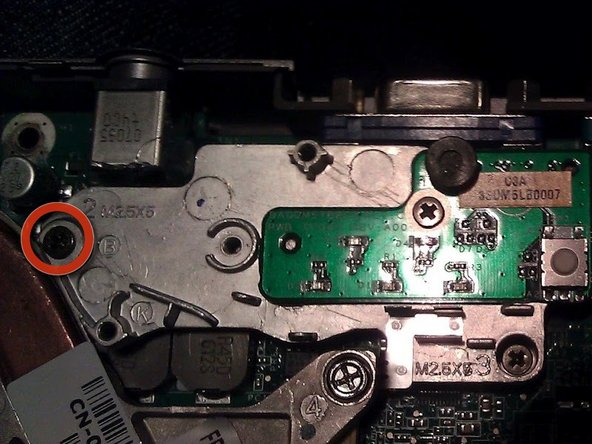
    • remove last screw, note this screw is longer then the other three

    • remove screen

  6. Dell Latitude D520 disassembly and power jack repair: шаг 6, изображение 1 из 3 Dell Latitude D520 disassembly and power jack repair: шаг 6, изображение 2 из 3 Dell Latitude D520 disassembly and power jack repair: шаг 6, изображение 3 из 3
    • Remove these 15 screws, they are all the same size

    • remove screw and cover

    • flip the laptop over

    • remove touchpad flat cable by gently pulling up.

    • remove 4 screws marked with the letter P

  7. Dell Latitude D520 disassembly and power jack repair: шаг 7, изображение 1 из 1
    • remove top cover being careful not to break any clips

  8. Dell Latitude D520 disassembly and power jack repair: шаг 8, изображение 1 из 2 Dell Latitude D520 disassembly and power jack repair: шаг 8, изображение 2 из 2
    • remove 3 screws

    • carefully remove small metal piece that was being help down by the three screws

  9. Dell Latitude D520 disassembly and power jack repair: шаг 9, изображение 1 из 2 Dell Latitude D520 disassembly and power jack repair: шаг 9, изображение 2 из 2
    • remove 4 screws

    • remove 1 screw

    • being careful not to break any clips, separate bottom plastic cover from the mother board carriage.

  10. Dell Latitude D520 disassembly and power jack repair: шаг 10, изображение 1 из 1
    • The middle part of my power connector had sheared away from its solder points on the motherboard.

    • I had to use a bit of flux, but I managed to re-tin all three contact point on the motherboard, as well as the pins in the connector.

    • I re-soldered the whole thing and used my trusty hot glue gun to encase the whole connector to prevent it from happening again anytime soon.

Заключение

To reassemble your device, follow these instructions in reverse order.

6 участников успешно повторили данное руководство.

otrebla

Участник с: 01/08/11

323 Репутация

1 руководство автора

0 Комментариев

Добавить комментарий

Просмотр статистики:

За последние 24часов: 1

За последние 7 дней: 3

За последние 30 дней: 21

За всё время: 9,683