Перейти к основному содержанию

Dell Latitude E6410 Screen Assembly Replacement

Выберете то, что вам нужно

  1. Dell Latitude E6410 Screen Assembly Replacement, Dell Latitude E6410 Screen Assembly: шаг 1, изображение 1 из 3 Dell Latitude E6410 Screen Assembly Replacement, Dell Latitude E6410 Screen Assembly: шаг 1, изображение 2 из 3 Dell Latitude E6410 Screen Assembly Replacement, Dell Latitude E6410 Screen Assembly: шаг 1, изображение 3 из 3
    • Slide both clips in towards each other to remove the battery from the laptop.

    • It is always important to remove an electronic device's power source when taking it apart to prevent electrocution.

  2. Dell Latitude E6410 Screen Assembly Replacement: шаг 2, изображение 1 из 1
    • Remove the two 5 mm Phillip's screws located on the left and right side of the battery socket.

  3. Dell Latitude E6410 Screen Assembly Replacement: шаг 3, изображение 1 из 3 Dell Latitude E6410 Screen Assembly Replacement: шаг 3, изображение 2 из 3 Dell Latitude E6410 Screen Assembly Replacement: шаг 3, изображение 3 из 3
    • Remove the two gray squares by sliding each piece towards you.

  4. Dell Latitude E6410 Screen Assembly Replacement: шаг 4, изображение 1 из 3 Dell Latitude E6410 Screen Assembly Replacement: шаг 4, изображение 2 из 3 Dell Latitude E6410 Screen Assembly Replacement: шаг 4, изображение 3 из 3
    • Remove the two 5mm Phillip's screws in the bottom right and the top left corners of the back panel.

    • Remove the 3mm Phillip's screw that is near the bottom right corner.

    • Loosen the Phillip's screw that is near the center until the spring pops up, but do not remove it.

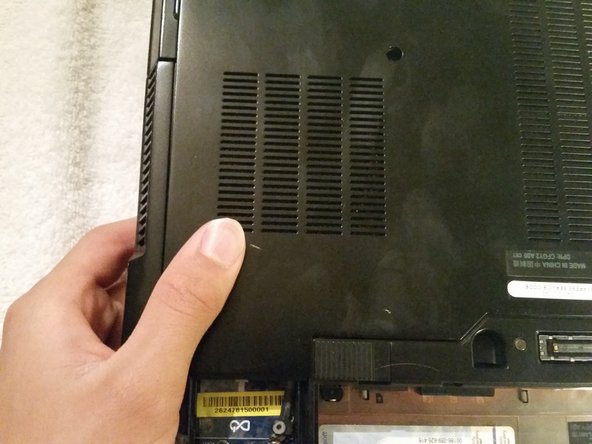
    • Detach the back case panel by sliding it away from the battery slot and lifting it out of place.

    • When reattaching the back panel slide it towards the location of the battery instead of away from it while also applying pressure downwards.

  5. Dell Latitude E6410 Screen Assembly Replacement: шаг 5, изображение 1 из 2 Dell Latitude E6410 Screen Assembly Replacement: шаг 5, изображение 2 из 2
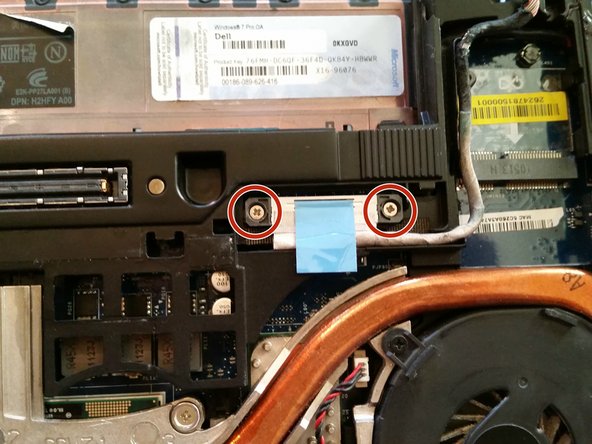
    • Loosen the two 5mm Phillip's screws near the top right corner that are holding the display cable onto the motherboard.

  6. Dell Latitude E6410 Screen Assembly Replacement: шаг 6, изображение 1 из 3 Dell Latitude E6410 Screen Assembly Replacement: шаг 6, изображение 2 из 3 Dell Latitude E6410 Screen Assembly Replacement: шаг 6, изображение 3 из 3
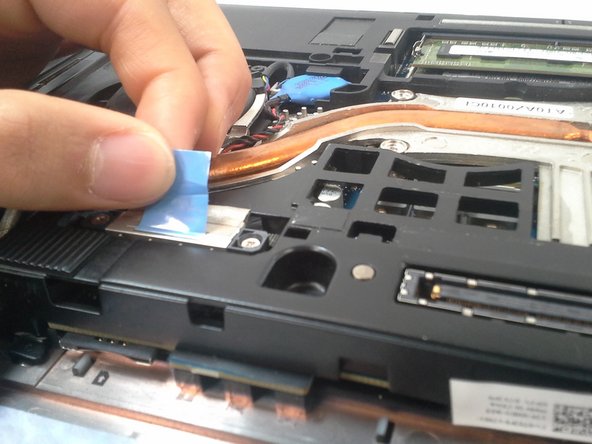
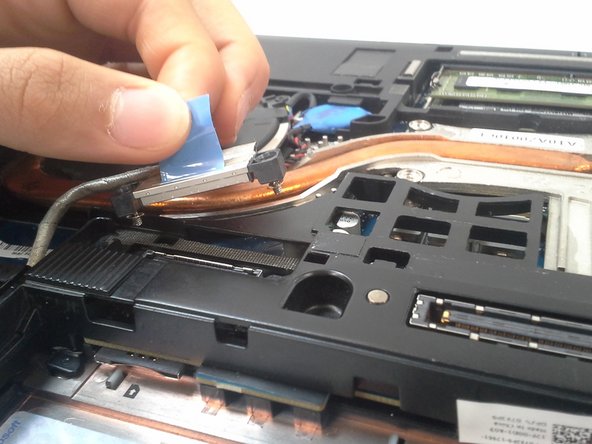
    • Detach the display cord from the motherboard by grabbing the blue tab in between your thumb and index finger and carefully pulling upwards.

    • Don't pull too hard or you may rip off the tab, but apply enough pressure so that it actually comes off.

  7. Dell Latitude E6410 Screen Assembly Replacement: шаг 7, изображение 1 из 3 Dell Latitude E6410 Screen Assembly Replacement: шаг 7, изображение 2 из 3 Dell Latitude E6410 Screen Assembly Replacement: шаг 7, изображение 3 из 3
    • Near the bottom left corner, detach the grey, black, and white wires from the graphics card and the two wires hooked in place by carefully unhooking them or pulling them off.

    • When reassembling use the second or last picture to reference where each wire goes.

  8. Dell Latitude E6410 Screen Assembly Replacement: шаг 8, изображение 1 из 1
    • Carefully unthread the wires detached in the last step from the hooks to completely free them from the laptop.

  9. Dell Latitude E6410 Screen Assembly Replacement: шаг 9, изображение 1 из 1
    • Remove the two 5mm Phillip's screws that are in the top right and left corners of the laptop.

  10. Dell Latitude E6410 Screen Assembly Replacement: шаг 10, изображение 1 из 3 Dell Latitude E6410 Screen Assembly Replacement: шаг 10, изображение 2 из 3 Dell Latitude E6410 Screen Assembly Replacement: шаг 10, изображение 3 из 3
    • Flip the laptop so that the top is facing up and grab the back two corners of the laptop screen. Pull upwards to remove the screen.

    • When reassembling use the new laptop screen.

Заключение

To reassemble your device, follow these instructions in reverse order.

10 участников успешно повторили данное руководство.

Esteban Damian

Участник с: 05/31/16

31 Репутация

1 руководство автора

Команда

Central Coast New Tech High, Team 4-1, Rushing Spring 2016 Участник Central Coast New Tech High, Team 4-1, Rushing Spring 2016

CCNTH-RUSHING-S16S4G1

2 членов

Автор 1 руководств

0 Комментариев

Добавить комментарий

Просмотр статистики:

За последние 24часов: 0

За последние 7 дней: 1

За последние 30 дней: 7

За всё время: 3,368