Перейти к основному содержанию

Dell Vostro 3550 Display Assembly Replacement

Выберете то, что вам нужно

  1. Dell Vostro 3550 Display Assembly Replacement, Display Assembly: шаг 1, изображение 1 из 2 Dell Vostro 3550 Display Assembly Replacement, Display Assembly: шаг 1, изображение 2 из 2
    • Grip the back trim of the laptop and pull upwards to remove it.

  2. Dell Vostro 3550 Display Assembly Replacement: шаг 2, изображение 1 из 3 Dell Vostro 3550 Display Assembly Replacement: шаг 2, изображение 2 из 3 Dell Vostro 3550 Display Assembly Replacement: шаг 2, изображение 3 из 3
    • Slide the plastic opening tool around the perimeter of the display bezel.

    • Carefully remove the bezel from the display.

  3. Dell Vostro 3550 Display Assembly Replacement: шаг 3, изображение 1 из 3 Dell Vostro 3550 Display Assembly Replacement: шаг 3, изображение 2 из 3 Dell Vostro 3550 Display Assembly Replacement: шаг 3, изображение 3 из 3
    • Remove the six 7 mm Phillips #0 screws attaching the display to the upper casing of the laptop.

    • When all six screws are removed, gently lower the display to reveal the camera cable.

  4. Dell Vostro 3550 Display Assembly Replacement: шаг 4, изображение 1 из 3 Dell Vostro 3550 Display Assembly Replacement: шаг 4, изображение 2 из 3 Dell Vostro 3550 Display Assembly Replacement: шаг 4, изображение 3 из 3
    • Disconnect the camera ribbon cable by gently pulling it away from its connector.

  5. Dell Vostro 3550 Display Assembly Replacement: шаг 5, изображение 1 из 2 Dell Vostro 3550 Display Assembly Replacement: шаг 5, изображение 2 из 2
    • Remove the four 5 mm Phillips #0 screws (two on either side) securing the display to the metal frame.

  6. Dell Vostro 3550 Display Assembly Replacement: шаг 6, изображение 1 из 3 Dell Vostro 3550 Display Assembly Replacement: шаг 6, изображение 2 из 3 Dell Vostro 3550 Display Assembly Replacement: шаг 6, изображение 3 из 3
    • Gently lower the display into a resting position.

  7. Dell Vostro 3550 Display Assembly Replacement: шаг 7, изображение 1 из 3 Dell Vostro 3550 Display Assembly Replacement: шаг 7, изображение 2 из 3 Dell Vostro 3550 Display Assembly Replacement: шаг 7, изображение 3 из 3
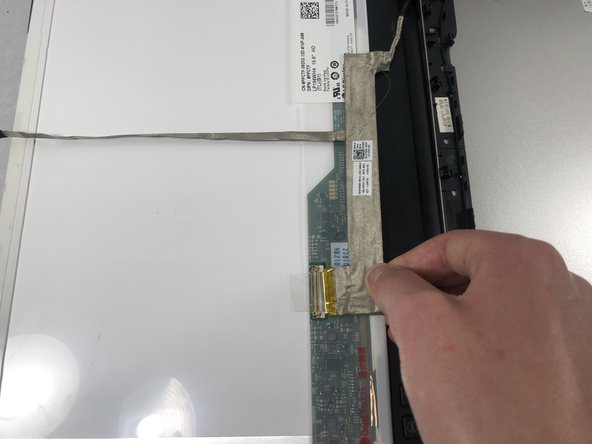
    • Loosen the clear tape fastening the ribbon cable to the display.

    • Carefully pull the ribbon cable away from the connector.

  8. Dell Vostro 3550 Display Assembly Replacement: шаг 8, изображение 1 из 3 Dell Vostro 3550 Display Assembly Replacement: шаг 8, изображение 2 из 3 Dell Vostro 3550 Display Assembly Replacement: шаг 8, изображение 3 из 3
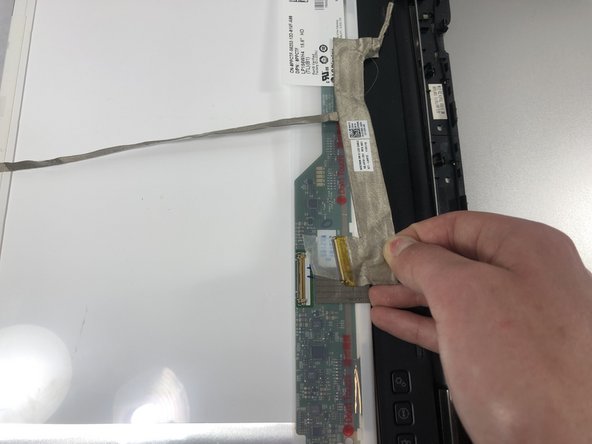
    • Peel the ribbon cable away from the display.

    • Remove the display from the laptop.

Заключение

To reassemble your device, follow these instructions in reverse order.

Dylan J. Souza

Участник с: 03/22/19

781 Репутация

Автор 5 руководств

Команда

UMass Dartmouth, Team S8-G6, Bailey Spring 2019 Участник UMass Dartmouth, Team S8-G6, Bailey Spring 2019

UMASSD-BAILEY-S19S8G6

3 членов

Автор 7 руководств

0 Комментариев

Добавить комментарий

Просмотр статистики:

За последние 24часов: 0

За последние 7 дней: 2

За последние 30 дней: 10

За всё время: 751