Перейти к основному содержанию

Dell XPS 15 9530 Keyboard Replacement

Выберете то, что вам нужно

  1. Dell XPS 15 9530 Keyboard Replacement, Base Cover: шаг 1, изображение 1 из 3 Dell XPS 15 9530 Keyboard Replacement, Base Cover: шаг 1, изображение 2 из 3 Dell XPS 15 9530 Keyboard Replacement, Base Cover: шаг 1, изображение 3 из 3
    • Using a T5 Torx screwdriver, remove ten 3mm screws.

  2. Dell XPS 15 9530 Keyboard Replacement: шаг 2, изображение 1 из 2 Dell XPS 15 9530 Keyboard Replacement: шаг 2, изображение 2 из 2
    • Lift the plastic tab.

    • Remove two 3mm Phillips #0 screws under the plastic tab.

  3. Dell XPS 15 9530 Keyboard Replacement: шаг 3, изображение 1 из 1
    • Lift the lower case off.

  4. Dell XPS 15 9530 Keyboard Replacement, Battery: шаг 4, изображение 1 из 2 Dell XPS 15 9530 Keyboard Replacement, Battery: шаг 4, изображение 2 из 2
    • Using a Phillips #0 screwdriver, remove the seven 3.5mm screws that secure the battery to the palm rest assembly.

  5. Dell XPS 15 9530 Keyboard Replacement: шаг 5, изображение 1 из 1
    • Disconnect the battery cable from the system board.

    • Be sure to use a plastic tool, not a metal one.

  6. Dell XPS 15 9530 Keyboard Replacement: шаг 6, изображение 1 из 1
    • Lift the battery off the chassis.

  7. Dell XPS 15 9530 Keyboard Replacement, Keyboard: шаг 7, изображение 1 из 3 Dell XPS 15 9530 Keyboard Replacement, Keyboard: шаг 7, изображение 2 из 3 Dell XPS 15 9530 Keyboard Replacement, Keyboard: шаг 7, изображение 3 из 3
    • Remove the three 3.5mm Phillips #0 screws mounting the motherboard.

  8. Dell XPS 15 9530 Keyboard Replacement: шаг 8, изображение 1 из 3 Dell XPS 15 9530 Keyboard Replacement: шаг 8, изображение 2 из 3 Dell XPS 15 9530 Keyboard Replacement: шаг 8, изображение 3 из 3
    Инструмент, используемый на этом этапе:
    Tweezers
    $4.99
    Купить
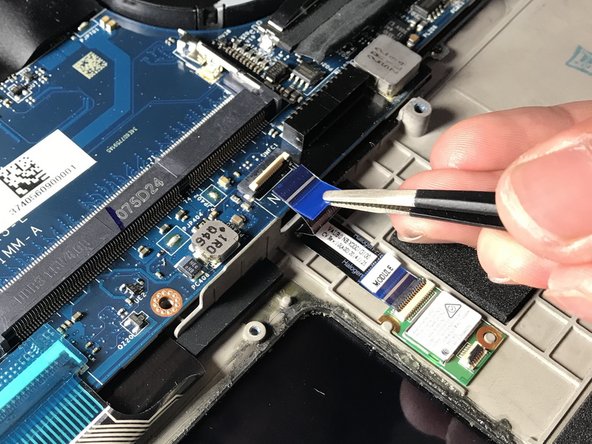
    • Disconnect ribbon cables above the touch pad using tweezers.

  9. Dell XPS 15 9530 Keyboard Replacement: шаг 9, изображение 1 из 3 Dell XPS 15 9530 Keyboard Replacement: шаг 9, изображение 2 из 3 Dell XPS 15 9530 Keyboard Replacement: шаг 9, изображение 3 из 3
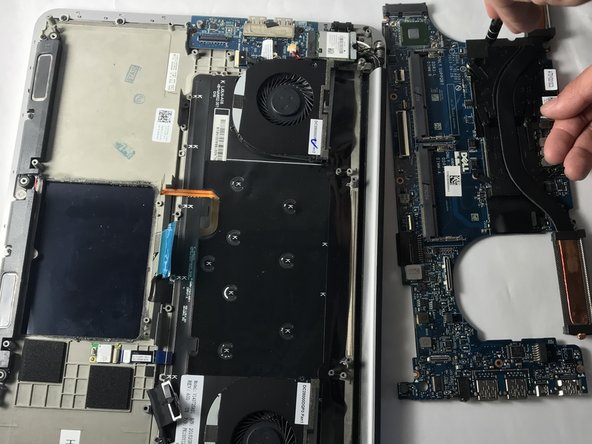
    • Lift and remove the motherboard from the chassis.

  10. Dell XPS 15 9530 Keyboard Replacement: шаг 10, изображение 1 из 3 Dell XPS 15 9530 Keyboard Replacement: шаг 10, изображение 2 из 3 Dell XPS 15 9530 Keyboard Replacement: шаг 10, изображение 3 из 3
    • Remove the ten 3mm Phillips #0 screws on the perimeter of the keyboard assembly.

    • Remove the ten 2.5mm Phillips #0 screws underneath the plastic shielding of the keyboard.

Заключение

To reassemble your device, follow these instructions in reverse order.

Larissa Omura

Участник с: 04/04/19

743 Репутация

Автор 6 руководств

Команда

Oregon Institute of Technology, Team S1-G3, Lancaster Spring 2019 Участник Oregon Institute of Technology, Team S1-G3, Lancaster Spring 2019

OIT-LANCASTER-S19S1G3

3 членов

Автор 13 руководств

Один комментарий

Thank you for this guide! Is there any way to obtain replacement screws for the outer perimeter of the keyboard? I’ve recently disassembled my XPS 9530 and found one of the screws is very stripped, I managed to get it out but it really shouldn’t be put back in due to the state of the head.

I’m struggling to find replacements for the size quoted. Are they Phillips M2 3mm silver screws?

James White - Ответить

Добавить комментарий

Просмотр статистики:

За последние 24часов: 0

За последние 7 дней: 10

За последние 30 дней: 39

За всё время: 6,586