Введение
If your Dell XPS 15 computer screen (model L501X/L502X) is having display issues that have to do with a malfunctioning screen, use this guide to replace the screen.
Before using this guide, inspect the computer screen and make sure that the display issues are rooted from screen failure rather than from internal hardware issues.
This guide includes work with small components and data storing components. When handling both internal and external computer hardware, be cautious of any static that may result from maneuvering any electrical pieces.
Make sure to turn off the device and unplug it from any electrical outlets before beginning the technical guide.
Выберете то, что вам нужно
-
-
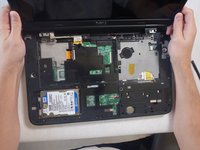
Remove the black battery bar from the computer before continuing any further operations.
-
Unscrew the three 5mm Phillps #2 screws on the left side of the back panel.
-
-
-
Lift up the left side of the panel.
-
There are three tabs holding in the right side of the panel. Pull the panel up and away from these tabs to remove it.
-
-
-
Pry up the top of the cover first by using a spudger to wedge in between the cover and base of the computer.
-
Once the spudger is between the cover and the base of the computer, wedge underneath the remaining border surrounding the keyboard.
-
-
-
Work your fingers underneath the cover. Then, delicately pull the cover off of the computer.
-
-
-
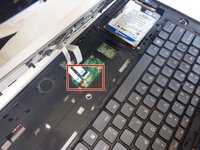
Unhook the cables connected to the mouse pad by flipping up the black tabs that hold either cable in place.
-
-
-
-
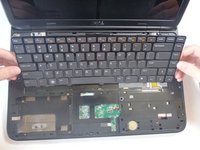
Slowly lift the top of the keyboard and then pull the keyboard towards the screen.
-
-
-
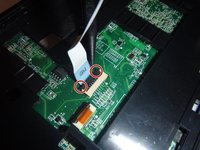
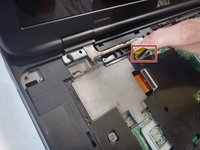
Using a spudger, slowly open up the two black clips holding down both cables.
-
Separate the unfastened cables from the base of the computer.
-
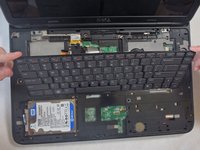
Once the cables are detached from the keyboard, you may pull the keyboard away completely and set it aside.
-
-
-
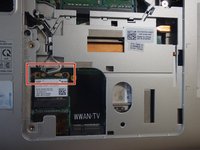
Notice that there are two sets of cords that start where we took the four Phillips screws out previously.
-
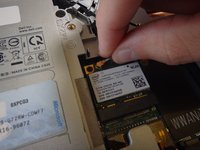
Using either your fingers or a plastic spudger, lift up the black tab to release the wire on the upper left-hand side.
-
-
-
Flip the computer over and remove the two 5 mm Phillips screws on both sides of the battery terminal using a Phillips screwdriver.
-
-
-
Unhook the end of the black wire and the end of the white wire from their respective terminals. Because neither wire is screwed down, both wires should easily pop off.
-
-
-
Flip the computer back over into its upright position and gently pull the wires away from their prior points of connection while making sure not to damage them.
-
-
-
Grab the screen on both sides and pull upward to remove the entire screen from the computer.
-
Swap your damaged screen with your replacement Dell XPS 15-L502X screen and reassemble your computer.
-
Reassembling your Dell XPS 15-L502X can be done by following the instructions to this guide in reverse order.
-


To reassemble your device, follow these instructions in reverse order.
To reassemble your device, follow these instructions in reverse order.
Отменить: Я не выполнил это руководство.
6 человек успешно провели ремонт по этому руководству.
Команду

IUPUI, Team 2-3, Baechle Fall 2015 Участник IUPUI, Team 2-3, Baechle Fall 2015
IUPUI-BAECHLE-F15S2G3
3 членов
Автор 8 руководств