Перейти к основному содержанию

Этот документ имеет более свежие изменения. Перейти к последней непроверенной версии.

Disassembling SanDisk Sansa Fuze

Выберете то, что вам нужно

  1. Disassembling SanDisk Sansa Fuze, Sansa Fuze MP3 Player: шаг 1, изображение 1 из 1
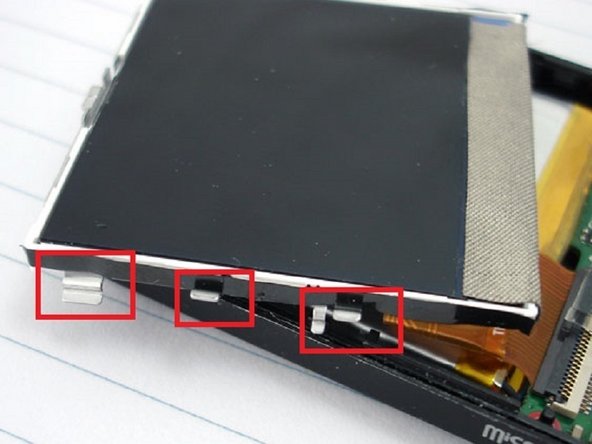
    • Pry open and pop the clips. Note that the bottom two clips are held in with a little bit of rubbery glue. Don’t rip the face off too quick since there is a ribbon cable you need to disconnect.

  2. Disassembling SanDisk Sansa Fuze: шаг 2, изображение 1 из 1
    • Remove ribbon cable connect to the face plate. Lift the face off and flip the brown ribbon release flap on the connection on the board. (The flap in this picture is black, opposite the cable. Lift the edge that is closest to you in the picture in order to release the cable.)

  3. Disassembling SanDisk Sansa Fuze: шаг 3, изображение 1 из 1
    • Remove two (in some versions there are 3) screws holding the board down

  4. Disassembling SanDisk Sansa Fuze: шаг 4, изображение 1 из 2 Disassembling SanDisk Sansa Fuze: шаг 4, изображение 2 из 2
    • Remove LCD by releasing the 4 clips on each side of the LCD, be carefully to not damage the LCD

  5. Disassembling SanDisk Sansa Fuze: шаг 5, изображение 1 из 1
    • Carefully flip the LCD over and disconnect the LCD cable from the board

  6. Disassembling SanDisk Sansa Fuze: шаг 6, изображение 1 из 1
    • Remove battery. The battery is taped down with a little double sided tape

    • If you are replacing the battery just apply a soldering iron to the battery connections on the board and gently pull them off..

    • To re-attached the new battery by reheating the old solder and reconnecting the new battery wires

    • Link to a battery Battery Clerk - Sansa Fuze battery

    • PLEASE NOT IF REPLACING THE BATTERY YOU DO NOT NEED TO REMOVE THE BOARD :)

  7. Disassembling SanDisk Sansa Fuze: шаг 7, изображение 1 из 1
    • Remove the board by lifting on the left side first as to work around the on off switch.

Заключение

To reassemble your device, follow these instructions in reverse order.

8 участников успешно повторили данное руководство.

James

Участник с: 03/17/13

493 Репутация

1 руководство автора

Команда

Everything iPod Участник Everything iPod

Community

62 членов

Автор 3 руководств

6 Комментариев

Hi,

I've lost the brown ribbon release flap. So my ribbon cable has no connection most of the time. Is there any chance to replace this with something else? Or get a new connector?

Thanks,

Simon

moony - Ответить

Sep 7 is backwards - device power button is on the right side, release motherboard on that side first. Otherwise thank you for the guide!

Killen Prophet - Ответить

Hi; I can't reconnect the ribbon cable in step 2, please help anyone. I tried regular tweezers, they are too big and the cable is too short.

Pat - Ответить

Thanks so much for this post! It was a big help in getting my screen fixed and everything re-connected! Love my sansa fuze!

Penney H - Ответить

Fixed my First Sandisk Fuse! I have had probably 10 over the last 15 years and finally got to repair one! Great Advice!

J.J. - Ответить

Добавить комментарий

Просмотр статистики:

За последние 24часов: 6

За последние 7 дней: 16

За последние 30 дней: 76

За всё время: 19,000