Эта версия возможно содержит некорректные исправления. Переключить на последнюю проверенную версию.
Выберете то, что вам нужно
-
Этот шаг не переведен. Помогите перевести
-
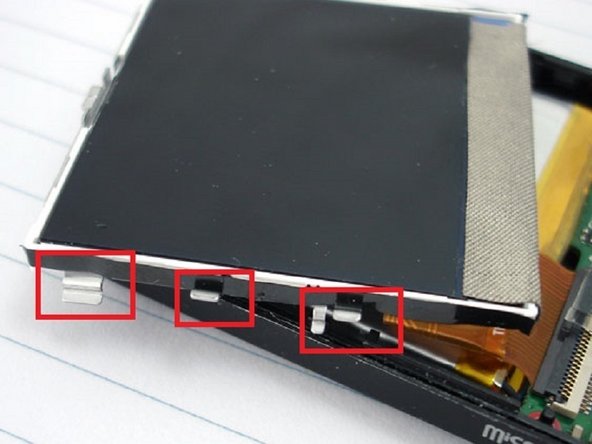
Pry open and pop the clips. Note that the bottom two clips are held in with a little bit of rubbery glue. Don’t rip the face off too quick since there is a ribbon cable you need to disconnect.
-
-
Этот шаг не переведен. Помогите перевести
-
Remove ribbon cable connect to the face plate. Lift the face off and flip the brown ribbon release flap on the connection on the board. (The flap in this picture is black, opposite the cable. Lift the edge that is closest to you in the picture in order to release the cable.)
-
-
Этот шаг не переведен. Помогите перевести
-
Remove two (in some versions there are 3) screws holding the board down
-
-
-
Этот шаг не переведен. Помогите перевести
-
Remove LCD by releasing the 4 clips on each side of the LCD, be carefully to not damage the LCD
-
-
Этот шаг не переведен. Помогите перевести
-
Carefully flip the LCD over and disconnect the LCD cable from the board
-
-
Этот шаг не переведен. Помогите перевести
-
Remove battery. The battery is taped down with a little double sided tape
-
If you are replacing the battery just apply a soldering iron to the battery connections on the board and gently pull them off..
-
To re-attached the new battery by reheating the old solder and reconnecting the new battery wires
-
Link to a battery Battery Clerk - Sansa Fuze battery
-
PLEASE NOT IF REPLACING THE BATTERY YOU DO NOT NEED TO REMOVE THE BOARD :)
-
-
Этот шаг не переведен. Помогите перевести
-
Remove the board by lifting on the left side first as to work around the on off switch.
-
Отменить: Я не выполнил это руководство.
8 участников успешно повторили данное руководство.
6 Комментариев
Sep 7 is backwards - device power button is on the right side, release motherboard on that side first. Otherwise thank you for the guide!


