Выберете то, что вам нужно
-
-
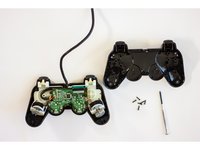
First, check that the connection port of your controller (whether wireless or not) has all the pins.
-
If you have a wired controller (a controller with a cable that connects directly to your console) try bending it in different directions. This may reconnect broken connections within the controller cable and could be a temporary fix.
-
-
-
Once the screws are removed, carefully pry the controller open with your hands.
-
Remove the screw holding the circuit board in place.
-
-
-
-
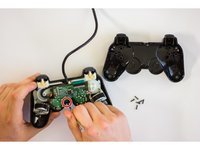
Analyze the rubber pads for any debris that may be getting in the way of the black pads. These make an electrical connection on the pad and may not be contacting properly.
-
-
-
Examine the flexible trigger board itself for any dirt or debris that could get in the rubber button pad's way.
-
-
-
Check the connection of the flexible trigger board to the main circuit board of your controller.
-
-
-
If the previous steps are all covered and you are still facing difficulties in getting your buttons to work, consider replacing the main circuit board or flexible trigger board.
-
-
-
Reverse the disassembly steps until the controller is back to its original state. Plug the controller into the console and test whether the fix worked.
-


Отменить: Я не выполнил это руководство.
48 человек успешно провели ремонт по этому руководству.
Команда

Cal Poly, Team 17-5, Green Fall 2015 Участник Cal Poly, Team 17-5, Green Fall 2015
CPSU-GREEN-F15S17G5
4 членов
Автор 12 руководств
7 Комментарии к руководству
Dualshock 2 controllers, model A and H, are having 8 pins, not 9. Your first Step is false and rarely wires are the cause of the problem.
No my Dual-shock 2 controller has 9 pins so you are wrong he is right man.
Eva Langley is correct, some of these controllers have only 8 pins, not 9. I myself can conformed this because I just recently opened one of two brand new fresh out of the box Sony original equipment controllers that I purchased (for a little less than $10 a piece) during a clearance sale at my local Sears just before they went out of business. So Eva is NOT wrong. I still have the second one still in the box and before anyone ask, I don’t won’t to sale. I purchased them because I have had both my original controllers go out after they were sitting up for a few years without use. My game units are very well taken care of but the controllers of the PS2 just stopped working and finding a definitive answer to why this happens is STILL very elusive in 2019.
After opening one of these, the R2 and L2 buttons don't feel right, is there a way to fix this?
Try to put R2 and L2 after you close the shell. The buttons have clips that hold on position after you insert them .