Перейти к основному содержанию

Dynex DX-WBRDVD1 Cleaning The Optical Lens

Выберете то, что вам нужно

  1. Dynex DX-WBRDVD1 Cleaning The Optical Lens, Top Cover: шаг 1, изображение 1 из 2 Dynex DX-WBRDVD1 Cleaning The Optical Lens, Top Cover: шаг 1, изображение 2 из 2
    • Remove the four 5mm Phillips #1 screws that connect the black outer shell to the silver back of the device.

  2. Dynex DX-WBRDVD1 Cleaning The Optical Lens: шаг 2, изображение 1 из 1
    • Remove the two 5mm screws on the left and right side panels.

    • There is one screw on each side that secures the cover to the body of the device.

  3. Dynex DX-WBRDVD1 Cleaning The Optical Lens: шаг 3, изображение 1 из 1
    • Lift the black cover to a 45 degree angle from the rear of the device and pull the cover away entirely.

    • Check that the power cord is not preventing the device from opening or closing.

  4. Dynex DX-WBRDVD1 Cleaning The Optical Lens, Dynex DX-WBRDVD1 Cleaning The Optical Lens: шаг 4, изображение 1 из 2 Dynex DX-WBRDVD1 Cleaning The Optical Lens, Dynex DX-WBRDVD1 Cleaning The Optical Lens: шаг 4, изображение 2 из 2
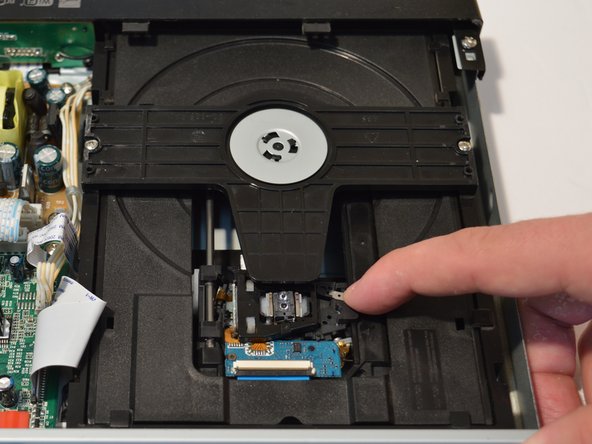
    • To access the optical lens, pull back the optical drive as shown in the pictures located on the two metal rails.

  5. Dynex DX-WBRDVD1 Cleaning The Optical Lens: шаг 5, изображение 1 из 2 Dynex DX-WBRDVD1 Cleaning The Optical Lens: шаг 5, изображение 2 из 2
    Инструмент, используемый на этом этапе:
    Microfiber Cleaning Cloths
    $3.99
    Купить
Заключение

To reassemble your device, follow these instructions in reverse order.

3 участников успешно повторили данное руководство.

Caleigh Firth

Участник с: 04/05/18

438 Репутация

Автор 3 руководств

Команда

Linn Benton Community College, Team S1-G2, Johnson Spring 2018 Участник Linn Benton Community College, Team S1-G2, Johnson Spring 2018

LBCC-JOHNSON-S18S1G2

4 членов

Автор 6 руководств

0 Комментариев

Добавить комментарий

Просмотр статистики:

За последние 24часов: 0

За последние 7 дней: 3

За последние 30 дней: 4

За всё время: 586