Перейти к основному содержанию

Elegoo Mars 3 Motherboard Replacement

Выберете то, что вам нужно

  1. Elegoo Mars 3 Motherboard Replacement, Remove the back screws: шаг 1, изображение 1 из 1
    • Remove 6 screws.

    • 12.5mm self tapping screws with 2.0mm hex socket head

  2. Elegoo Mars 3 Motherboard Replacement, Remove the back lid: шаг 2, изображение 1 из 2 Elegoo Mars 3 Motherboard Replacement, Remove the back lid: шаг 2, изображение 2 из 2
    • Use a small flat-headed screwdriver, spudger, or similar to pry open the lid enough to be able to get a grip of it and pull straight back and then fold down.

    • The back of the lid has a PCB with cables connecting it to the motherboard inside the unit. While not particularly fragile, do take care so you do not damage the connectors.

  3. Elegoo Mars 3 Motherboard Replacement, Remove the LED and power connectors: шаг 3, изображение 1 из 2 Elegoo Mars 3 Motherboard Replacement, Remove the LED and power connectors: шаг 3, изображение 2 из 2
    • Remove the connectors by pulling them straight out.

    • Make sure you connect the connectors in the correct sockets during reassembly!

  4. Elegoo Mars 3 Motherboard Replacement, Remove the resin panel connector: шаг 4, изображение 1 из 3 Elegoo Mars 3 Motherboard Replacement, Remove the resin panel connector: шаг 4, изображение 2 из 3 Elegoo Mars 3 Motherboard Replacement, Remove the resin panel connector: шаг 4, изображение 3 из 3
    • Use a spudger or similar tool (your finger nail works if you can get it there) to loosen the resin panel connector by flipping the dark gray part 90° down.

    • Pull the cable straight up.

    • Be careful not to bend the cable!

  5. Elegoo Mars 3 Motherboard Replacement, Remove the bottom right connectors: шаг 5, изображение 1 из 1
    • Remove the three cable connectors in the bottom right corner by pulling them straight out.

    • Be sure to pull the connectors, and not the cables!

    • If you are also replacing the limit switch, now is a good time to do so.

  6. Elegoo Mars 3 Motherboard Replacement, Unfasten the motherboard: шаг 6, изображение 1 из 1
    • Remove the two screws fastening the motherboard to the unit.

    • 7.5mm self tapping screws with 2.0mm hex socket head

    • The touch screen cable on the right and the USB cable on the left are still connected to the motherboard.

  7. Elegoo Mars 3 Motherboard Replacement, Remove the tape covering the touch screen connector: шаг 7, изображение 1 из 2 Elegoo Mars 3 Motherboard Replacement, Remove the tape covering the touch screen connector: шаг 7, изображение 2 из 2
    Инструмент, используемый на этом этапе:
    Tweezers
    $4.99
    Купить
    • Use a pair of tweezers to get a grip on and remove the tape covering the touch screen connector.

    • You can transfer this tape and reuse it on the new motherboard.

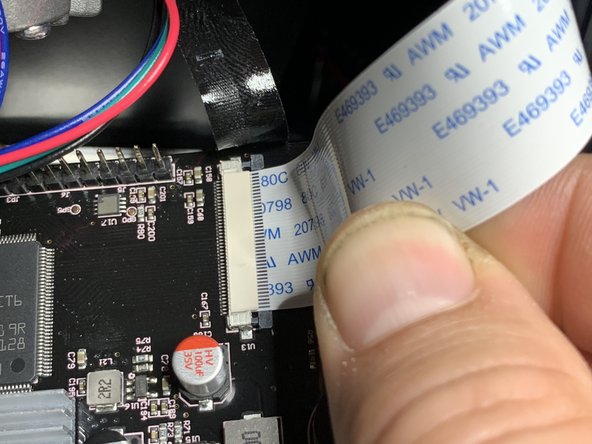
  8. Elegoo Mars 3 Motherboard Replacement, Remove the touch screen cable: шаг 8, изображение 1 из 3 Elegoo Mars 3 Motherboard Replacement, Remove the touch screen cable: шаг 8, изображение 2 из 3 Elegoo Mars 3 Motherboard Replacement, Remove the touch screen cable: шаг 8, изображение 3 из 3
    • Use a spudger or similar to unlock the connector by pushing the dark gray part to the right, away from the connector, both on the top and bottom.

    • Note how far into the connector the cable is seated. When reinserting the cable in the new motherboard it can be hard to feel if the cable is fully inserted.

    • Remove the cable by pulling it out of the connector to the right.

  9. Elegoo Mars 3 Motherboard Replacement, Remove the USB cable: шаг 9, изображение 1 из 1
    • Unplug the USB cable.

    • In my case the glue did not stick to the USB cable, just the USB socket on the motherboard, so I was able to just pull it out without doing anything with the glue. If necessary you should be able to pry off the glue blob with a spudger or similar.

    • During reassembly it is not necessary to glue these together.

Заключение

To reassemble your device, follow these instructions in reverse order.

Еще один человек закончил это руководство.

Konrad Skeri Ekblad

Участник с: 12/10/17

520 Репутация

Автор 3 руководств

0 Комментариев

Добавить комментарий

Просмотр статистики:

За последние 24часов: 4

За последние 7 дней: 15

За последние 30 дней: 31

За всё время: 1,130