Введение
The I/O board houses the 3.5mm plugs for an AUX input and headphone output, the USB charging plug for a smartphone, and a DC input. In the case that any of these are damaged, the entire board may need to be replaced.
Выберете то, что вам нужно
-
-
Pull the plastic tab on the battery compartment cover panel to loosen it, then pull the panel off.
-
-
-
On the bottom of the device case's face are two T10 screws. Use a T10 Torx screwdriver to remove the two screws.
-
-
-
While using the T10 screwdriver, remove the two T10 screws on the back of the device's case.
-
-
-
-
Remove the two Phillips #00 screws located in the center of the back of the device.
-
-
-
On the bottom of the device's case there are two rubber feet. Pry the rubber feet off of the case.
-
-
-
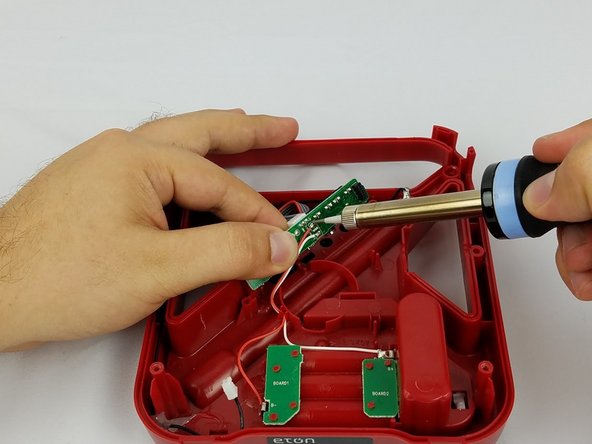
Unsolder the red and white wires where the backup batteries connect to the I/O board.
-
-
-
Just above the I/O board, there is a small clip securing the wire to the motherboard. Remove the Philips #1 screw and lift it up.
-


To reassemble your device, follow these instructions in the reverse order.
To reassemble your device, follow these instructions in the reverse order.
Команда

USF Tampa, Team 1-6, Nance Spring 2016 Участник USF Tampa, Team 1-6, Nance Spring 2016
USFT-NANCE-S16S1G6
4 членов
Автор 13 руководств
Один комментарий
You say “No parts required,” list a soldering station that you never use, and only tell us how to get the board out.
My USB Connector got ripped off the ckt board, I was hoping to find a source (parts) for the replacement board…
“In the case that any of these are damaged, the entire board may need to be replaced.”