Перейти к основному содержанию

Eureka SuctionSeal 2.0 Pet Belt Latch Assembly Replacement

Выберете то, что вам нужно

  1. Eureka SuctionSeal 2.0 Pet Belt Latch Assembly Replacement, Dust Cup: шаг 1, изображение 1 из 2 Eureka SuctionSeal 2.0 Pet Belt Latch Assembly Replacement, Dust Cup: шаг 1, изображение 2 из 2
    • Place the device upright with the brush roller closest to you.

    • Pull up on the latch at the top of the dust cup.

    • Tilt the top of the dust cup forward and pull towards yourself, removing the container from the device.

  2. Eureka SuctionSeal 2.0 Pet Belt Latch Assembly Replacement, Brush Roll Cover: шаг 2, изображение 1 из 2 Eureka SuctionSeal 2.0 Pet Belt Latch Assembly Replacement, Brush Roll Cover: шаг 2, изображение 2 из 2
    • Locate the gray exhaust filter cover at the top of the vacuum's base.

    • Grip the two tabs in the middle of the filter cover and rotate counter-clockwise.

    • Lift the cover away from the vacuum.

  3. Eureka SuctionSeal 2.0 Pet Belt Latch Assembly Replacement: шаг 3, изображение 1 из 3 Eureka SuctionSeal 2.0 Pet Belt Latch Assembly Replacement: шаг 3, изображение 2 из 3 Eureka SuctionSeal 2.0 Pet Belt Latch Assembly Replacement: шаг 3, изображение 3 из 3
    • Pull up and unhook the two front tower latches using two fingers. These are located at the base of the tower.

    • Pull up and unhook the latch on the back of the tower.

    • Firmly lift the vacuum tower up and out of its stand.

    • The exhaust filter cover can be replaced once the tower is removed. It will not affect the steps.

  4. Eureka SuctionSeal 2.0 Pet Belt Latch Assembly Replacement: шаг 4, изображение 1 из 2 Eureka SuctionSeal 2.0 Pet Belt Latch Assembly Replacement: шаг 4, изображение 2 из 2
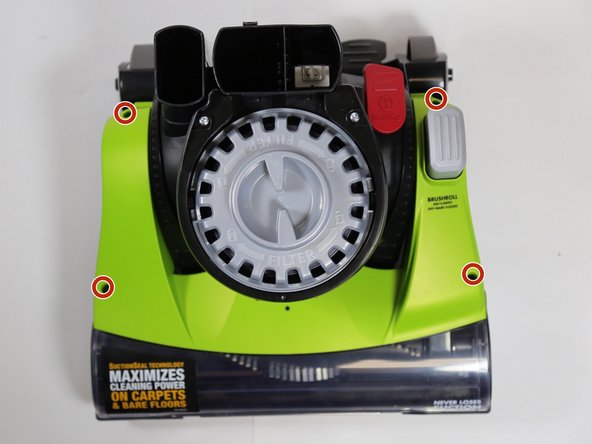
    • Remove the four 20mm screws on the top of the vacuum head's cover using a JIS 1 screwdriver.

  5. Eureka SuctionSeal 2.0 Pet Belt Latch Assembly Replacement: шаг 5, изображение 1 из 2 Eureka SuctionSeal 2.0 Pet Belt Latch Assembly Replacement: шаг 5, изображение 2 из 2
    • Turn the vacuum head so that the back is facing you.

    • Press the handle release pedal.

    • Rotate the top of the motor cover down while pressing on the pedal release.

    • The motor cover should rotate from an upright position back towards the ground, as it would if the handle were still attached.

  6. Eureka SuctionSeal 2.0 Pet Belt Latch Assembly Replacement: шаг 6, изображение 1 из 3 Eureka SuctionSeal 2.0 Pet Belt Latch Assembly Replacement: шаг 6, изображение 2 из 3 Eureka SuctionSeal 2.0 Pet Belt Latch Assembly Replacement: шаг 6, изображение 3 из 3
    • Locate the two tabs on the back of the cover.

    • Pull up on the tabs and lift the cover away from the device.

  7. Eureka SuctionSeal 2.0 Pet Belt Latch Assembly Replacement, Belt Latch Assembly: шаг 7, изображение 1 из 2 Eureka SuctionSeal 2.0 Pet Belt Latch Assembly Replacement, Belt Latch Assembly: шаг 7, изображение 2 из 2
    • Locate the belt latch assembly. It will be on your right when the brush roll is facing you.

    • Remove the two 20mm screws using a JIS 1 screwdriver.

  8. Eureka SuctionSeal 2.0 Pet Belt Latch Assembly Replacement: шаг 8, изображение 1 из 1
    • Lift up on the belt latch assembly and remove it from the vacuum.

Заключение

To reassemble your device, follow these instructions in reverse order.

Grayson Clendenon

Участник с: 10/02/17

571 Репутация

Автор 5 руководств

Команда

Cal Poly, Team S4-G5, Livingston Fall 2017 Участник Cal Poly, Team S4-G5, Livingston Fall 2017

CPSU-LIVINGSTON-F17S4G5

3 членов

Автор 16 руководств

0 Комментариев

Добавить комментарий

Просмотр статистики:

За последние 24часов: 0

За последние 7 дней: 1

За последние 30 дней: 8

За всё время: 834