Перейти к основному содержанию

Этот документ имеет более свежие изменения. Перейти к последней непроверенной версии.

Fairphone 1 Motherboard Replacement

Выберете то, что вам нужно

  1. Fairphone 1 Motherboard Replacement, Back Cover: шаг 1, изображение 1 из 3 Fairphone 1 Motherboard Replacement, Back Cover: шаг 1, изображение 2 из 3 Fairphone 1 Motherboard Replacement, Back Cover: шаг 1, изображение 3 из 3
    • There is a small indentation in the side of the phone near the bottom of the back cover.

    • With the indentation as leverage, use your fingernail to pry the bottom portion of the back cover from the phone.

  2. Fairphone 1 Motherboard Replacement: шаг 2, изображение 1 из 3 Fairphone 1 Motherboard Replacement: шаг 2, изображение 2 из 3 Fairphone 1 Motherboard Replacement: шаг 2, изображение 3 из 3
    • Slide the back cover down and remove it from the phone.

  3. Fairphone 1 Motherboard Replacement, Battery: шаг 3, изображение 1 из 3 Fairphone 1 Motherboard Replacement, Battery: шаг 3, изображение 2 из 3 Fairphone 1 Motherboard Replacement, Battery: шаг 3, изображение 3 из 3
    • There is a small indentation in the back of the phone just below the battery.

    • Use a fingernail in this indentation to push the battery toward the top of the phone

    • Pull the battery out away from the phone.

  4. Fairphone 1 Motherboard Replacement: шаг 4, изображение 1 из 1
    • Remove the battery from your Fairphone.

  5. Fairphone 1 Motherboard Replacement, SIM and MicroSD Card: шаг 5, изображение 1 из 3 Fairphone 1 Motherboard Replacement, SIM and MicroSD Card: шаг 5, изображение 2 из 3 Fairphone 1 Motherboard Replacement, SIM and MicroSD Card: шаг 5, изображение 3 из 3
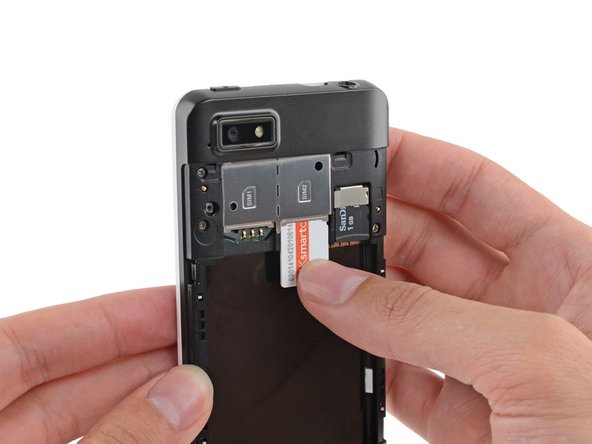
    • Use your finger to slide the SIM card straight down out of its tray.

    • Remove the SIM card from your Fairphone.

    • Repeat this procedure if you have a second SIM card.

    • Be sure to remove all SIM cards before servicing your phone.

  6. Fairphone 1 Motherboard Replacement: шаг 6, изображение 1 из 2 Fairphone 1 Motherboard Replacement: шаг 6, изображение 2 из 2
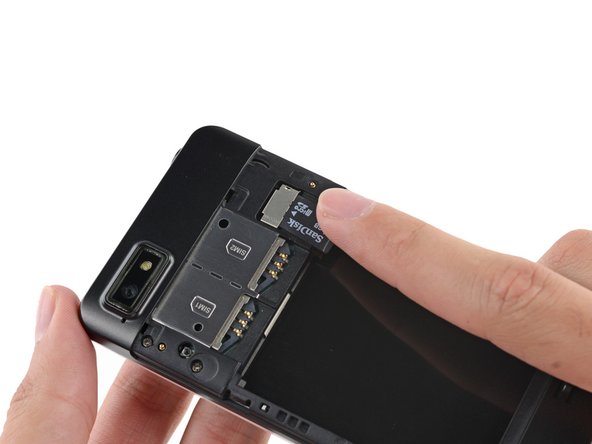
    • If you have a microSD card, use your finger to slide it straight out of its slot.

    • Remove the microSD card from your phone.

  7. Fairphone 1 Motherboard Replacement, Midframe Assembly: шаг 7, изображение 1 из 1
    • Remove the five 3.9 mm Phillips #000 screws securing the midframe to the display assembly.

  8. Fairphone 1 Motherboard Replacement: шаг 8, изображение 1 из 3 Fairphone 1 Motherboard Replacement: шаг 8, изображение 2 из 3 Fairphone 1 Motherboard Replacement: шаг 8, изображение 3 из 3
    • The midframe is secured to the display assembly by several small plastic clips.

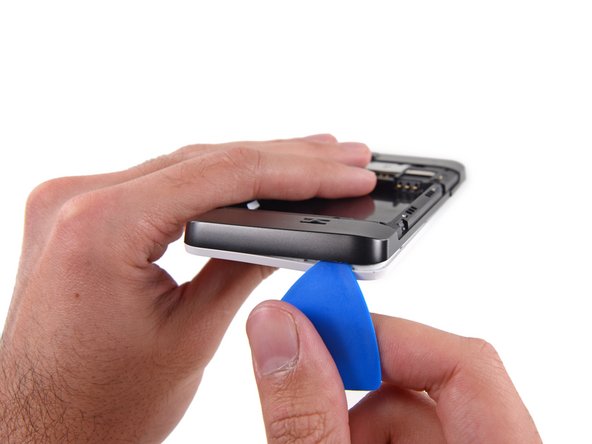
    • Use an opening pick to carefully pry the midframe away from the display assembly.

    • Start just below the volume rocker and work your way down toward the bottom of the phone, freeing the plastic clips along the side.

  9. Fairphone 1 Motherboard Replacement: шаг 9, изображение 1 из 2 Fairphone 1 Motherboard Replacement: шаг 9, изображение 2 из 2
    • Carefully round the corner, separating the midframe from the display assembly.

  10. Fairphone 1 Motherboard Replacement: шаг 10, изображение 1 из 1
    • After rounding the next corner, the midframe should be free along the bottom and the sides.

  11. Fairphone 1 Motherboard Replacement: шаг 11, изображение 1 из 3 Fairphone 1 Motherboard Replacement: шаг 11, изображение 2 из 3 Fairphone 1 Motherboard Replacement: шаг 11, изображение 3 из 3
    • Run the opening pick and pry along the top seam.

    • To avoid bending or damaging the opening picks, do not pry near to the power switch, USB port, or headphone jack.

  12. Fairphone 1 Motherboard Replacement: шаг 12, изображение 1 из 1
    • Separate any remaining clips and remove the midframe from the phone.

  13. Fairphone 1 Motherboard Replacement, Motherboard Assembly: шаг 13, изображение 1 из 3 Fairphone 1 Motherboard Replacement, Motherboard Assembly: шаг 13, изображение 2 из 3 Fairphone 1 Motherboard Replacement, Motherboard Assembly: шаг 13, изображение 3 из 3
    • Use tweezers to remove the volume rocker and power buttons from the display assembly.

    • During reassembly make sure the orientation of the buttons is correct. The rubber backings must fit into the channels in the assembly.

  14. Fairphone 1 Motherboard Replacement: шаг 14, изображение 1 из 1
    • Use the flat end of a spudger to disconnect the antenna cable connector.

    • Make sure to only disconnect the connector from its socket, and not the entire socket from the board.

  15. Fairphone 1 Motherboard Replacement: шаг 15, изображение 1 из 2 Fairphone 1 Motherboard Replacement: шаг 15, изображение 2 из 2
    • Use tweezers to remove the adhesive foam tape from the top of the digitizer cable ZIF socket.

  16. Fairphone 1 Motherboard Replacement: шаг 16, изображение 1 из 3 Fairphone 1 Motherboard Replacement: шаг 16, изображение 2 из 3 Fairphone 1 Motherboard Replacement: шаг 16, изображение 3 из 3
    • Use the tip of a spudger to flip open the tab on the digitizer ZIF connector.

    • Use tweezers to pull the digitizer cable away from its socket on the motherboard.

  17. Fairphone 1 Motherboard Replacement: шаг 17, изображение 1 из 1
    • Remove the three 2.5 mm Phillips #000 screws securing the motherboard to the display assembly.

  18. Fairphone 1 Motherboard Replacement: шаг 18, изображение 1 из 2 Fairphone 1 Motherboard Replacement: шаг 18, изображение 2 из 2
    • Do not try to remove the motherboard just yet, as it is still connected to the display assembly by the display data cable.

    • Gently lift the top end of the motherboard up to expose the display data cable.

    • The rear-facing camera may be adhered to the display assembly. Try to pry it and the motherboard up together.

  19. Fairphone 1 Motherboard Replacement: шаг 19, изображение 1 из 2 Fairphone 1 Motherboard Replacement: шаг 19, изображение 2 из 2
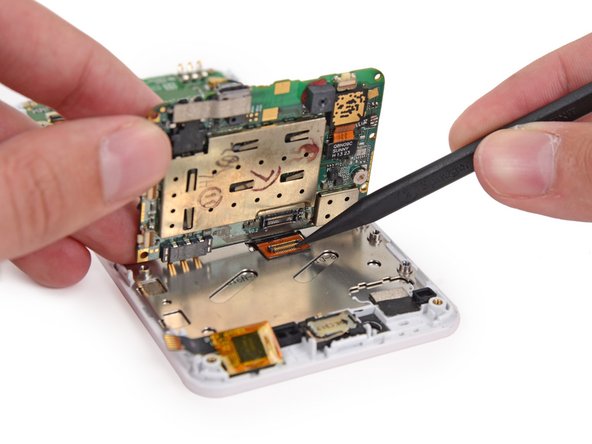
    • Use the tip of a spudger to disconnect the display data cable from the back of the motherboard.

  20. Fairphone 1 Motherboard Replacement: шаг 20, изображение 1 из 1
    • Remove the motherboard from the display assembly.

  21. Fairphone 1 Motherboard Replacement, Rear Camera: шаг 21, изображение 1 из 3 Fairphone 1 Motherboard Replacement, Rear Camera: шаг 21, изображение 2 из 3 Fairphone 1 Motherboard Replacement, Rear Camera: шаг 21, изображение 3 из 3
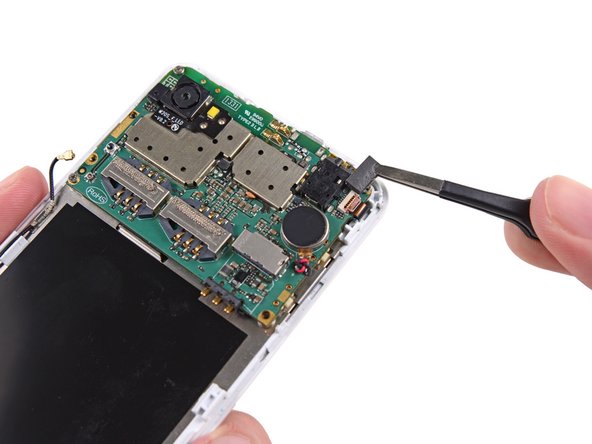
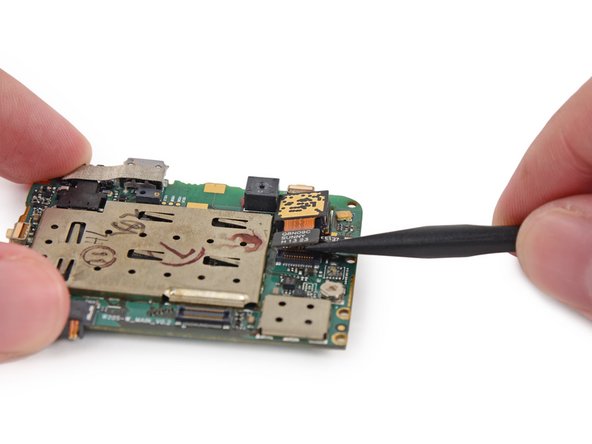
    • Use the flat end of a spudger to disconnect the rear-facing camera cable connector from its socket on the motherboard.

    • Remove the rear facing camera from the motherboard.

  22. Fairphone 1 Motherboard Replacement, Motherboard: шаг 22, изображение 1 из 1
    • Motherboard remains.

    • Remember to remove all the plastic seals of the new motherboard. You will find at least one covering the microphone for dust protection.

Заключение

To reassemble your device, follow these instructions in reverse order.

8 участников успешно повторили данное руководство.

Andrew Optimus Goldheart

Участник с: 10/17/09

502 755 Репутация

Автор 407 руководств

Команда

iFixit Участник iFixit

Staff

135 членов

Автор 16 757 руководств

Один комментарий

This is a wonderful and detailed guide - thank you. However, I followed the instructions precisely and whilst the phone now switches on perfectly, the touchscreen does not work. Thoughts on how ifixthat welcome!!

Anthe George - Ответить

Добавить комментарий

Просмотр статистики:

За последние 24часов: 1

За последние 7 дней: 4

За последние 30 дней: 16

За всё время: 9,297