Перейти к основному содержанию

Fairphone 1 Wi-Fi Antenna Daughterboard Replacement

Выберете то, что вам нужно

  1. Fairphone 1 Wi-Fi Antenna Daughterboard Replacement, Back Cover: шаг 1, изображение 1 из 3 Fairphone 1 Wi-Fi Antenna Daughterboard Replacement, Back Cover: шаг 1, изображение 2 из 3 Fairphone 1 Wi-Fi Antenna Daughterboard Replacement, Back Cover: шаг 1, изображение 3 из 3
    • There is a small indentation in the side of the phone near the bottom of the back cover.

    • With the indentation as leverage, use your fingernail to pry the bottom portion of the back cover from the phone.

  2. Fairphone 1 Wi-Fi Antenna Daughterboard Replacement: шаг 2, изображение 1 из 3 Fairphone 1 Wi-Fi Antenna Daughterboard Replacement: шаг 2, изображение 2 из 3 Fairphone 1 Wi-Fi Antenna Daughterboard Replacement: шаг 2, изображение 3 из 3
    • Slide the back cover down and remove it from the phone.

  3. Fairphone 1 Wi-Fi Antenna Daughterboard Replacement, Battery: шаг 3, изображение 1 из 3 Fairphone 1 Wi-Fi Antenna Daughterboard Replacement, Battery: шаг 3, изображение 2 из 3 Fairphone 1 Wi-Fi Antenna Daughterboard Replacement, Battery: шаг 3, изображение 3 из 3
    • There is a small indentation in the back of the phone just below the battery.

    • Use a fingernail in this indentation to push the battery toward the top of the phone

    • Pull the battery out away from the phone.

  4. Fairphone 1 Wi-Fi Antenna Daughterboard Replacement: шаг 4, изображение 1 из 1
    • Remove the battery from your Fairphone.

  5. Fairphone 1 Wi-Fi Antenna Daughterboard Replacement, SIM and MicroSD Card: шаг 5, изображение 1 из 3 Fairphone 1 Wi-Fi Antenna Daughterboard Replacement, SIM and MicroSD Card: шаг 5, изображение 2 из 3 Fairphone 1 Wi-Fi Antenna Daughterboard Replacement, SIM and MicroSD Card: шаг 5, изображение 3 из 3
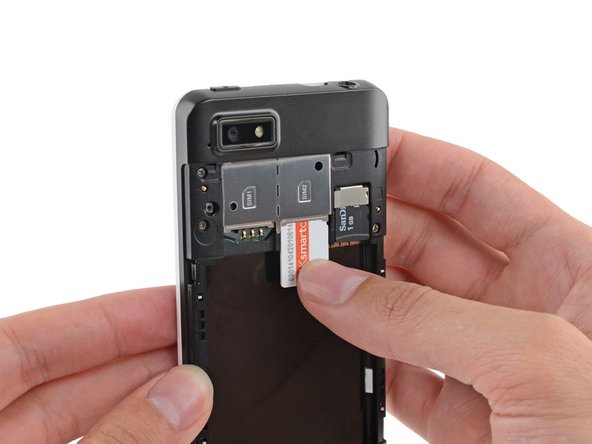
    • Use your finger to slide the SIM card straight down out of its tray.

    • Remove the SIM card from your Fairphone.

    • Repeat this procedure if you have a second SIM card.

    • Be sure to remove all SIM cards before servicing your phone.

  6. Fairphone 1 Wi-Fi Antenna Daughterboard Replacement: шаг 6, изображение 1 из 2 Fairphone 1 Wi-Fi Antenna Daughterboard Replacement: шаг 6, изображение 2 из 2
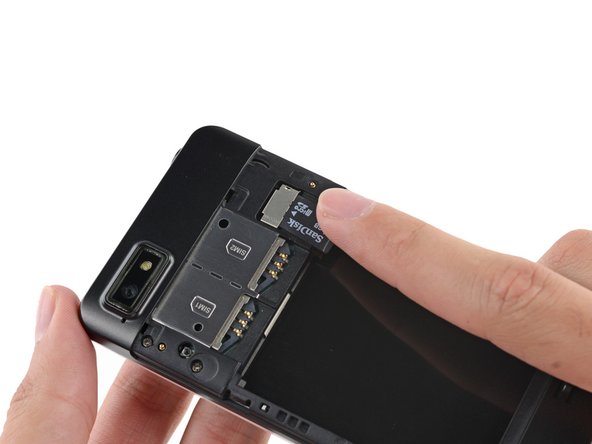
    • If you have a microSD card, use your finger to slide it straight out of its slot.

    • Remove the microSD card from your phone.

  7. Fairphone 1 Wi-Fi Antenna Daughterboard Replacement, Midframe Assembly: шаг 7, изображение 1 из 1
    • Remove the five 3.9 mm Phillips #000 screws securing the midframe to the display assembly.

    The three upper -next to the SIM blocks- screws are a bit longer that the three others. It is important to keep them like this because if not, they will not tight to the whole.

    Jaime Bosque Torrecilla - Ответить

    There are only 5 screws. I see none longer than others.

    Viktor Steiner -

    You're right, I've just done it and it's true. Thanks!

    Aiala -

  8. Fairphone 1 Wi-Fi Antenna Daughterboard Replacement: шаг 8, изображение 1 из 3 Fairphone 1 Wi-Fi Antenna Daughterboard Replacement: шаг 8, изображение 2 из 3 Fairphone 1 Wi-Fi Antenna Daughterboard Replacement: шаг 8, изображение 3 из 3
    • The midframe is secured to the display assembly by several small plastic clips.

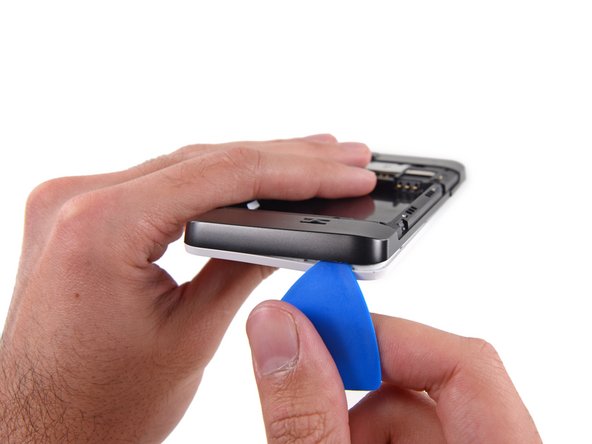
    • Use an opening pick to carefully pry the midframe away from the display assembly.

    • Start just below the volume rocker and work your way down toward the bottom of the phone, freeing the plastic clips along the side.

    No need to be TOO careful. Just remove the whole thing, no stress.

    clem - Ответить

    Some stupid person put a sticker on the fifth screw. If you can not find the fifth screw, check if there are any BLACK (yes, black) stickers on top of them. Also, which 'designer' made the first design choice for plastic clips? I WILL FIND YOU. AND KILL YOU. *!&*^#% stupidest way to affirm or secure something!

    maggelo - Ответить

    It must be done very carefully: I'd broken both white pieces. Hope has no consequences ...

    Aiala - Ответить

    You also can start from the interior (white pieces all around batterie place)

    remy.carl.fr - Ответить

  9. Fairphone 1 Wi-Fi Antenna Daughterboard Replacement: шаг 9, изображение 1 из 2 Fairphone 1 Wi-Fi Antenna Daughterboard Replacement: шаг 9, изображение 2 из 2
    • Carefully round the corner, separating the midframe from the display assembly.

  10. Fairphone 1 Wi-Fi Antenna Daughterboard Replacement: шаг 10, изображение 1 из 1
    • After rounding the next corner, the midframe should be free along the bottom and the sides.

  11. Fairphone 1 Wi-Fi Antenna Daughterboard Replacement: шаг 11, изображение 1 из 3 Fairphone 1 Wi-Fi Antenna Daughterboard Replacement: шаг 11, изображение 2 из 3 Fairphone 1 Wi-Fi Antenna Daughterboard Replacement: шаг 11, изображение 3 из 3
    • Run the opening pick and pry along the top seam.

    • To avoid bending or damaging the opening picks, do not pry near to the power switch, USB port, or headphone jack.

  12. Fairphone 1 Wi-Fi Antenna Daughterboard Replacement: шаг 12, изображение 1 из 1
    • Separate any remaining clips and remove the midframe from the phone.

  13. Fairphone 1 Wi-Fi Antenna Daughterboard Replacement, Wi-Fi Antenna Daughterboard: шаг 13, изображение 1 из 1
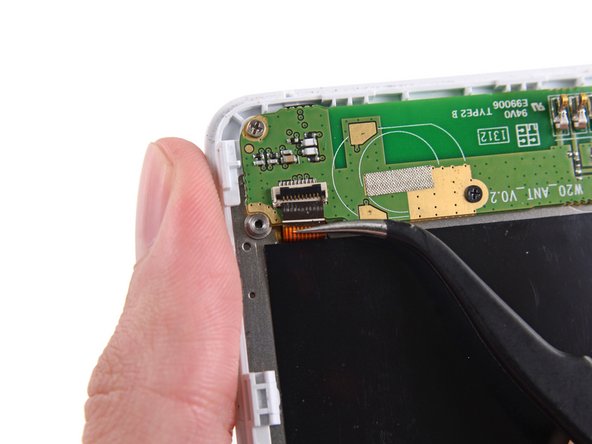
    • Use the flat end of a spudger to disconnect the antenna cable connector.

    • Be careful to pry on the connector, not the socket.

  14. Fairphone 1 Wi-Fi Antenna Daughterboard Replacement: шаг 14, изображение 1 из 3 Fairphone 1 Wi-Fi Antenna Daughterboard Replacement: шаг 14, изображение 2 из 3 Fairphone 1 Wi-Fi Antenna Daughterboard Replacement: шаг 14, изображение 3 из 3
    • Use the tip of a spudger to flip open the tab on the daughterboard data cable ZIF connector.

    • Use tweezers to pull the daughterboard data cable away from its socket.

  15. Fairphone 1 Wi-Fi Antenna Daughterboard Replacement: шаг 15, изображение 1 из 1
    • Remove the following screws securing the Wi-Fi daughterboard to the display assembly:

    • Two 2.5 mm Phillips #000 screws

    • One 1.6 mm Phillips #000 screw

    No "1.6 mm Phillips #000 screw" in my phone

    Erik Buelinckx - Ответить

    No One 1.6 mm Phillips #000 screw in Ynte's Fairphone.

    Inge - Ответить

    no one in mine either

    Koen Go - Ответить

    My Fairphone is also lacking the orange marked screw.

    Jan Boonen - Ответить

  16. Fairphone 1 Wi-Fi Antenna Daughterboard Replacement: шаг 16, изображение 1 из 2 Fairphone 1 Wi-Fi Antenna Daughterboard Replacement: шаг 16, изображение 2 из 2
    • The Wi-Fi antenna daughterboard is held to the front assembly by mild adhesive.

    • Use tweezers to gently pry the board up and remove it from the phone.

Заключение

To reassemble your device, follow these instructions in reverse order.

9 участников успешно повторили данное руководство.

Andrew Optimus Goldheart

Участник с: 10/17/09

502 855 Репутация

Автор 407 руководств

Команда

iFixit Участник iFixit

Staff

135 членов

Автор 16 817 руководств

Один комментарий

I would suggest to rename the guide to "Fairphone Wi-Fi Antenna and Microphone Daughterboard Replacement", because it is also what you need to do to replace a broken fairphone microphone.

Torsten - Ответить

Добавить комментарий

Просмотр статистики:

За последние 24часов: 1

За последние 7 дней: 4

За последние 30 дней: 12

За всё время: 12,019