Перейти к основному содержанию

Fender Starcaster Tuning Heads Replacement

Выберете то, что вам нужно

  1. Fender Starcaster Tuning Heads Replacement, Loosen the Strings: шаг 1, изображение 1 из 3 Fender Starcaster Tuning Heads Replacement, Loosen the Strings: шаг 1, изображение 2 из 3 Fender Starcaster Tuning Heads Replacement, Loosen the Strings: шаг 1, изображение 3 из 3
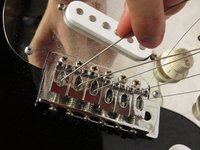
    • Start by loosening the strings. This is done by turning the tuning knob until the string has lost tension.

    • Repeat this for all six strings on the guitar.

  2. Fender Starcaster Tuning Heads Replacement, Remove the Strings from the Tuning Pegs: шаг 2, изображение 1 из 2 Fender Starcaster Tuning Heads Replacement, Remove the Strings from the Tuning Pegs: шаг 2, изображение 2 из 2
    • Be mindful of the string ends. They may be sharp and could puncture your skin.

    • It may be necessary to use pliers to remove string ends from the tuning peg.

  3. Fender Starcaster Tuning Heads Replacement, Remove the Strings from the Bridge: шаг 3, изображение 1 из 3 Fender Starcaster Tuning Heads Replacement, Remove the Strings from the Bridge: шаг 3, изображение 2 из 3 Fender Starcaster Tuning Heads Replacement, Remove the Strings from the Bridge: шаг 3, изображение 3 из 3
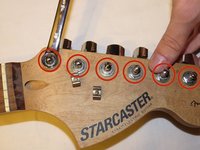
    • After removing the strings from the tuning pegs, slide the strings through the bridge and out of the back of the guitar.

    • If the twists in the string ends are in the way, use wire cutters to snip them off. This will allow the heavier strings to pass through the bridge easier.

  4. Fender Starcaster Tuning Heads Replacement, Tuning Heads: шаг 4, изображение 1 из 2 Fender Starcaster Tuning Heads Replacement, Tuning Heads: шаг 4, изображение 2 из 2
    • Using a wrench, remove the nuts around each tuning head post.

  5. Fender Starcaster Tuning Heads Replacement: шаг 5, изображение 1 из 3 Fender Starcaster Tuning Heads Replacement: шаг 5, изображение 2 из 3 Fender Starcaster Tuning Heads Replacement: шаг 5, изображение 3 из 3
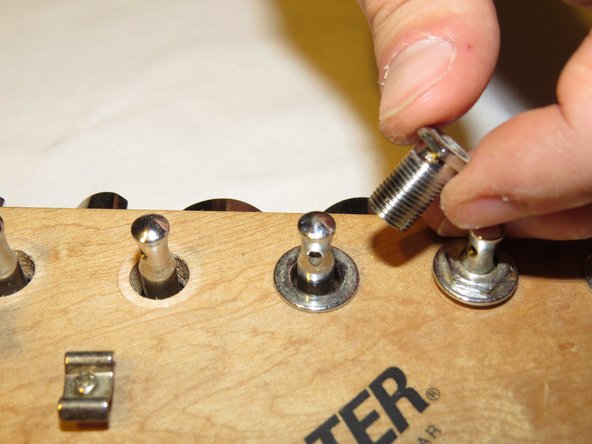
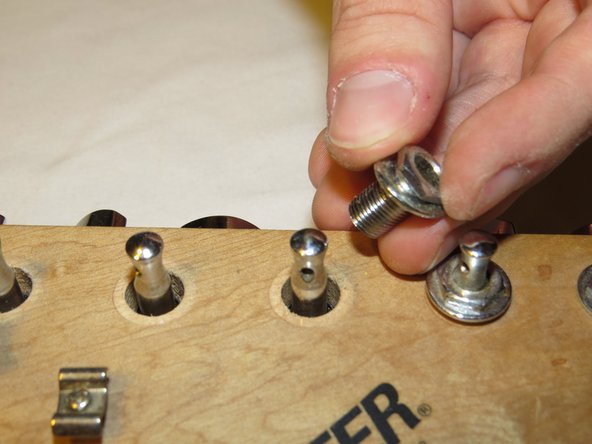
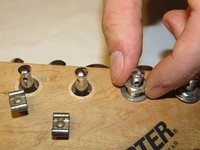
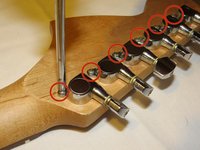
    • Next, remove the threaded retainer sleeve from each post.

    • Don't forget the washer.

  6. Fender Starcaster Tuning Heads Replacement: шаг 6, изображение 1 из 2 Fender Starcaster Tuning Heads Replacement: шаг 6, изображение 2 из 2
    • Next, remove the screws from the backside of each tuner.

  7. Fender Starcaster Tuning Heads Replacement: шаг 7, изображение 1 из 2 Fender Starcaster Tuning Heads Replacement: шаг 7, изображение 2 из 2
    • Finally, remove the tuning machine assembly from the headstock.

Заключение

To reassemble your device, follow these instructions in reverse order.

2 участников успешно повторили данное руководство.

Christopher Hartigan

Участник с: 09/10/14

164 Репутация

Автор 5 руководств

Команда

Pasco Hernando, Team 5-3, Prince Fall 2014 Участник Pasco Hernando, Team 5-3, Prince Fall 2014

PHSC-PRINCE-F14S5G3

9 членов

Автор 10 руководств

3 Комментариев

Does the 2013 Starcaster take a 10mm tuning peg?

Brian Seese - Ответить

This is only the removal. Nothing After step 7. What about the actual replacement? What did you replace them with? Did it involve any machining?

Richard Caruso - Ответить

This is only the removal. What about the actual replacement? What did you replace them with? Did it involve any machining?

Richard Caruso - Ответить

Добавить комментарий

Просмотр статистики:

За последние 24часов: 0

За последние 7 дней: 4

За последние 30 дней: 28

За всё время: 2,469