Выберете то, что вам нужно
-
-
Great collection of other T734 information: http://forum.tabletpcreview.com/threads/...
-
-
-
First remove the battery... a little tricky. Slide and press at the same time,
-
Next let's slide out the ultrabay-ish CD drive. There's a little latch on the side of the CD drive. Pull it and it should slide out. (Take out your CD drive security screw if it is installed...)
-
Unscrew and remove: Pen, WWAN cover, cooling insert, Hard drive cage, Ram cover and ram. Lay all in a safe space for the upcoming challenge.
-
-
-
Remove the 19 screws from the back panel.
-
Be sure to get the hidden screws where the CD drive was.
-
Now remove the back plastic guard. This is right behind the screen. Some careful spugging and the plastic should pop off.
-
Next remove the 3 screws uncovered by the rear guard.
-
-
-
Carefully pry up keyboard. Watch out for the keyboard/touchpad connector. After lifting the front of the keyboard off about 1/2 inches reach in and disconnect the cable.
-
Lift out keyboard/touchpad
-
-
-
-
Remove both display connectors. Be careful to flip up the latch before pulling on the cable.
-
Remove the WWAN and Wifi antennae cables.
-
Remove 2 screws holding the display assembly into the rear cover.
-
Remove display assembly and set aside.
-
Be sure to remove the ribbon cable connecting to the main board.
-
-
-
Remove this screw before removing Keyboard and top cover... Oops
-
Remove this cable
-
Remove this cable. Tiny wire for tiny speakers...
-
Remove these screws and remove the expresscard board.
-
Carefully lift up the tape around the hard drive cable. Remove cable and tape as required.
-
-
-
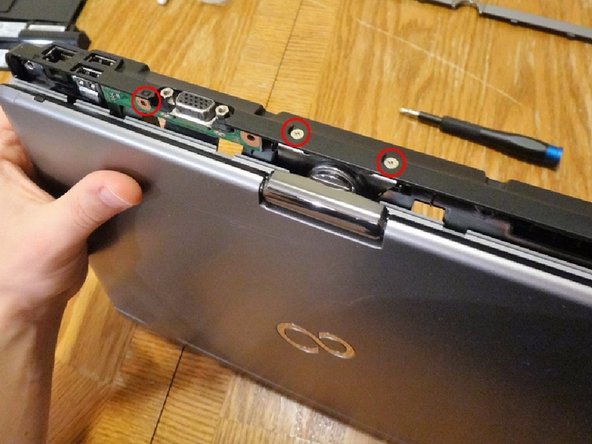
Remove the 2 hex standoffs on either side of the VGA port.
-
Disconnect/Snap off the VGA connector/board from the main board.
-
-
-
Motherboard is now free. Mostly
-
The power connected is attached under the motherboard. After loosening the board, lift it up enough to remove the power cable.
-
-
-
Photos showing the motherboard
-
Cool fan grills. Oh, make sure to disconnect the power cable and undo the 2 screws holding the fan down.
-
-
-
Loosen the 3 screws holding the head sink onto the cpu socket. Common practice is to remove and replace the thermal paste.
-
You can install any G3 socket no more than 37 watt cpu.
-


To reassemble your device, follow these instructions in reverse order.
To reassemble your device, follow these instructions in reverse order.
Отменить: Я не выполнил это руководство.
Еще один человек закончил это руководство.
Прикрепленные документы
4 Комментариев
Yes the 4712mq is a 37W part. As is the 4702mq. I would look at the forum thread in the description. But from memory I don't think anyone else has tried the 45W part. Physically you might be able to do it. (Board power delivery not with standing)
The cooling solution is only designed for 35W. Adding a full fat 45W skew would probably lead to throttling under load and/or uncomfortable temperatures on the bottom cover near the vent.
You didn't have to remove the LCD to remove the system board, but very good disassemble notes
It's for the wifi card. I don't know if the BIOS would support booting from that slot. It's worth a try. When I had this laptop I ran it with a 2.5" SATA SSD and that worked fine.