Выберете то, что вам нужно
-
-
Remove the Philips screw holding the steam oven to the cabinet.
-
The removal of the screw requires a Philips PH2 screwdriver
-
-
-
-
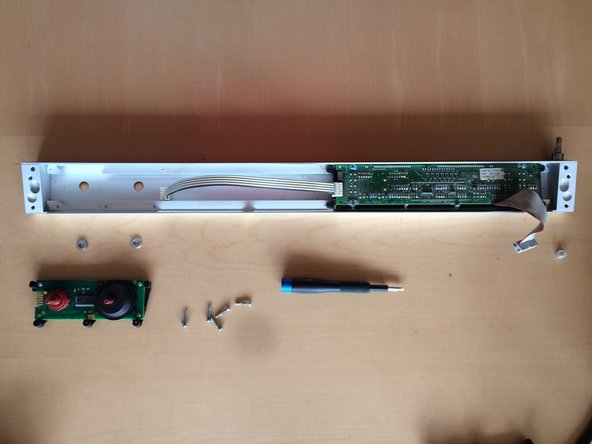
The front control panel is held in place with 4 screws (TR20) on the back of the panel. Those can sometimes be tight. (Sorry, no pictures available). The screws can either be felt or seen, depending on how far the oven was pulled out of the cabinet.
-
After removing the screws, hold the panel so that the 2 ribbon cables to the control unit do not break.
-
Remove the wide cable where it connects to the oven and the thin cable at the control panel.
-
On the door side is still a fixation, which can easily fall out! Check the last picture (blue circle)
-


Repeat the steps in reverse order to reassemble your device.
Repeat the steps in reverse order to reassemble your device.
Особая благодарность этим переводчикам:
100%


Эти переводчики помогают нам починить мир! Хотите внести свой вклад?
Начните переводить ›
Команда

7 Комментариев
Fragen: Schritt 3 : “Die Verblendung wird mit 4 Schrauben (TR20) auf der Rückseite der Verbledung gehalten. Kann etwas fest sitzen.”
Ist hier gemeint - 4 Schrauben der Blende oben und unten? Vielleicht ein Foto?
“Auf der Türseite ist noch eine Fixierung, die kann leicht rausfallen!” Was ist mit Fixierung gemeint? Wo sitzt die Fixierung und wofür ist sie erforderlich?
Hallo Udo,
danke für deinen Kommentar. Ich gehe mal auf die Punkte ein:
Schritt 3: leider sind die 4 Schrauben auf der Rückseite der Verblendung und in meinem Fall war der Dampfgarer schon bzw. noch eingebaut, weshalb es mir nicht möglich war ein Foto davon zu machen, die Kamera passt einfach nicht dazwischen. Ich weiß auch, dass die Bildqualität etwas zu wünschen lässt, aber man kann beim Bild auf den beiden Außenseiten der Verblendung 4 Löcher sehen, die werden jeweils von der Rückseite gehalten. Auf dem letzten Foto von Schritt 4 kann man es auch sehen. Man sieht die Schrauben auch sofort wenn man das Gerät etwas herauszieht.
Bzgl. der Fixierung der Tür: Das ist ein kleines Metallstück das lose in der ausgefrästen Mulde liegt und entsprechend leicht rausfallen kann. Sieht man ebenfalls auf Bild 4.2, dort liegt es unterhalb der Mulde. Ich werde das nochmal markieren.
Danke für die Hinweise, ich hoffe, die Reparatur ging trotzdem gut?
Johannes,
erst einmal vielen Dank für die Tips.
Habe aber im Moment das Problem die Außenblende/ Alu ab zu bekommen. Sitzt die wirklich so fest ?( Gerät ist eingebaut)
Habe vier Schrauben gelöst , von oben zwei ,von unten zwei.
Oder bin ich auf dem falschen Weg ?
Johannes,
habe das Problem gelöst! Bei mir waren bei den vier Schrauben, Kunststoffabdeckung darüber. Somit nicht sofort erkannt.
Aber jetzt bin ich auf einem guten Weg.
Danke
Udo
Johannes,
Nochmal Dank für die Anleitung !
Kann man den “Schalter Bedienteil rechts, Nr.: 00174722”, irgendwo preiswerter beziehen als bei Gaggenau? ( ca. 182,40 € )
Gruß
Danke, Udo