Введение
If your Game Boy Pocket does not turn on, you may need to replace the motherboard. The motherboard, the main printed circuit board (PCB), is the central hub where all the parts that make a Game Boy Pocket function meet—such as the sound, power, and visual component. A faulty motherboard can result in a loss of power and functionality in your Game Boy Pocket.
Before using this guide, make sure to test your Game Boy Pocket with fresh batteries. Doing so confirms that the motherboard is the faulty part.
Before beginning, power down your device and remove all batteries.
Выберете то, что вам нужно
-
-
Place the Game Boy Pocket face-down on a clean, flat surface.
-
Use a Y1 tri-wing screwdriver and turn counterclockwise to remove the four external screws.
-
Use a Y1 tri-wing screwdriver and turn counterclockwise to remove the two screws inside the battery compartment.
-
-
-
Place your hands on the front and back covers of the Game Boy Pocket, and carefully separate the device.
-
-
-
-
Use a Phillips #1 screwdriver and turn counterclockwise to remove the three screws on the motherboard.
-
-
-
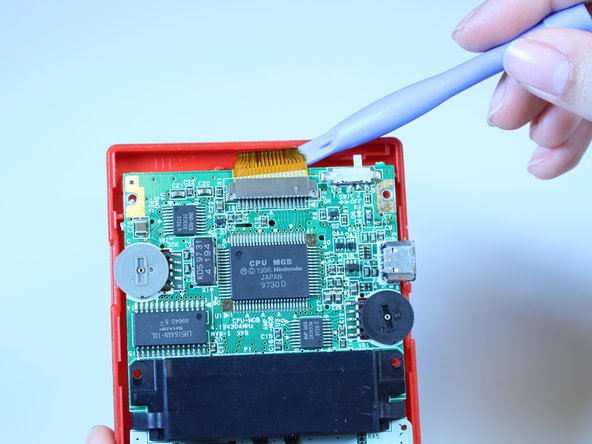
Use a plastic opening tool to dislodge and remove the clip securing the ribbon cable.
-
Make sure you apply pressure on both sides of the clip to loosen it.
-
-
-
Grab the black piece protruding from the motherboard, and lift up to remove the motherboard.
-


To reassemble your device, follow these instructions in reverse order.
To reassemble your device, follow these instructions in reverse order.
Отменить: Я не выполнил это руководство.
5 участников успешно повторили данное руководство.
Команда

USF Tampa, Team 1-1, Leahy Fall 2014 Участник USF Tampa, Team 1-1, Leahy Fall 2014
USFT-LEAHY-F14S1G1
4 членов
Автор 13 руководств