Перейти к основному содержанию

Garmin Dash Cam 20 Battery Replacement

Выберете то, что вам нужно

  1. Garmin Dash Cam 20 Battery Replacement, Internal Assembly: шаг 1, изображение 1 из 2 Garmin Dash Cam 20 Battery Replacement, Internal Assembly: шаг 1, изображение 2 из 2
    • Be sure to turn off the Dash Cam by pressing the power button.

  2. Garmin Dash Cam 20 Battery Replacement: шаг 2, изображение 1 из 2 Garmin Dash Cam 20 Battery Replacement: шаг 2, изображение 2 из 2
    • Rotate the Dash Cam to where the socket faces you.

    • Remove the 9 mm screw using the Torx T6 screwdriver.

  3. Garmin Dash Cam 20 Battery Replacement: шаг 3, изображение 1 из 2 Garmin Dash Cam 20 Battery Replacement: шаг 3, изображение 2 из 2
    • Remove the Dash Cam socket piece.

  4. Garmin Dash Cam 20 Battery Replacement: шаг 4, изображение 1 из 2 Garmin Dash Cam 20 Battery Replacement: шаг 4, изображение 2 из 2
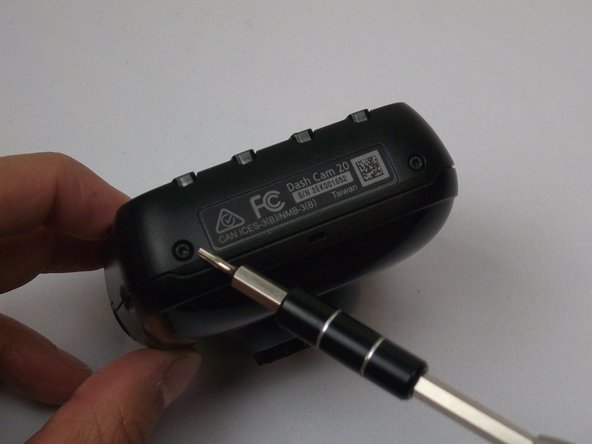
    • Rotate the Dash Cam to where the product information faces you.

    • Remove the two 5 mm screws using the Torx T5 screwdriver.

  5. Garmin Dash Cam 20 Battery Replacement: шаг 5, изображение 1 из 3 Garmin Dash Cam 20 Battery Replacement: шаг 5, изображение 2 из 3 Garmin Dash Cam 20 Battery Replacement: шаг 5, изображение 3 из 3
    • Remove top case from the bottom case.

    • The compact nature of the casing requires use of the metal spudger for needed leverage.

  6. Garmin Dash Cam 20 Battery Replacement: шаг 6, изображение 1 из 3 Garmin Dash Cam 20 Battery Replacement: шаг 6, изображение 2 из 3 Garmin Dash Cam 20 Battery Replacement: шаг 6, изображение 3 из 3
    • Remove the two 5mm screws using the Torx T5 screwdriver

    • By removing the screws, the metal battery frame will now become free from the rest of the device.

  7. Garmin Dash Cam 20 Battery Replacement, Battery: шаг 7, изображение 1 из 3 Garmin Dash Cam 20 Battery Replacement, Battery: шаг 7, изображение 2 из 3 Garmin Dash Cam 20 Battery Replacement, Battery: шаг 7, изображение 3 из 3
    • Remove the green tape overlying the pin connector with tweezers.

    • Remove the pin connector using tweezers.

    • Do not break black cord connection between motherboard and metal mount (orange circle).

  8. Garmin Dash Cam 20 Battery Replacement: шаг 8, изображение 1 из 3 Garmin Dash Cam 20 Battery Replacement: шаг 8, изображение 2 из 3 Garmin Dash Cam 20 Battery Replacement: шаг 8, изображение 3 из 3
    • This step shows the use of an incorrect tool. Only use ESD safe tools when handling the battery.

    • With the the nylon spudger, lift the battery to expose and stretch the glue. Cut the glue residue by gliding the tool from left to right.

Заключение

To reassemble your device, follow these instructions in reverse order.

3 участников успешно повторили данное руководство.

Jesse Hillman

Участник с: 10/04/16

757 Репутация

Автор 5 руководств

Команда

USF Tampa, Team 2-1, Cagle Fall 2016 Участник USF Tampa, Team 2-1, Cagle Fall 2016

USFT-CAGLE-F16S2G1

4 членов

Автор 5 руководств

3 Комментариев

An excellent article except for one major problem but, why does iFixIt not sell theses batteries or direct you on where a person could actually buy one? This knowledge is pretty much useless with out a replacement battery to actually use.

Bradley Hyman - Ответить

Thanks for this guide. This gave my Garmin 20 another couple of years! :)

BTW, I was able to buy the battery replacement from Amazon: https://www.amazon.com/gp/product/B07KSR...

pro cabales - Ответить

Добавить комментарий

Просмотр статистики:

За последние 24часов: 1

За последние 7 дней: 13

За последние 30 дней: 45

За всё время: 3,832