Перейти к основному содержанию

Garmin Nuvi 1490T Display Screen Replacement

Выберете то, что вам нужно

  1. Garmin Nuvi 1490T Display Screen Replacement, Front Frame Panel: шаг 1, изображение 1 из 1
    • Power off your GPS before moving on.

    • Locate the crevice that separates the frame from the body.

  2. Garmin Nuvi 1490T Display Screen Replacement: шаг 2, изображение 1 из 1
    • Carefully insert the plastic prying tool into the crevice to separate the frame from the body.

    • Applying excessive force can lead to a damaged or scratched display screen.

  3. Garmin Nuvi 1490T Display Screen Replacement: шаг 3, изображение 1 из 2 Garmin Nuvi 1490T Display Screen Replacement: шаг 3, изображение 2 из 2
    • Slide the plastic prying tool around the perimeter to completely remove the frame.

  4. Garmin Nuvi 1490T Display Screen Replacement, Second Frame Panel: шаг 4, изображение 1 из 3 Garmin Nuvi 1490T Display Screen Replacement, Second Frame Panel: шаг 4, изображение 2 из 3 Garmin Nuvi 1490T Display Screen Replacement, Second Frame Panel: шаг 4, изображение 3 из 3
    • Remove the four 11.0 mm screws using the Torx T5 screwdriver.

  5. Garmin Nuvi 1490T Display Screen Replacement: шаг 5, изображение 1 из 3 Garmin Nuvi 1490T Display Screen Replacement: шаг 5, изображение 2 из 3 Garmin Nuvi 1490T Display Screen Replacement: шаг 5, изображение 3 из 3
    • Using the plastic prying tool, dislodge the frame from the body of the device.

    • Using your hands, completely disconnect the frame from the body.

    • Set the pieces of the frame aside.

  6. Garmin Nuvi 1490T Display Screen Replacement, Display Screen: шаг 6, изображение 1 из 3 Garmin Nuvi 1490T Display Screen Replacement, Display Screen: шаг 6, изображение 2 из 3 Garmin Nuvi 1490T Display Screen Replacement, Display Screen: шаг 6, изображение 3 из 3
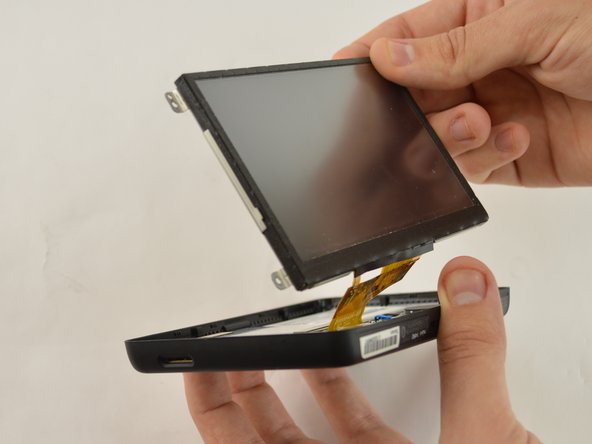
    • Gently lift up the display screen using your fingers to make sure the only thing connecting it to the body is the ribbon cable.

  7. Garmin Nuvi 1490T Display Screen Replacement: шаг 7, изображение 1 из 2 Garmin Nuvi 1490T Display Screen Replacement: шаг 7, изображение 2 из 2
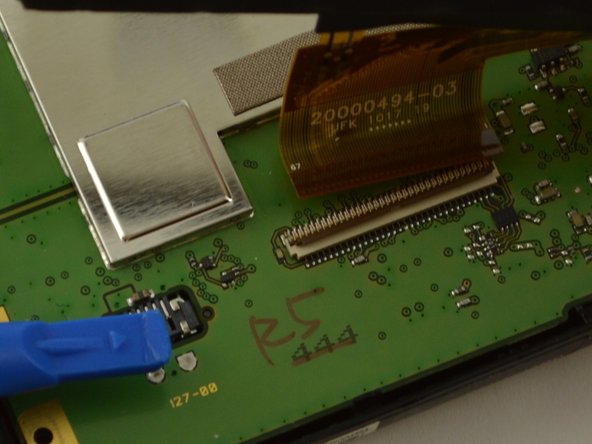
    • Remove the piece of tape that is covering the connecting point of the motherboard and display.

  8. Garmin Nuvi 1490T Display Screen Replacement: шаг 8, изображение 1 из 3 Garmin Nuvi 1490T Display Screen Replacement: шаг 8, изображение 2 из 3 Garmin Nuvi 1490T Display Screen Replacement: шаг 8, изображение 3 из 3
    • Using the plastic opening tool or your fingers, lift up the ZIF connector holding the ribbon cable in place.

    • Carefully pull the ribbon cable out of the connector with tweezers or two fingers.

    • Gently disconnect the display by pulling upward. Set display aside.

    • If the display screen does not disconnect easily, make sure the ZIF connector is no longer holding it in place.

Заключение

To reassemble your device, follow these instructions in reverse order.

5 участников успешно повторили данное руководство.

Ricardo Solis

Участник с: 01/20/16

1 037 Репутация

Автор 6 руководств

Команда

USF Tampa, Team 15-2, Remmell Spring 2016 Участник USF Tampa, Team 15-2, Remmell Spring 2016

USFT-REMMELL-S16S15G2

4 членов

Автор 6 руководств

Один комментарий

Awesome!! Thank you for putting this out there. Helped me save buying a new gps when the screen on my got damaged.

George Gearing - Ответить

Добавить комментарий

Просмотр статистики:

За последние 24часов: 0

За последние 7 дней: 2

За последние 30 дней: 7

За всё время: 2,644