Перейти к основному содержанию

Gateway NV55C49u USB Port Replacement

Выберете то, что вам нужно

  1. Gateway NV55C49u USB Port Replacement, USB Port: шаг 1, изображение 1 из 1
    • Flip the laptop bottom side up.

  2. Gateway NV55C49u USB Port Replacement: шаг 2, изображение 1 из 1
    • Slide the battery lock to show the red background.

  3. Gateway NV55C49u USB Port Replacement: шаг 3, изображение 1 из 2 Gateway NV55C49u USB Port Replacement: шаг 3, изображение 2 из 2
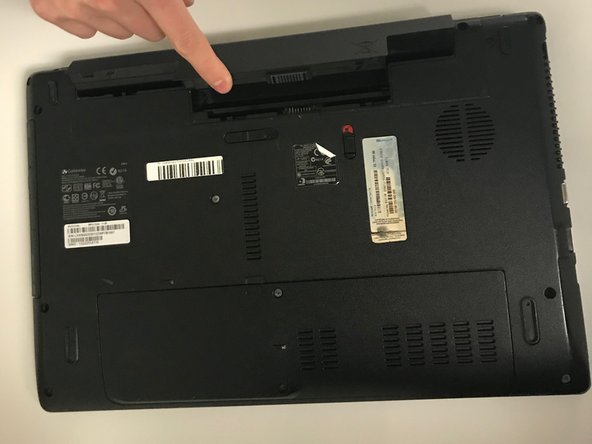
    • Push the battery slider to the other side. This will automatically eject the battery.

    • You can now remove the battery

  4. Gateway NV55C49u USB Port Replacement: шаг 4, изображение 1 из 2 Gateway NV55C49u USB Port Replacement: шаг 4, изображение 2 из 2
    • Remove the two 6.0mm Phillips #00 screws from the back cover.

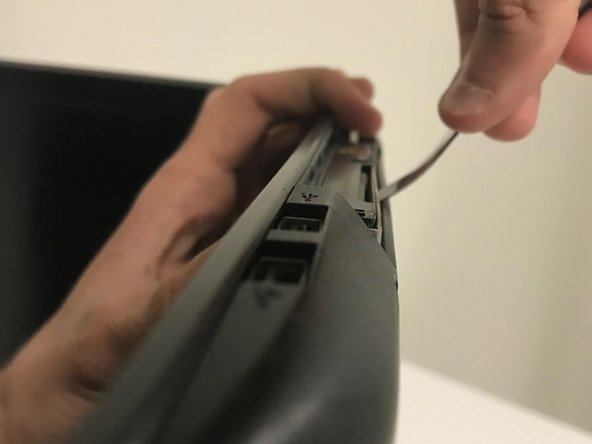
    • Remove the back cover by placing a plastic opening tool in the indention and prying upwards.

  5. Gateway NV55C49u USB Port Replacement: шаг 5, изображение 1 из 1
    • Remove all nine 6.0mm #00 Phillips screws from the back of the laptop.

  6. Gateway NV55C49u USB Port Replacement: шаг 6, изображение 1 из 1
    • Remove the four 3.0mm Phillips #0 screws from the battery compartment.

  7. Gateway NV55C49u USB Port Replacement: шаг 7, изображение 1 из 1
    • Flip the laptop over so that the cover faces you.

    • Open the laptop so you can see the keyboard.

  8. Gateway NV55C49u USB Port Replacement: шаг 8, изображение 1 из 1
    • Push in the tabs that are located around the keyboard using the triangle scalpel tool.

    • This should release the keyboard so it can be pulled up

  9. Gateway NV55C49u USB Port Replacement: шаг 9, изображение 1 из 1
    • Slowly lift up the keyboard away from the laptop.

    • Push on the sides on the black ribbon cable using 2 plastic opening tools to release it.

  10. Gateway NV55C49u USB Port Replacement: шаг 10, изображение 1 из 1
    • Remove the 3 ribbon cables that are showing using the plastic opening tools.

  11. Gateway NV55C49u USB Port Replacement: шаг 11, изображение 1 из 2 Gateway NV55C49u USB Port Replacement: шаг 11, изображение 2 из 2
    • Remove the disk drive cover on the right side of the laptop using the plastic opening tool.

    • Slide the disc drive out of its compartment, using the metal spudger.

  12. Gateway NV55C49u USB Port Replacement: шаг 12, изображение 1 из 1
    • Lift the face plate off the laptop body.

  13. Gateway NV55C49u USB Port Replacement: шаг 13, изображение 1 из 1
    • Remove the 6.0 mm Phillips #00 screw that holds in the USB port.

  14. Gateway NV55C49u USB Port Replacement: шаг 14, изображение 1 из 1
    • Push on the sides of the white ribbon cable that is attached to the motherboard using the 2 plastic opening tools to release it.

Заключение

To reassemble your device, follow these instructions in reverse order.

Micaela

Участник с: 10/16/18

329 Репутация

1 руководство автора

Команда

University of North Texas, Team S8-G1, Riccardelli Fall 2018 Участник University of North Texas, Team S8-G1, Riccardelli Fall 2018

UNT-RICCARDELLI-F18S8G1

5 членов

Автор 9 руководств

0 Комментариев

Добавить комментарий

Просмотр статистики:

За последние 24часов: 2

За последние 7 дней: 5

За последние 30 дней: 7

За всё время: 697