Введение
This repair guide was authored by the iFixit staff and hasn’t been endorsed by Google. Learn more about our repair guides here.
Use this guide to replace a cracked or broken screen on your Google Pixel 6.
Your new replacement screen will come with the fingerprint reader already attached. If not, you will need to reinstall the original fingerprint reader to your new replacement screen. If you are replacing the fingerprint reader, you will need to recalibrate the reader to maintain its functionality. If you're using an aftermarket screen and fingerprint sensor, you may encounter issues with the fingerprint recalibration tool.
If the frame is deformed, it's important to replace it to make sure the new screen will mount correctly and won’t suffer damage from uneven pressure.
If your battery is swollen, take appropriate precautions. Before disassembling your device, discharge the battery below 25%. This reduces the risk of a dangerous thermal event if the battery is accidentally damaged during the repair.
Caution: The Pixel 6 contains class 1 lasers. Disassembly could result in exposure to invisible infrared laser emissions.
Note: This guide instructs you to replace only the screen, including its safety plastic frame. However, some replacement screens for this phone come without the pre-installed frame (a.k.a. chassis), which requires a different removal procedure. Make sure you have the correct part before starting this guide.
Retaining water resistance after the repair will depend on how well you reapply the adhesive, but your device will lose its IP (Ingress Protection) rating.
Before you begin this procedure, be sure to have a set of replacement adhesives for the screen.
Выберете то, что вам нужно
-
-
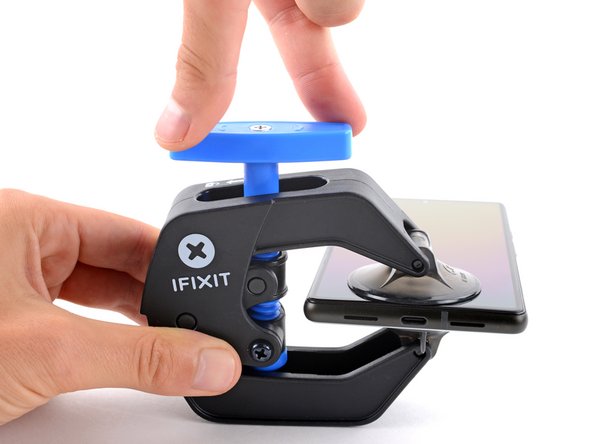
Pull the blue handle backwards to unlock the Anti-Clamp's arms.
-
Slide the arms over either the left or right edge of your phone.
-
Position the suction cups near the bottom edge of the phone—one on the front, and one on the back.
-
Squeeze the cups together to apply suction.
-
-
-
Pull the blue handle forward to lock the arms.
-
Turn the handle clockwise 360 degrees or until the cups start to stretch.
-
Make sure the suction cups remain aligned with each other. If they begin to slip out of alignment, loosen the suction cups slightly and realign the arms.
-
-
-
Heat an iOpener and thread it through the arms of the Anti-Clamp.
-
Fold the iOpener so it lays on the bottom edge of the phone.
-
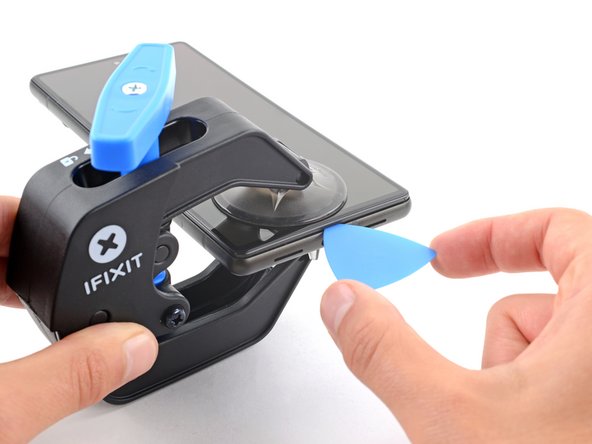
Wait one minute to give the adhesive a chance to release and present an opening gap.
-
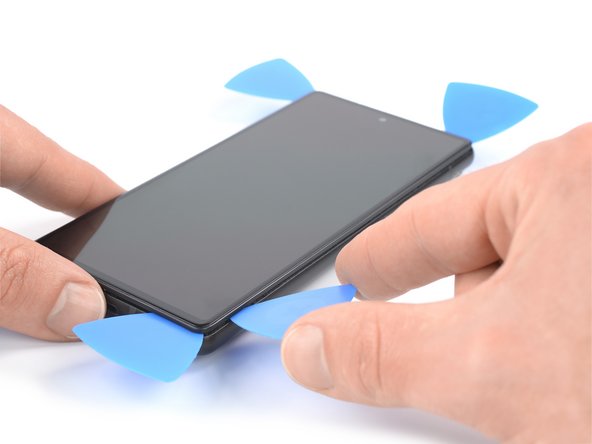
Insert an opening pick under the screen frame when the Anti-Clamp creates a large enough gap.
-
Skip the next two steps.
-
-
-
Apply a heated iOpener to the screen to loosen the adhesive underneath. Apply the iOpener for at least three minutes.
-
-
-
-
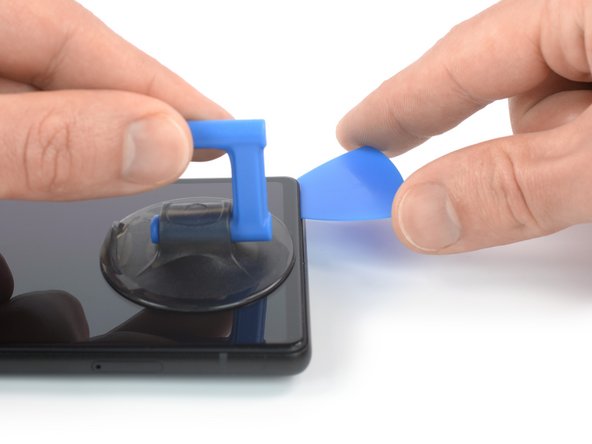
Once the screen is warm to the touch, apply a suction handle to the bottom edge of the screen.
-
Lift the screen, including its safety frame, with the suction handle to create a small gap between the screen and the phone assembly.
-
Insert an opening pick into the gap between the screen frame and the phone assembly.
-
Slide the opening pick to the bottom right corner of the screen to slice its adhesive.
-
Leave the opening pick in place to prevent the adhesive from resealing.
-
-
-
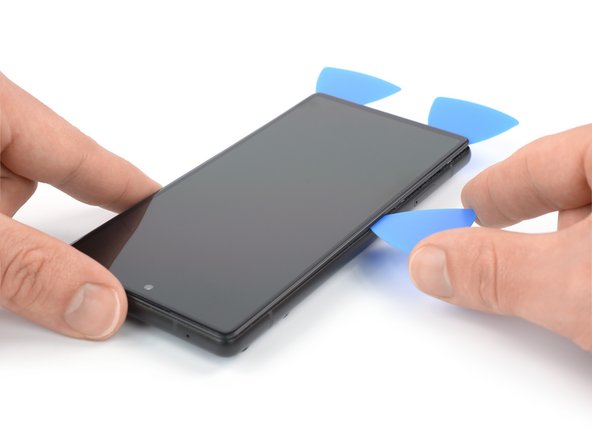
Insert a second opening pick at the bottom edge and slide it to the bottom left corner of the screen to slice the adhesive.
-
Leave the opening pick in place to prevent the adhesive from resealing.
-
-
-
The screen of the Google Pixel 6 is not only held in place by adhesive but also small plastic clips. If your opening pick gets blocked during the screen removal procedure, it means you inserted your pick too deep underneath the screen. Only insert the tip of the opening pick (3-4 mm) when slicing the display adhesive.
-
Insert a third opening pick underneath the bottom left corner of the screen.
-
Slide the opening pick along the left edge of the screen to slice the adhesive.
-
Leave the opening pick in the top left corner to prevent the adhesive from resealing.
-
-
-
Insert a fourth opening pick at the top left corner of the screen.
-
Slide the opening pick along the top edge of the phone to slice the adhesive.
-
Leave the opening pick in the top right corner to prevent the adhesive from resealing.
-
-
-
Insert a fifth opening pick and slide it along the right edge of the phone to slice the remaining adhesive.
-
-
-
Carefully open the right side of the screen to the left side of the phone assembly like you would open a book.
-
-
-
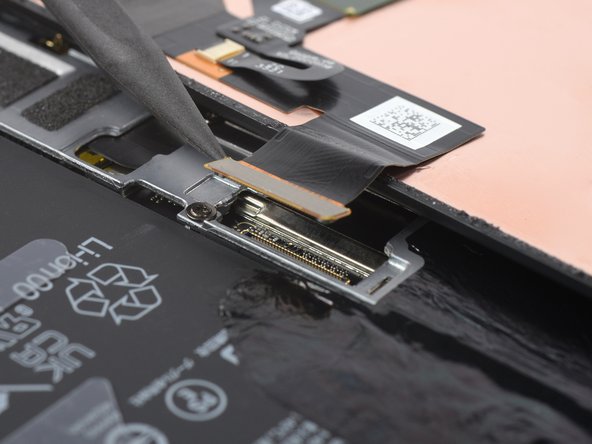
Use a pair of tweezers to carefully unhinge and remove the metal bracket sitting on top of the display cable connector.
-
-
-
Use a spudger to disconnect the display flex cable by prying the connector straight up from its socket.
-
-
-
Remove the screen.
-
If you replaced the screen, check the front-facing camera hole on the screen and remove any remaining protective liners in it.
-
This is a good point to test your phone before sealing it up. Temporarily connect your screen, power on your phone, and make sure it works as expected. Before continuing with reassembly, power off your phone and disconnect the screen.
-
Follow this guide if you're using custom-cut adhesives for your device.
-
Follow this guide if you're using a pre-cut adhesive card.
-
If you're installing a new screen, follow this guide to calibrate the fingerprint sensor.
-


If possible, turn on your device and test your repair before installing new adhesive and resealing.
To reassemble your device, follow these instructions in reverse order.
To run a diagnostics test with the built-in Pixel Diagnostic tool, click here.
Take your e-waste to an R2 or e-Stewards certified recycler.
Repair didn’t go as planned? Try some basic troubleshooting, or ask our Answers community for help.
Отменить: Я не выполнил это руководство.
127 участников успешно повторили данное руководство.


65 Комментариев
Ordered the official Google Pixel 6 display part from iFixit and followed this guide, which worked well. However, it's probably worth adding that you may need to manually calibrate the display once it's installed if the phone is throwing up fingerprint reader errors (which is what happened to me). You can do that via this tool from Google: https://pixelrepair.withgoogle.com/udfps
The guide worked great, thanks! :D
Warning to others though: Careful what you buy! The genuine display was out of stock so I bought from a different source which didn't come with a fingerprint reader or display adhesive. My fault for not paying attention when buying, but fair warning to everyone else to double check. I hadn't even considered the reader being glued to the screen but not included on replacement parts. The adhesive is an easy purchase, but not sure how hard the fingerprint reader will be. I might be back to unlocking with a pin like some kind of caveman!
Nvm, found the guide for the fingerprint reader replacement. Hopefully I can just move this one over.
Bought the screen with repair kit from iFixit. Be aware, the custom cut adhesive guide they recommend for reattaching the screen is WRONG. It says you hold the tabs to align and place the adhesive strip. That's NOT the case with the one included here. The side with the tabs actually has to be pulled off first. Had to order another one from iFixit. Now without my phone a couple days while waiting for the new part to arrive. Now without my phone for a few days waiting for the new adhesive to arrive. Not great.
For those who are not able to get the Pixel 6 detected in the "Fast Boot Mode" on the website https://pixelrepair.withgoogle.com/udfps you need to install the Driver. First and foremost on Device Manager you should see Pixel 6 or other device, and then update driver, install the driver from the downloaded w/ instructions from https://developer.android.com/studio/run.... Update Driver and point the driver to this location where you just downloaded the driver. (unzipped version). Once you are done the device gets recognized immmeidately on the Chrome Repair Website.
And one more important steps, make sure this is in Fast Mode (not safe/recovery/rescue). Second after you see successful installation on Chrome, you need to restart the Pixel 6, the automatic first restart does not work, you need to restart manually. And then go to finger print and setup again. This is very important!!