Перейти к основному содержанию

Google Pixelbook Go Back Panel Replacement

Выберете то, что вам нужно

  1. Google Pixelbook Go Back Panel Replacement, Back Panel: шаг 1, изображение 1 из 2 Google Pixelbook Go Back Panel Replacement, Back Panel: шаг 1, изображение 2 из 2
    • Flip the device so that the back is facing up.

    • Peel the rubber stoppers off the top and bottom of the device.

  2. Google Pixelbook Go Back Panel Replacement: шаг 2, изображение 1 из 2 Google Pixelbook Go Back Panel Replacement: шаг 2, изображение 2 из 2
    • Remove ten 3 mm screws from around the edge of the back panel using a T5 Torx screwdriver.

  3. Google Pixelbook Go Back Panel Replacement: шаг 3, изображение 1 из 3 Google Pixelbook Go Back Panel Replacement: шаг 3, изображение 2 из 3 Google Pixelbook Go Back Panel Replacement: шаг 3, изображение 3 из 3
    • Use an iFixit opening tool to pry up the back panel cover.

    • There is an orange ribbon cable that connects the cover to the base, so don't separate the two pieces completely.

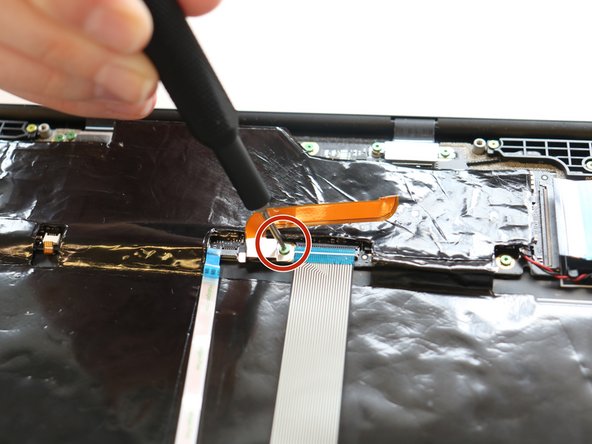
    • Remove the single 2 mm screw using a Torx T3 screwdriver.

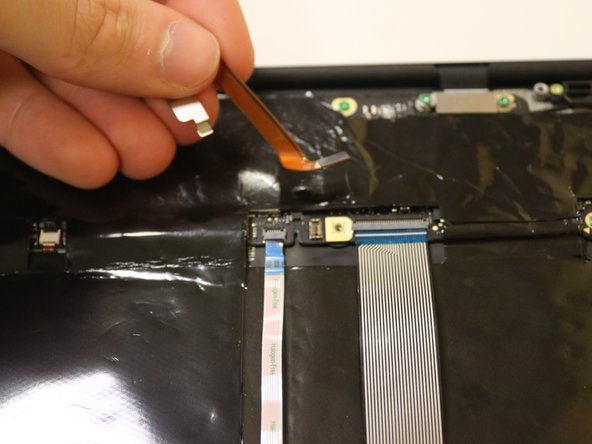
    • Disconnect the orange cable from the base of the device.

  4. Google Pixelbook Go Back Panel Replacement: шаг 4, изображение 1 из 1
    • Insert wisdom here.

Заключение

To reassemble your device, follow these instructions in reverse order.

Kristen Gismondi

Участник с: 11/12/14

82 689 Репутация

Автор 202 руководств

Команда

iFixit Участник iFixit

Staff

136 членов

Автор 17 420 руководств

0 Комментариев

Добавить комментарий

Просмотр статистики:

За последние 24часов: 0

За последние 7 дней: 8

За последние 30 дней: 26

За всё время: 429