Перейти к основному содержанию

HP 15-ay103dx Display Screen Hinges Replacement

Выберете то, что вам нужно

  1. HP 15-ay103dx Display Screen Hinges Replacement, Battery: шаг 1, изображение 1 из 1
    • Slide the two battery lock latches on the back of the device to the “unlock” position.

  2. HP 15-ay103dx Display Screen Hinges Replacement: шаг 2, изображение 1 из 1
    • Lift the battery upward to remove it from the device.

  3. HP 15-ay103dx Display Screen Hinges Replacement, Back Panel: шаг 3, изображение 1 из 1
    • Using the PH1 phillips-head screwdriver, remove all the 5/16 in. screws from the back of the device.

    • There should be 10 in total, be sure to keep them together!

  4. HP 15-ay103dx Display Screen Hinges Replacement: шаг 4, изображение 1 из 1
    • Locate the optical disc drive and remove it from the device by sliding it straight of the device.

  5. HP 15-ay103dx Display Screen Hinges Replacement: шаг 5, изображение 1 из 2 HP 15-ay103dx Display Screen Hinges Replacement: шаг 5, изображение 2 из 2
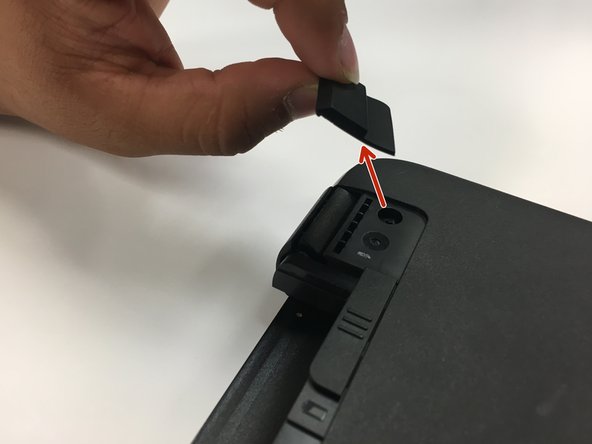
    • Covering the hinges of the device are rubber bumpers secured to the device using adhesive. Remove them carefully.

    • Place the adhesive side up as you will need to place them back after your replacement is complete.

  6. HP 15-ay103dx Display Screen Hinges Replacement: шаг 6, изображение 1 из 2 HP 15-ay103dx Display Screen Hinges Replacement: шаг 6, изображение 2 из 2
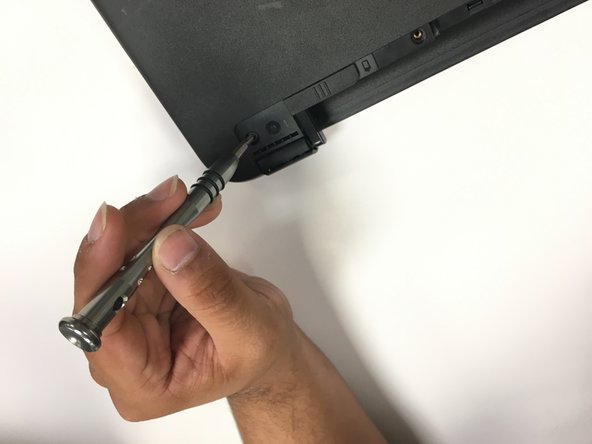
    • In the same spot you’ve just removed the bumpers from, you will find two 5/16 in. screws. Using the same Phillips-head screwdriver used in step 2, remove the screws

    • Be sure to keep the screws together!

  7. HP 15-ay103dx Display Screen Hinges Replacement: шаг 7, изображение 1 из 1
    • Carefully remove the back panel from the device.

    • If you are unable to do this with your hands, you can use a thin prying tool of your choice to make it easier!

  8. HP 15-ay103dx Display Screen Hinges Replacement, Display Screen Hinges: шаг 8, изображение 1 из 2 HP 15-ay103dx Display Screen Hinges Replacement, Display Screen Hinges: шаг 8, изображение 2 из 2
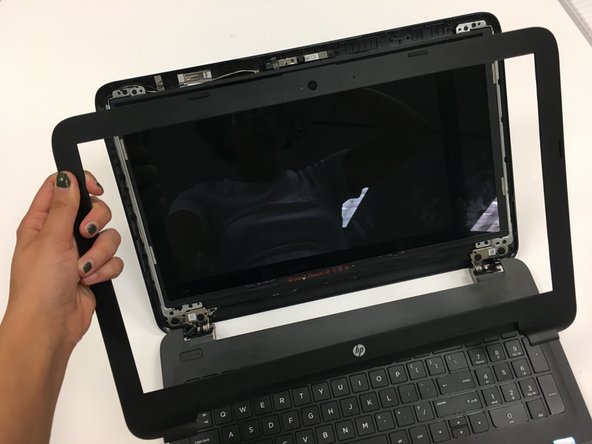
    • Use a spudger to carefully remove the border around the display screen.

    • As long as you are slow and delicate, the border will eventually come off.

  9. HP 15-ay103dx Display Screen Hinges Replacement: шаг 9, изображение 1 из 2 HP 15-ay103dx Display Screen Hinges Replacement: шаг 9, изображение 2 из 2
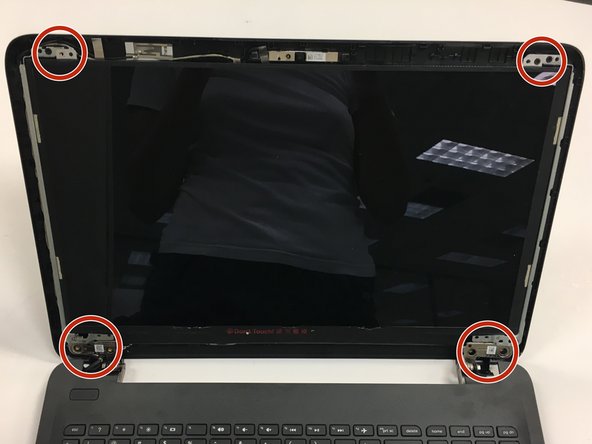
    • Remove the two 5/16 screws in the top corners and the four in the bottom corners.

  10. HP 15-ay103dx Display Screen Hinges Replacement: шаг 10, изображение 1 из 1
    • Carefully pull the screen from the hinges and lower it on to the table.

    • There will be wires running from the screen to the motherboard. You do not need to unplug these.

    • The hinges are made of malleable metal and are easily bent.

  11. HP 15-ay103dx Display Screen Hinges Replacement: шаг 11, изображение 1 из 1
    • Remove the 5/16 screws securing the hinges to the computer.

Заключение

To reassemble your device, follow these instructions in reverse order.

Еще один человек закончил это руководство.

Kody Franklin

Участник с: 09/25/17

131 Репутация

1 руководство автора

Команда

University of North Texas, Team S3-G3, Thompson Fall 2017 Участник University of North Texas, Team S3-G3, Thompson Fall 2017

UNT-THOMPSON-F17S3G3

4 членов

Автор 6 руководств

0 Комментариев

Добавить комментарий

Просмотр статистики:

За последние 24часов: 0

За последние 7 дней: 2

За последние 30 дней: 4

За всё время: 757