Перейти к основному содержанию

HP 7 1800 Motherboard Replacement

Выберете то, что вам нужно

  1. HP 7 1800 Motherboard Replacement, Remove the back panel: шаг 1, изображение 1 из 2 HP 7 1800 Motherboard Replacement, Remove the back panel: шаг 1, изображение 2 из 2
    • Carefully insert a Spudger into one of the corners of the tablet.

    • Slide the Spudger along the edge popping the tabs out along the way.

    • Be careful not to break the tabs.

  2. HP 7 1800 Motherboard Replacement, Remove the battery: шаг 2, изображение 1 из 3 HP 7 1800 Motherboard Replacement, Remove the battery: шаг 2, изображение 2 из 3 HP 7 1800 Motherboard Replacement, Remove the battery: шаг 2, изображение 3 из 3
    • Slide the Spudger under the battery to lift it off the adhesive.

    • Gently pull the cable connection from the motherboard using tweezers.

  3. HP 7 1800 Motherboard Replacement, Remove the large ribbon cable: шаг 3, изображение 1 из 2 HP 7 1800 Motherboard Replacement, Remove the large ribbon cable: шаг 3, изображение 2 из 2
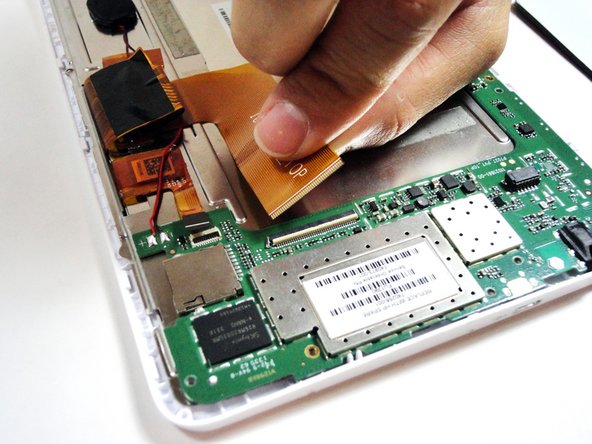
    • Remove the larger ribbon cable by gently flipping the beige latch and pulling it out with tweezers.

  4. HP 7 1800 Motherboard Replacement, Remove the smaller ribbon cable: шаг 4, изображение 1 из 2 HP 7 1800 Motherboard Replacement, Remove the smaller ribbon cable: шаг 4, изображение 2 из 2
    • Remove the smaller ribbon cable by gently flipping the black latch and pulling it out with tweezers.

  5. HP 7 1800 Motherboard Replacement, Unscrew the 7 silver screws from the logic board: шаг 5, изображение 1 из 1
    • Remove the following 7 screws:

    • Six 4.17mm Phillips #00 around the motherboard.

    • One 2.67mm Phillips #00 next to the front facing camera.

    • The 2.67mm screw circled in yellow is notably shorter than the other 6 screws circled in red.

  6. HP 7 1800 Motherboard Replacement, Unplug the front facing camera from the logic board: шаг 6, изображение 1 из 1
    • Gently pry the front facing camera plug up and off of the motherboard.

  7. HP 7 1800 Motherboard Replacement, Remove the logic board: шаг 7, изображение 1 из 1
    • Carefully lift the motherboard directly up.

Заключение

To reassemble your device, follow these instructions in reverse order.

TMD

Участник с: 01/21/15

765 Репутация

Автор 5 руководств

Команда

USF Tampa, Team 4-1, Brown Winter 2015 Участник USF Tampa, Team 4-1, Brown Winter 2015

USFT-BROWN-W15S4G1

4 членов

Автор 14 руководств

Один комментарий

After replacing the motherboard, will is act as a brand new tablet upon next boot? Will the OS and everything already be installed? Or is the main memory module elsewhere in the tablet?

jakehittinger - Ответить

Добавить комментарий

Просмотр статистики:

За последние 24часов: 0

За последние 7 дней: 6

За последние 30 дней: 7

За всё время: 931