Введение
This is a replacement guide for the HP Chromebook 11 G5 motherboard. The main purpose of the steps below is to show you how to replace the motherboard. The motherboard connects many other essential components necessary to operate the device. Symptoms of a defective motherboard include being unable to power the device while it is plugged in to charge and displaying a distorted image even when connected to an external monitor. If these steps are followed carefully and correctly the motherboard should be easily replaced. Be sure to power off your device before beginning the replacement process.
Выберете то, что вам нужно
-
-
Remove four large rubber pads from the bottom of the device to reveal screws using the pointed end of a spudger.
-
-
-
Remove two smaller rubber pads from the bottom of the device to reveal screws using the pointed end of a spudger.
-
-
-
Wedge the flat-end of a metal spudger between the base of the device and the keyboard assembly while applying downward pressure. Slide the spudger across the entirety of the gap until the two components separate.
-
-
-
-
Disconnect the two ribbon cables connected to the motherboard by using the pointed end of a spudger to lift the plastic connector lids to allow the ribbon cables to be gently removed by hand.
-
-
-
Remove the 4mm screw from the Wi-Fi card using a Phillips #00 screwdriver.
-
-
-
Remove the two wires from the top of the Wi-Fi card by gently pushing them away from the sockets they are connected to using the pointed end of a spudger.
-
The Wi-Fi card can now be removed from the base of the device by hand.
-
-
-
Release the ribbon cable connecting the motherboard to the Hall effect sensor by lifting the plastic connector lid using the pointed end of a spudger.
-
You can now remove the ribbon cable from the motherboard by gently pulling it with your hand.
-
-
-
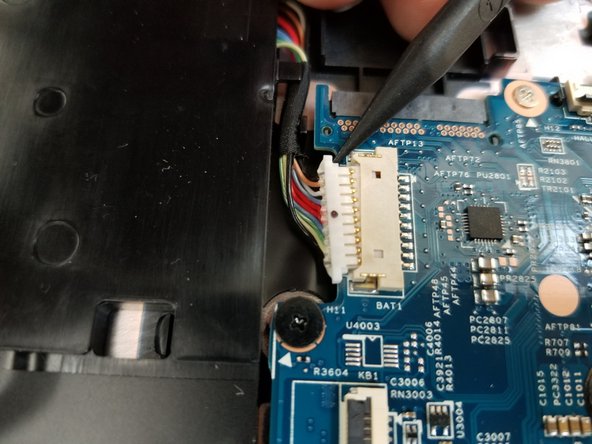
Remove the battery connector by pushing both ends away from the motherboard one at a time using the pointed end of a spudger.
-
-
-
Disconnect the right-side speaker by pushing both ends of the connector away from the motherboard one at a time using the pointed end of a spudger.
-
-
-
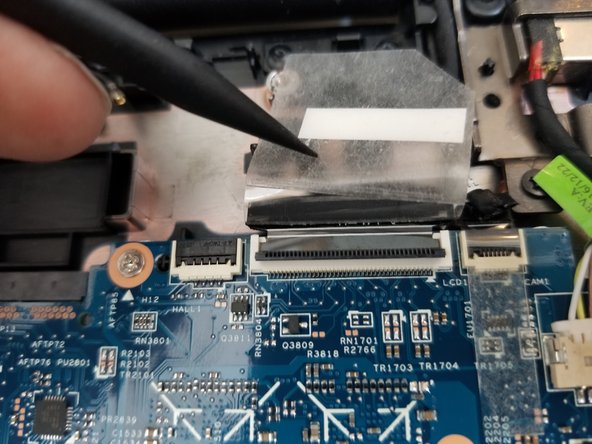
Peel the tape over the display cable before lifting the plastic connector lid holding it in place by using the pointed end of a spudger.
-
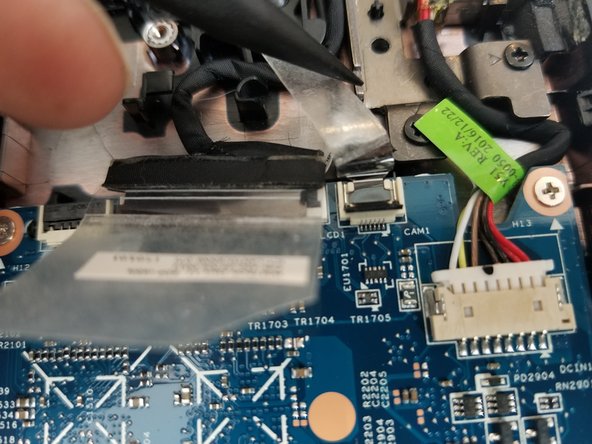
Remove the cable by gently pulling it with your hand.
-
-
-
Peel the tape over the camera connector before lifting the plastic connector lid holding it in place by using the pointed end of a spudger.
-
Remove the cable by gently pulling it with your hand.
-
-
-
Remove the charging port connector by pulling both ends away from the motherboard using your fingers.
-
-
-
Remove the five 4mm screws from the motherboard using a Phillips #00 screwdriver.
-


To reassemble your device, follow these instructions in reverse order.
To reassemble your device, follow these instructions in reverse order.
Отменить: Я не выполнил это руководство.
2 участников успешно повторили данное руководство.
Команда

York University, Team S1-G3, Woodhouse Winter 2020 Участник York University, Team S1-G3, Woodhouse Winter 2020
YORK-WOODHOUSE-W20S1G3
3 членов
Автор 5 руководств