Перейти к основному содержанию

HP Chromebook 14-Q010DX Hard drive Replacement

Выберете то, что вам нужно

  1. HP Chromebook 14-Q010DX Hard drive Replacement, Keyboard and Touchpad: шаг 1, изображение 1 из 2 HP Chromebook 14-Q010DX Hard drive Replacement, Keyboard and Touchpad: шаг 1, изображение 2 из 2
    • Flip the laptop with the base of the laptop is facing you.

    • Using the #00 screwdriver, unscrew these screws.

  2. HP Chromebook 14-Q010DX Hard drive Replacement: шаг 2, изображение 1 из 3 HP Chromebook 14-Q010DX Hard drive Replacement: шаг 2, изображение 2 из 3 HP Chromebook 14-Q010DX Hard drive Replacement: шаг 2, изображение 3 из 3
    • Warning! When prying open a laptop it could require some force, but it also has fragile connectors underneath. Use caution so as to avoid breaking these connectors.

    • Start from the top right corner of the laptop and work clockwise with an iFixit opening tool or spudger to pry the keyboard from the frame of the laptop.

  3. HP Chromebook 14-Q010DX Hard drive Replacement: шаг 3, изображение 1 из 3 HP Chromebook 14-Q010DX Hard drive Replacement: шаг 3, изображение 2 из 3 HP Chromebook 14-Q010DX Hard drive Replacement: шаг 3, изображение 3 из 3
    • Warning! Handle the flaps and ribbon cables with care to prevent damage.

    • Gently pull the keyboard in the opposite direction of the screen, so the wires beneath are exposed.

    • Lift the black flap and pull the blue ribbon gently towards you until it is disconnected.

    • Lift the white flap and pull the blue ribbon towards you until it is disconnected.

  4. HP Chromebook 14-Q010DX Hard drive Replacement: шаг 4, изображение 1 из 1
    • Lift keyboard slightly and remove the strip gently to prevent damaging any parts.

    • The tape has no function other than to keep the wire tucked away.

  5. HP Chromebook 14-Q010DX Hard drive Replacement: шаг 5, изображение 1 из 1
    • Set aside the detached keyboard.

  6. HP Chromebook 14-Q010DX Hard drive Replacement, Speaker: шаг 6, изображение 1 из 3 HP Chromebook 14-Q010DX Hard drive Replacement, Speaker: шаг 6, изображение 2 из 3 HP Chromebook 14-Q010DX Hard drive Replacement, Speaker: шаг 6, изображение 3 из 3
    • Undo the black tape located on the bottom from the frame of the laptop.

    • The tape has no function other than to keep the wire tucked away.

    • Using fingers or the spudger, slide out the black connector indicated on the left.

    • Use a #00 screwdriver to remove the two screws.

  7. HP Chromebook 14-Q010DX Hard drive Replacement: шаг 7, изображение 1 из 2 HP Chromebook 14-Q010DX Hard drive Replacement: шаг 7, изображение 2 из 2
    • Gently remove the speakers.

  8. HP Chromebook 14-Q010DX Hard drive Replacement, Battery: шаг 8, изображение 1 из 2 HP Chromebook 14-Q010DX Hard drive Replacement, Battery: шаг 8, изображение 2 из 2
    • Note the shape that this wire strip is resting at and that the blue tip of the strip goes into the right connector for reassembly.

    • Lift the black flaps and gently pull the strip out.

    • Set the strip aside.
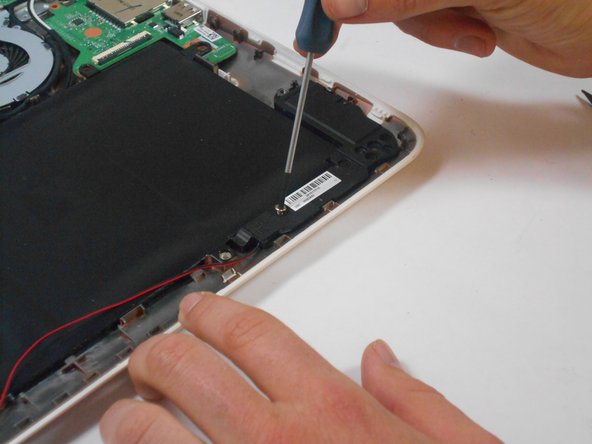
  9. HP Chromebook 14-Q010DX Hard drive Replacement: шаг 9, изображение 1 из 3 HP Chromebook 14-Q010DX Hard drive Replacement: шаг 9, изображение 2 из 3 HP Chromebook 14-Q010DX Hard drive Replacement: шаг 9, изображение 3 из 3
    • Remove the screw.

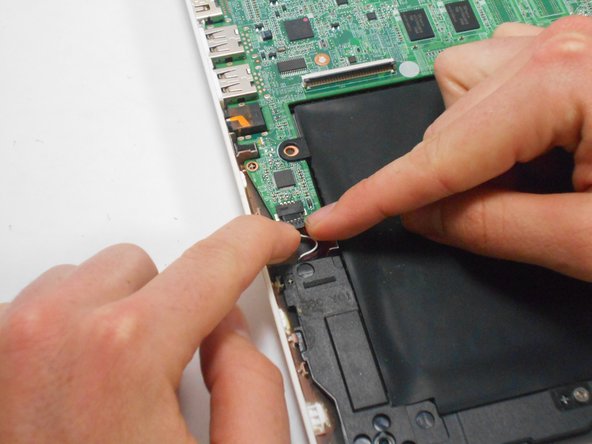
    • Use your fingers to pull the white tab out of the black slot above the battery.

  10. HP Chromebook 14-Q010DX Hard drive Replacement: шаг 10, изображение 1 из 1
    • Gently remove battery.

  11. HP Chromebook 14-Q010DX Hard drive Replacement, Bluetooth and Wireless Card: шаг 11, изображение 1 из 2 HP Chromebook 14-Q010DX Hard drive Replacement, Bluetooth and Wireless Card: шаг 11, изображение 2 из 2
    • Using a spudger, remove the white and black cables from the card.

  12. HP Chromebook 14-Q010DX Hard drive Replacement: шаг 12, изображение 1 из 2 HP Chromebook 14-Q010DX Hard drive Replacement: шаг 12, изображение 2 из 2
    • Remove screw from card.

  13. HP Chromebook 14-Q010DX Hard drive Replacement: шаг 13, изображение 1 из 1
    • Gently pull card at a 45° angle to remove it.

  14. HP Chromebook 14-Q010DX Hard drive Replacement, USB/SD card: шаг 14, изображение 1 из 2 HP Chromebook 14-Q010DX Hard drive Replacement, USB/SD card: шаг 14, изображение 2 из 2
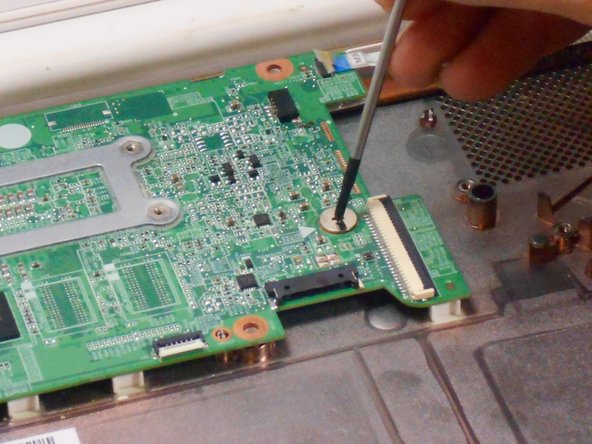
    • Remove screw indicated by the red circle at the top of the card port.

  15. HP Chromebook 14-Q010DX Hard drive Replacement: шаг 15, изображение 1 из 1
    • Gently remove the USB/SD card port.

  16. HP Chromebook 14-Q010DX Hard drive Replacement, Fan: шаг 16, изображение 1 из 3 HP Chromebook 14-Q010DX Hard drive Replacement, Fan: шаг 16, изображение 2 из 3 HP Chromebook 14-Q010DX Hard drive Replacement, Fan: шаг 16, изображение 3 из 3
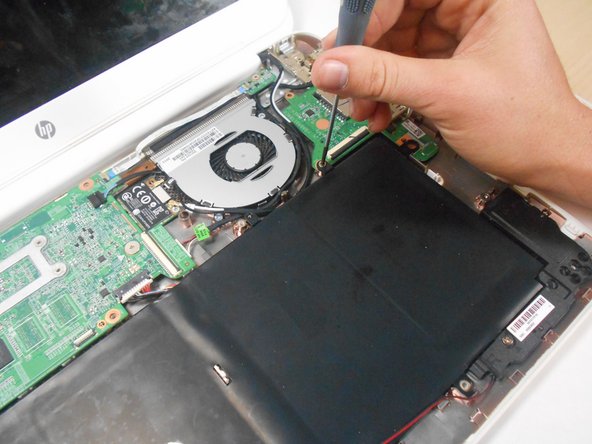
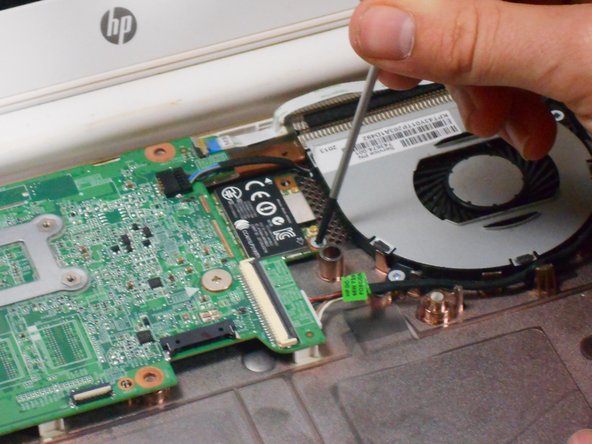
    • Remove the 3 screws around the fan.

    • Using your fingers or the spudger, disconnect the cable connecting the fan to the motherboard.

  17. HP Chromebook 14-Q010DX Hard drive Replacement: шаг 17, изображение 1 из 1
    • Gently remove fan.

  18. HP Chromebook 14-Q010DX Hard drive Replacement, Motherboard: шаг 18, изображение 1 из 2 HP Chromebook 14-Q010DX Hard drive Replacement, Motherboard: шаг 18, изображение 2 из 2
    • Using your fingers or spudger, pull out the connector.

  19. HP Chromebook 14-Q010DX Hard drive Replacement: шаг 19, изображение 1 из 3 HP Chromebook 14-Q010DX Hard drive Replacement: шаг 19, изображение 2 из 3 HP Chromebook 14-Q010DX Hard drive Replacement: шаг 19, изображение 3 из 3
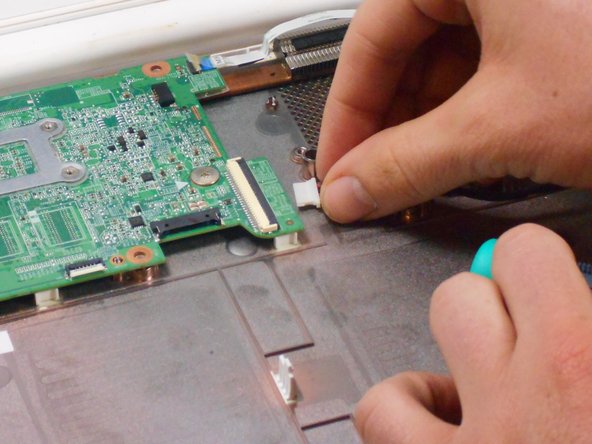
    • Remove all of the indicated screws.

    • Pull up on black strip to remove the monitor cord.

  20. HP Chromebook 14-Q010DX Hard drive Replacement: шаг 20, изображение 1 из 1
    • Gently remove motherboard.

  21. HP Chromebook 14-Q010DX Hard drive Replacement, Hard drive: шаг 21, изображение 1 из 1
    • Flip motherboard over.

  22. HP Chromebook 14-Q010DX Hard drive Replacement: шаг 22, изображение 1 из 1
    • Remove the screw indicated by the red circle.

  23. HP Chromebook 14-Q010DX Hard drive Replacement: шаг 23, изображение 1 из 1
    • Remove the hard drive by pulling the device from the black slot.

Заключение

To reassemble your device, follow these instructions in reverse order.

13 участников успешно повторили данное руководство.

Kevin Piper

Участник с: 01/16/15

1 587 Репутация

Автор 6 руководств

Команда

USF Tampa, Team 17-2, Watkins Winter 2015 Участник USF Tampa, Team 17-2, Watkins Winter 2015

USFT-WATKINS-W15S17G2

4 членов

Автор 8 руководств

3 Комментариев

Thanks so much for your clearly , detailed and easy to follow guide, nice job!

pedro munoz - Ответить

Buenas tarde y despuesnde quitar el disco duro que se hace se cambia por otro igual o que modelo

chaffa_45 - Ответить

Can you add more storage on the HP Chromebook 14 SMB about 500GB. I also want to know if the Chromebook can run Windows 10 without any problems.

Fire Alarm Collector - Ответить

Добавить комментарий

Просмотр статистики:

За последние 24часов: 2

За последние 7 дней: 23

За последние 30 дней: 99

За всё время: 20,513