Эта версия возможно содержит некорректные исправления. Переключить на последнюю проверенную версию.
Выберете то, что вам нужно
-
Этот шаг не переведен. Помогите перевести
-
Open the front access panel by placing your finger in the front slot and pulling gently.
-
-
Этот шаг не переведен. Помогите перевести
-
Open the protective lid that is covering the glass. Press gently against the base of the panel to remove the lid from the rest of the printer.
-
-
Этот шаг не переведен. Помогите перевести
-
Carefully lift the top panel off of the printer.
-
Do not tear or damage the two cables that connect the top lid to the motherboard.
-
-
Этот шаг не переведен. Помогите перевести
-
Remove the two cables by gripping each one close to their connection ports on the motherboard and gently disconnecting them.
-
-
-
Этот шаг не переведен. Помогите перевести
-
Detach the white ribbon cable.
-
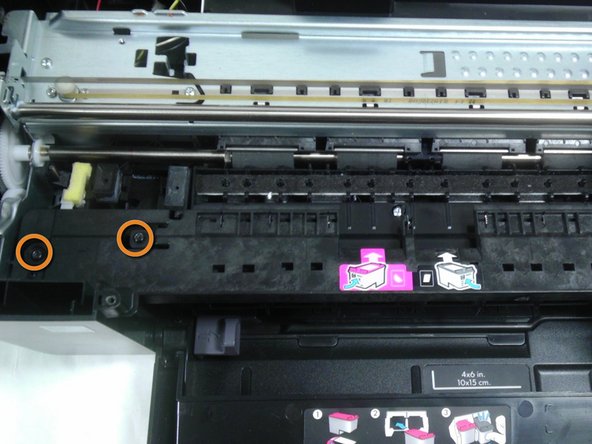
Remove the two 9mm Torx screws on either side of the white bracket.
-
-
Этот шаг не переведен. Помогите перевести
-
Remove the three black 9mm Torx screws and pull the black panel out from under the ink carriage.
-
-
Этот шаг не переведен. Помогите перевести
-
Remove the five 9mm Torx screws on the silver panel.
-
Pull out the silver panel.
-
-
Этот шаг не переведен. Помогите перевести
-
Remove the green & yellow cable and the black & white cable.
-
-
Этот шаг не переведен. Помогите перевести
-
Turn the printer over.
-
Locate the gap at the bottom corner near the product information sticker.
-
Reach a flat head screwdriver inside the gap and unlatch the silver tab.
-
-
Этот шаг не переведен. Помогите перевести
-
Remove the two 9mm Torx screws in order to detach the roller assembly from the system.
-


Отменить: Я не выполнил это руководство.
7 участников успешно повторили данное руководство.
Команда

Cal Poly, Team 18-35, Regan Winter 2013 Участник Cal Poly, Team 18-35, Regan Winter 2013
CPSU-REGAN-W13S18G35
5 членов
Автор 15 руководств