Эта версия возможно содержит некорректные исправления. Переключить на последнюю проверенную версию.
Выберете то, что вам нужно
-
Этот шаг не переведен. Помогите перевести
-
On the back of the computer, slide the left switch towards the outside of the laptop until you hear a click.
-
-
Этот шаг не переведен. Помогите перевести
-
Slide the battery away from the switches until it can be lifted away from the laptop.
-
Lift the battery away from the laptop.
-
-
Этот шаг не переведен. Помогите перевести
-
On the back of the laptop, slide the right switch toward the outside of the laptop until you hear a click.
-
-
Этот шаг не переведен. Помогите перевести
-
Slide the back shell of the laptop away from the switches until it can be lifted up.
-
Lift the shell straight up.
-
-
-
Этот шаг не переведен. Помогите перевести
-
Using a Phillips #0 bit, unscrew the two screws in front of the battery slot located on the bottom of the laptop.
-
-
Этот шаг не переведен. Помогите перевести
-
Using a spudger, work around the edge of the keyboard and pry it up from the device.
-
-
Этот шаг не переведен. Помогите перевести
-
Disconnect the keyboard cable on the laptop using a thin pry tool to open the connection.
-
-
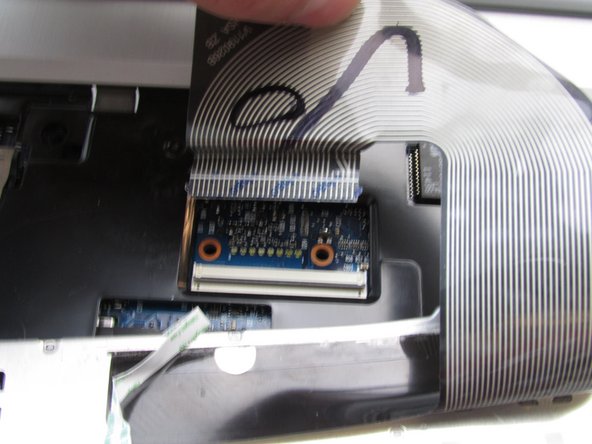
Этот шаг не переведен. Помогите перевести
-
Using the spudger again, disconnect the thin ribbon strip on the back of the keyboard.
-


Отменить: Я не выполнил это руководство.
3 участников успешно повторили данное руководство.

Команда

Embry-Riddle Aeronautical University, Team S12-G1, Lamothe Fall 2019 Участник Embry-Riddle Aeronautical University, Team S12-G1, Lamothe Fall 2019
ERAU-LAMOTHE-F19S12G1
4 членов
Автор 10 руководств
2 Комментариев
There's a third keyboard screw right beside the fan
yeah just wanted to say this ...
Also the screws are PH1 not PH0