Перейти к основному содержанию

HP Envy 17-J013CL WLAN Module Replacement

Выберете то, что вам нужно

  1. HP Envy 17-J013CL WLAN Module Replacement, Battery: шаг 1, изображение 1 из 1
    • Lay the laptop with the battery facing towards you.

    • Remember to disconnect the AC cable and other power sources from the device before replacing/repairing parts.

  2. HP Envy 17-J013CL WLAN Module Replacement: шаг 2, изображение 1 из 1
    • Grab hold of the small battery slider and apply pressure to the right.

    • The laptop itself will push the battery out for you once the switch slides all the way to the right.

  3. HP Envy 17-J013CL WLAN Module Replacement: шаг 3, изображение 1 из 3 HP Envy 17-J013CL WLAN Module Replacement: шаг 3, изображение 2 из 3 HP Envy 17-J013CL WLAN Module Replacement: шаг 3, изображение 3 из 3
    • Pull the battery out and let go of the battery slider.

  4. HP Envy 17-J013CL WLAN Module Replacement, Back Panel: шаг 4, изображение 1 из 2 HP Envy 17-J013CL WLAN Module Replacement, Back Panel: шаг 4, изображение 2 из 2
    • Use a PH1-screwdriver to loosen the 7mm screw. The screw will not fully come out as it is held by a washer underneath but will come out enough to open it.

  5. HP Envy 17-J013CL WLAN Module Replacement: шаг 5, изображение 1 из 1
    • Gently pull the back panel off starting from the battery side towards the back.

    • Pull it back as it snaps out of the holding sockets.

    • It is preferred to use both hands when pulling the back panel off to prevent bending it out of shape.

  6. HP Envy 17-J013CL WLAN Module Replacement, WLAN Module: шаг 6, изображение 1 из 2 HP Envy 17-J013CL WLAN Module Replacement, WLAN Module: шаг 6, изображение 2 из 2
    • Locate the WLAN module.

  7. HP Envy 17-J013CL WLAN Module Replacement: шаг 7, изображение 1 из 2 HP Envy 17-J013CL WLAN Module Replacement: шаг 7, изображение 2 из 2
    • Use a PH1-screwdriver to remove the 7mm screw from the motherboard.

  8. HP Envy 17-J013CL WLAN Module Replacement: шаг 8, изображение 1 из 2 HP Envy 17-J013CL WLAN Module Replacement: шаг 8, изображение 2 из 2
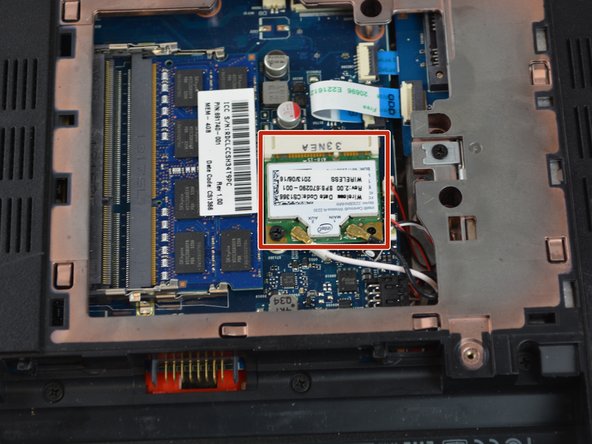
    • Lift the black and white wire from the module. Removing the wires from the ends will have a distinct popping noise.

    • Remember to put the white wire on the left side of the module and the black wire on the right side. Failure to do so may cause issues.

  9. HP Envy 17-J013CL WLAN Module Replacement: шаг 9, изображение 1 из 2 HP Envy 17-J013CL WLAN Module Replacement: шаг 9, изображение 2 из 2
    • Gently pull out the module away from the motherboard.

    • Make sure to put the module back in the correct orientation designated by the little arch in the end of the module.

Заключение

To reassemble your device, follow these instructions in reverse order.

Еще один человек закончил это руководство.

Matt McBride

Участник с: 02/02/17

845 Репутация

Автор 6 руководств

Команда

USF Tampa, Team 16-6, Blackwell Spring 2017 Участник USF Tampa, Team 16-6, Blackwell Spring 2017

USFT-BLACKWELL-S17S16G6

3 членов

Автор 6 руководств

0 Комментариев

Добавить комментарий

Просмотр статистики:

За последние 24часов: 0

За последние 7 дней: 1

За последние 30 дней: 1

За всё время: 333