Перейти к основному содержанию

HP Envy 4520 Glass Scanner Bed Replacement

Выберете то, что вам нужно

  1. HP Envy 4520 Glass Scanner Bed Replacement, Glass Scanner Bed: шаг 1, изображение 1 из 2 HP Envy 4520 Glass Scanner Bed Replacement, Glass Scanner Bed: шаг 1, изображение 2 из 2
    • Lift the entire scanner bed up.

  2. HP Envy 4520 Glass Scanner Bed Replacement: шаг 2, изображение 1 из 2 HP Envy 4520 Glass Scanner Bed Replacement: шаг 2, изображение 2 из 2
    • Remove the T10, 13 mm center screw.

  3. HP Envy 4520 Glass Scanner Bed Replacement: шаг 3, изображение 1 из 2 HP Envy 4520 Glass Scanner Bed Replacement: шаг 3, изображение 2 из 2
    • Remove the large flat ribbon cable by pinching the top and bottom of the cable between thumb and index finger and pulling away from the mother board.

    • Remove the small flat ribbon cable by pinching the top and bottom of the cable between thumb and index finger and pulling away from the mother board.

  4. HP Envy 4520 Glass Scanner Bed Replacement: шаг 4, изображение 1 из 2 HP Envy 4520 Glass Scanner Bed Replacement: шаг 4, изображение 2 из 2
    • Remove the clip holding the scanner bed up by using the plastic opening tools. Prying the clip away from the the side of the scanner bed.

  5. HP Envy 4520 Glass Scanner Bed Replacement: шаг 5, изображение 1 из 2 HP Envy 4520 Glass Scanner Bed Replacement: шаг 5, изображение 2 из 2
    • Remove the six 14 mm T10 Hex screws from the main plastic frame.

  6. HP Envy 4520 Glass Scanner Bed Replacement: шаг 6, изображение 1 из 3 HP Envy 4520 Glass Scanner Bed Replacement: шаг 6, изображение 2 из 3 HP Envy 4520 Glass Scanner Bed Replacement: шаг 6, изображение 3 из 3
    • Using the plastic opening tools, pry between the outer shell and the main plastic frame.

  7. HP Envy 4520 Glass Scanner Bed Replacement: шаг 7, изображение 1 из 3 HP Envy 4520 Glass Scanner Bed Replacement: шаг 7, изображение 2 из 3 HP Envy 4520 Glass Scanner Bed Replacement: шаг 7, изображение 3 из 3
    • Remove the black flat ribbon cable by pinching the top and bottom of the cable between thumb and index finger and pulling it away from the port.

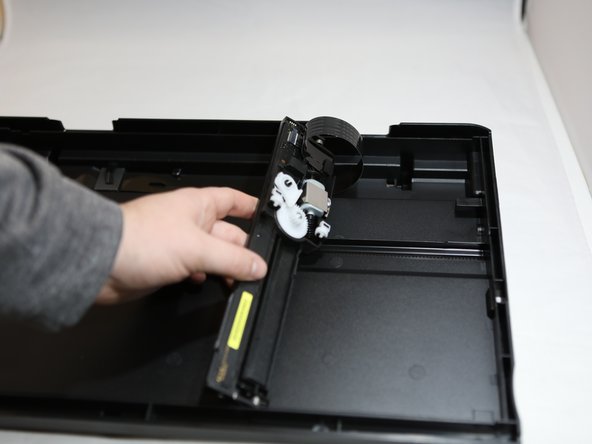
    • Lift the scanner bed in an upward motion out of the printer.

  8. HP Envy 4520 Glass Scanner Bed Replacement: шаг 8, изображение 1 из 2 HP Envy 4520 Glass Scanner Bed Replacement: шаг 8, изображение 2 из 2
    • Remove the nine 14 mm T10 Hex screws located around the edge of the scanner bed (Bottom).

    • Pry the two plastic flanges outward to release the glass scanner bed.

  9. HP Envy 4520 Glass Scanner Bed Replacement: шаг 9, изображение 1 из 3 HP Envy 4520 Glass Scanner Bed Replacement: шаг 9, изображение 2 из 3 HP Envy 4520 Glass Scanner Bed Replacement: шаг 9, изображение 3 из 3
    • Remove the glass scanner bed.

    • Then to reassemble align the small gear with the track and gently push down.

Заключение

To reassemble your device, follow these instructions in reverse order.

Еще один человек закончил это руководство.

Sage Davis

Участник с: 09/26/18

300 Репутация

1 руководство автора

Команда

Eastern Washington University, Team S1-G6, Carnegie Fall 2018 Участник Eastern Washington University, Team S1-G6, Carnegie Fall 2018

EWU-CARNEGIE-F18S1G6

4 членов

Автор 13 руководств

Один комментарий

step 4 - Remove the clip holding the scanner bed up by using the plastic opening tools. Prying the clip away from the the side of the scanner bed.

That clip is designed to be pulled toward the front of the printer to be released from the pin. And push the arm toward the back to snap back in place.

Jack Smith - Ответить

Добавить комментарий

Просмотр статистики:

За последние 24часов: 0

За последние 7 дней: 3

За последние 30 дней: 18

За всё время: 1,090