Перейти к основному содержанию

HP Envy x360 m6-aq005dx Hard Drive Replacement

Выберете то, что вам нужно

  1. HP Envy x360 m6-aq005dx Hard Drive Replacement, Back Panel: шаг 1, изображение 1 из 2 HP Envy x360 m6-aq005dx Hard Drive Replacement, Back Panel: шаг 1, изображение 2 из 2
    • Use the plastic opening tool to remove the gray rubber pads on the bottom of the laptop. For our device we only needed to remove the two at the top.

  2. HP Envy x360 m6-aq005dx Hard Drive Replacement: шаг 2, изображение 1 из 3 HP Envy x360 m6-aq005dx Hard Drive Replacement: шаг 2, изображение 2 из 3 HP Envy x360 m6-aq005dx Hard Drive Replacement: шаг 2, изображение 3 из 3
    • Use a Torx T5 screwdriver to remove the six 5.1 mm screws.

    • Use a JIS #1 screwdriver to remove the two 7.2mm screws.

  3. HP Envy x360 m6-aq005dx Hard Drive Replacement: шаг 3, изображение 1 из 1
    • Use a plastic opening tool to pry open the case. Go slowly around the edge. You will hear popping noises, such are due to popping open the small joints that keep the cover attached.

  4. HP Envy x360 m6-aq005dx Hard Drive Replacement, Battery: шаг 4, изображение 1 из 2 HP Envy x360 m6-aq005dx Hard Drive Replacement, Battery: шаг 4, изображение 2 из 2
    • Use a JIS #1 screwdriver to remove the six 4.7 mm screws.

  5. HP Envy x360 m6-aq005dx Hard Drive Replacement: шаг 5, изображение 1 из 1
    • Battery might cause a small electric shock.

    • Use tweezers to disconnect the battery from the motherboard.

  6. HP Envy x360 m6-aq005dx Hard Drive Replacement, Hard Drive: шаг 6, изображение 1 из 2 HP Envy x360 m6-aq005dx Hard Drive Replacement, Hard Drive: шаг 6, изображение 2 из 2
    • Use a JIS J1 bit to remove the two 4.6 mm screws.

  7. HP Envy x360 m6-aq005dx Hard Drive Replacement: шаг 7, изображение 1 из 2 HP Envy x360 m6-aq005dx Hard Drive Replacement: шаг 7, изображение 2 из 2
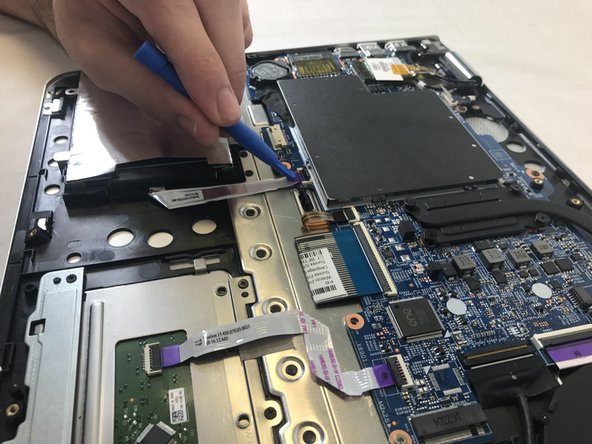
    • The red square is around the ribbon cable.

    • Use the plastic opening tool to open the black security connector. then pull the ribbon cable to disconnect it from the motherboard.

Заключение

To reassemble your device, follow these instructions in reverse order.

3 участников успешно повторили данное руководство.

Matthew Martin

Участник с: 10/10/17

711 Репутация

Автор 5 руководств

Команда

USF Tampa, Team S13-G17, Cagle Fall 2017 Участник USF Tampa, Team S13-G17, Cagle Fall 2017

USFT-CAGLE-F17S13G17

4 членов

Автор 7 руководств

0 Комментариев

Добавить комментарий

Просмотр статистики:

За последние 24часов: 1

За последние 7 дней: 1

За последние 30 дней: 4

За всё время: 13,290