Перейти к основному содержанию

HP Envy x360 m6-aq103dx Display Replacement

Выберете то, что вам нужно

  1. HP Envy x360 m6-aq103dx Display Replacement, Bottom Cover: шаг 1, изображение 1 из 3 HP Envy x360 m6-aq103dx Display Replacement, Bottom Cover: шаг 1, изображение 2 из 3 HP Envy x360 m6-aq103dx Display Replacement, Bottom Cover: шаг 1, изображение 3 из 3
    • Flip the laptop over to expose the underside.

    • Remove the two grip pads with blue plastic opening tool by inserting the tool between the laptop and the pads and slowly lifting up.

    • The grip pads are tacky, remove slowly to avoid separating the adhesive.

  2. HP Envy x360 m6-aq103dx Display Replacement: шаг 2, изображение 1 из 1
    • Remove the two 8 mm Phillips Head screws that were under the grip pads using a Phillip's Head 1 Screwdriver.

  3. HP Envy x360 m6-aq103dx Display Replacement: шаг 3, изображение 1 из 1
    • Remove the six 5 mm Torx screws using a T5 Torx Screwdriver.

  4. HP Envy x360 m6-aq103dx Display Replacement: шаг 4, изображение 1 из 3 HP Envy x360 m6-aq103dx Display Replacement: шаг 4, изображение 2 из 3 HP Envy x360 m6-aq103dx Display Replacement: шаг 4, изображение 3 из 3
    • Use the nylon spudger to pop off the bottom cover by inserting it into the heat vent and twisting to the left or right.

    • You may hear a slight clicking or popping, but that is normal.

  5. HP Envy x360 m6-aq103dx Display Replacement, Battery: шаг 5, изображение 1 из 2 HP Envy x360 m6-aq103dx Display Replacement, Battery: шаг 5, изображение 2 из 2
    • Use the Phillips Head 1 Screwdriver to remove the six 4 mm screws.

  6. HP Envy x360 m6-aq103dx Display Replacement: шаг 6, изображение 1 из 3 HP Envy x360 m6-aq103dx Display Replacement: шаг 6, изображение 2 из 3 HP Envy x360 m6-aq103dx Display Replacement: шаг 6, изображение 3 из 3
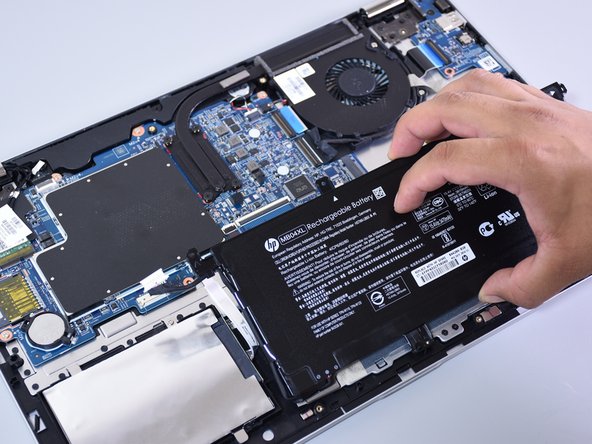
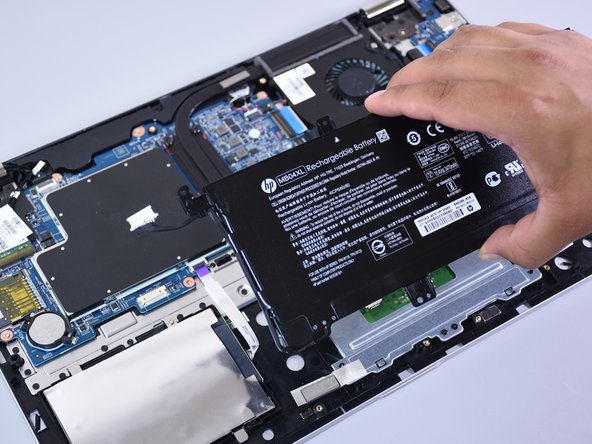
    • Disconnect the battery port from the motherboard by gently lifting it on both sides with the plastic opening tool.

    • Lift up the port with the tool.

  7. HP Envy x360 m6-aq103dx Display Replacement: шаг 7, изображение 1 из 3 HP Envy x360 m6-aq103dx Display Replacement: шаг 7, изображение 2 из 3 HP Envy x360 m6-aq103dx Display Replacement: шаг 7, изображение 3 из 3
    • Lift the battery out of the laptop with your hands.

  8. HP Envy x360 m6-aq103dx Display Replacement, Display: шаг 8, изображение 1 из 2 HP Envy x360 m6-aq103dx Display Replacement, Display: шаг 8, изображение 2 из 2
    • Click the back cover on so none of the internal components are damaged during the following steps.

    • Open the display, so it is flat and the screen is facing up.

    • Put the suction cup in the middle of the screen.

  9. HP Envy x360 m6-aq103dx Display Replacement: шаг 9, изображение 1 из 2 HP Envy x360 m6-aq103dx Display Replacement: шаг 9, изображение 2 из 2
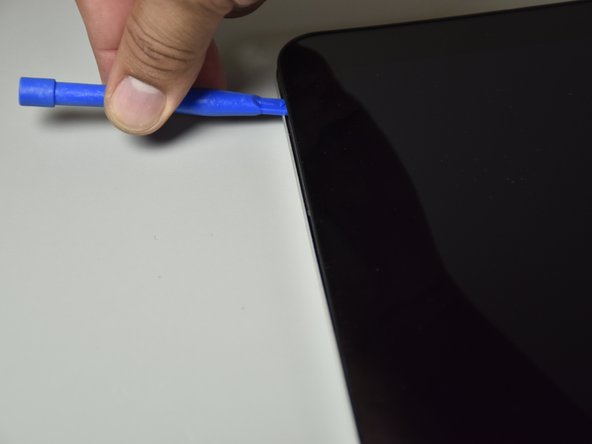
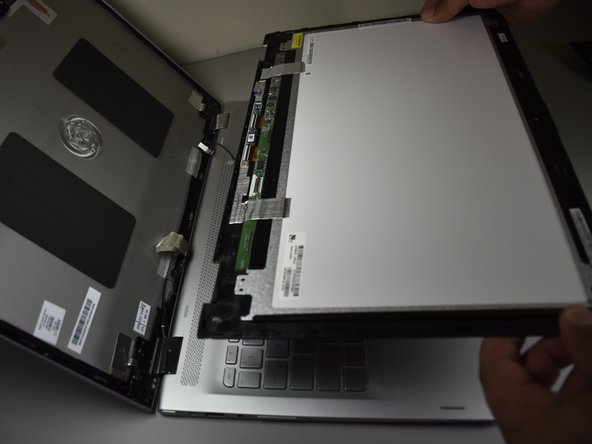
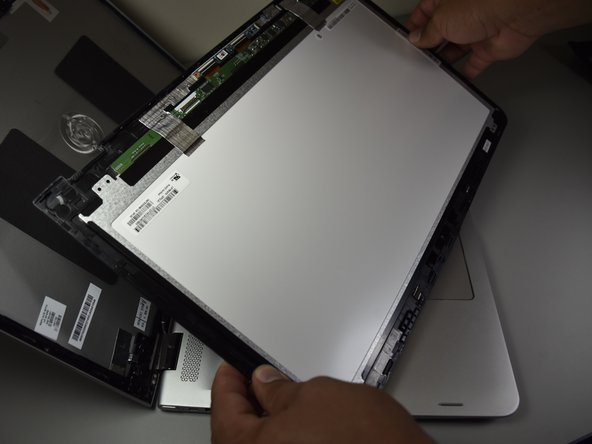
    • Wedge the small plastic opening tool between the frame and the screen and pry it open by lifting up.

  10. HP Envy x360 m6-aq103dx Display Replacement: шаг 10, изображение 1 из 2 HP Envy x360 m6-aq103dx Display Replacement: шаг 10, изображение 2 из 2
    • Slide the tool around the edge of the frame while pulling on the suction cup.

    • Popping sounds are ok.

  11. HP Envy x360 m6-aq103dx Display Replacement: шаг 11, изображение 1 из 1
    • Take the suction cup off before laying the screen on the keyboard.

  12. HP Envy x360 m6-aq103dx Display Replacement: шаг 12, изображение 1 из 3 HP Envy x360 m6-aq103dx Display Replacement: шаг 12, изображение 2 из 3 HP Envy x360 m6-aq103dx Display Replacement: шаг 12, изображение 3 из 3
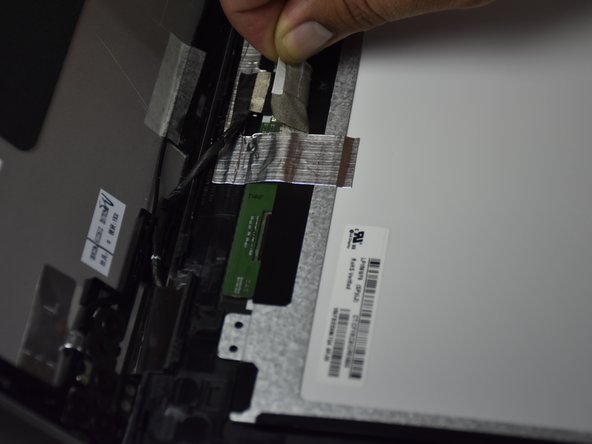
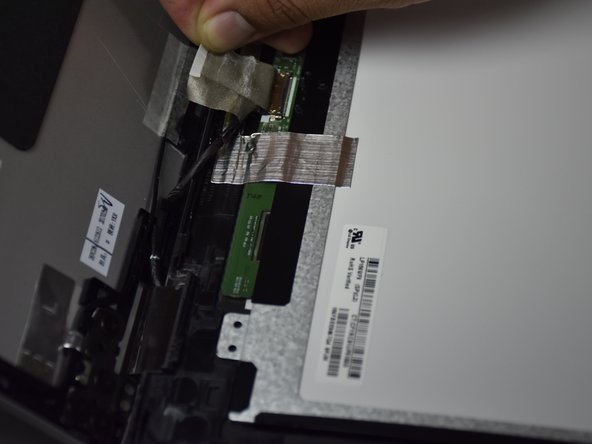
    • Remove the grey tape covering the wires by pulling on the tab slowly (located at the bottom of the display.

    • Detach the grey tape and the clear tape by wedging the small blue opening tool under the tape enough to raise a corner and pull the tape off with your hand.

    • Remove the tape slowly to avoid separating the adhesive.

    • Do this for both pieces of tape that cover wires.

  13. HP Envy x360 m6-aq103dx Display Replacement: шаг 13, изображение 1 из 3 HP Envy x360 m6-aq103dx Display Replacement: шаг 13, изображение 2 из 3 HP Envy x360 m6-aq103dx Display Replacement: шаг 13, изображение 3 из 3
    • For the round cable underneath the smaller of the two pieces of tape, remove the cable by sliding it backwards.

    • Remove the other cable by pulling on the tape downwards and backwards.

  14. HP Envy x360 m6-aq103dx Display Replacement: шаг 14, изображение 1 из 3 HP Envy x360 m6-aq103dx Display Replacement: шаг 14, изображение 2 из 3 HP Envy x360 m6-aq103dx Display Replacement: шаг 14, изображение 3 из 3
    • Lift the screen up with your hands.

Заключение

To reassemble your device, follow these instructions in reverse order.

11 участников успешно повторили данное руководство.

Christopher Martinez

Участник с: 10/02/17

406 Репутация

1 руководство автора

Команда

Cal Poly, Team S4-G3, Livingston Fall 2017 Участник Cal Poly, Team S4-G3, Livingston Fall 2017

CPSU-LIVINGSTON-F17S4G3

4 членов

Автор 9 руководств

8 Комментариев

Thank you for this. I was getting REAL nervous as I got to the bottom portion of the screen. It really looks like the bottom is a separate panel (with screws under it) - Your photos assured me that it was not, so I gave it a little more and she came right off. Excellent work and photos!

[Only edit would be, no need to take the battery out, just disconnect]

Kyle B - Ответить

Where can I get the screen to buy online please, I am from Africa

aholylier - Ответить

Amazon or Ebay work. Just be sure your getting a screen with the proper resolution. You can inspect the connector to see what one you have if you dont know (the pin configuration is slightly diferent)

Kyle B - Ответить

which resolution requires what pins

Chris Henrie -

do you know the part number of the display for this laptop?

Debbie Endara - Ответить

Добавить комментарий

Просмотр статистики:

За последние 24часов: 5

За последние 7 дней: 27

За последние 30 дней: 82

За всё время: 14,190