Перейти к основному содержанию

HP Envy x360 m6-aq103dx RAM Replacement

Выберете то, что вам нужно

  1. HP Envy x360 m6-aq103dx RAM Replacement, Bottom Cover: шаг 1, изображение 1 из 3 HP Envy x360 m6-aq103dx RAM Replacement, Bottom Cover: шаг 1, изображение 2 из 3 HP Envy x360 m6-aq103dx RAM Replacement, Bottom Cover: шаг 1, изображение 3 из 3
    • Flip the laptop over to expose the underside.

    • Remove the two grip pads with blue plastic opening tool by inserting the tool between the laptop and the pads and slowly lifting up.

    • The grip pads are tacky, remove slowly to avoid separating the adhesive.

  2. HP Envy x360 m6-aq103dx RAM Replacement: шаг 2, изображение 1 из 1
    • Remove the two 8 mm Phillips Head screws that were under the grip pads using a Phillip's Head 1 Screwdriver.

  3. HP Envy x360 m6-aq103dx RAM Replacement: шаг 3, изображение 1 из 1
    • Remove the six 5 mm Torx screws using a T5 Torx Screwdriver.

  4. HP Envy x360 m6-aq103dx RAM Replacement: шаг 4, изображение 1 из 3 HP Envy x360 m6-aq103dx RAM Replacement: шаг 4, изображение 2 из 3 HP Envy x360 m6-aq103dx RAM Replacement: шаг 4, изображение 3 из 3
    • Use the nylon spudger to pop off the bottom cover by inserting it into the heat vent and twisting to the left or right.

    • You may hear a slight clicking or popping, but that is normal.

  5. HP Envy x360 m6-aq103dx RAM Replacement, Battery: шаг 5, изображение 1 из 2 HP Envy x360 m6-aq103dx RAM Replacement, Battery: шаг 5, изображение 2 из 2
    • Use the Phillips Head 1 Screwdriver to remove the six 4 mm screws.

  6. HP Envy x360 m6-aq103dx RAM Replacement: шаг 6, изображение 1 из 3 HP Envy x360 m6-aq103dx RAM Replacement: шаг 6, изображение 2 из 3 HP Envy x360 m6-aq103dx RAM Replacement: шаг 6, изображение 3 из 3
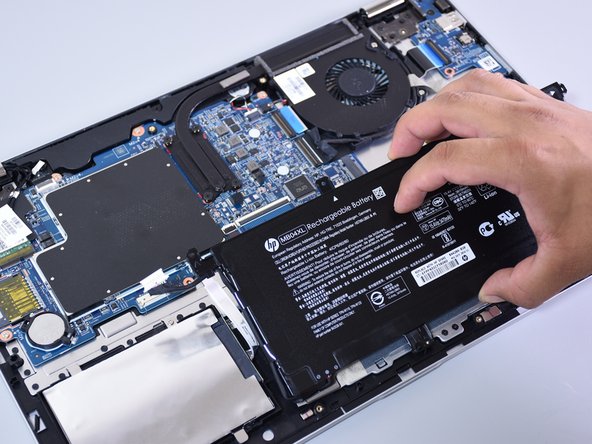
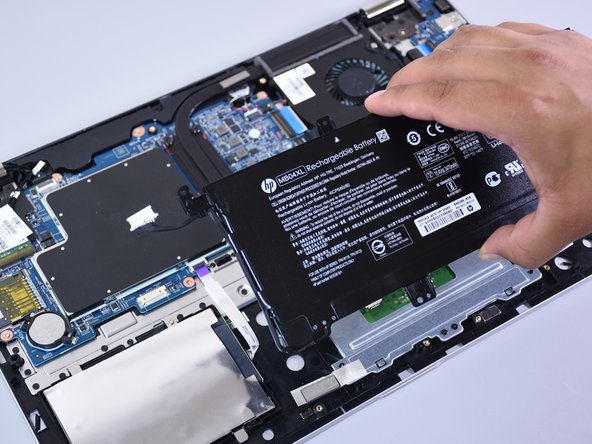
    • Disconnect the battery port from the motherboard by gently lifting it on both sides with the plastic opening tool.

    • Lift up the port with the tool.

  7. HP Envy x360 m6-aq103dx RAM Replacement: шаг 7, изображение 1 из 3 HP Envy x360 m6-aq103dx RAM Replacement: шаг 7, изображение 2 из 3 HP Envy x360 m6-aq103dx RAM Replacement: шаг 7, изображение 3 из 3
    • Lift the battery out of the laptop with your hands.

  8. HP Envy x360 m6-aq103dx RAM Replacement, RAM: шаг 8, изображение 1 из 2 HP Envy x360 m6-aq103dx RAM Replacement, RAM: шаг 8, изображение 2 из 2
    Инструмент, используемый на этом этапе:
    Anti-Static Wrist Strap
    $7.95
    Купить
  9. HP Envy x360 m6-aq103dx RAM Replacement: шаг 9, изображение 1 из 3 HP Envy x360 m6-aq103dx RAM Replacement: шаг 9, изображение 2 из 3 HP Envy x360 m6-aq103dx RAM Replacement: шаг 9, изображение 3 из 3
    • Pull the two outer pins on either side of the ram chip outward with your hands.

    • The ram chips should pop up.

    • Do this for both chips.

  10. HP Envy x360 m6-aq103dx RAM Replacement: шаг 10, изображение 1 из 3 HP Envy x360 m6-aq103dx RAM Replacement: шаг 10, изображение 2 из 3 HP Envy x360 m6-aq103dx RAM Replacement: шаг 10, изображение 3 из 3
    • Remove the chips one at a time, by sliding them towards the side of the computer they are pointing towards.

Заключение

To reassemble your device, follow these instructions in reverse order.

2 участников успешно повторили данное руководство.

Joey Chen

Участник с: 10/02/17

316 Репутация

Автор 2 руководств

Команда

Cal Poly, Team S4-G3, Livingston Fall 2017 Участник Cal Poly, Team S4-G3, Livingston Fall 2017

CPSU-LIVINGSTON-F17S4G3

4 членов

Автор 9 руководств

0 Комментариев

Добавить комментарий

Просмотр статистики:

За последние 24часов: 0

За последние 7 дней: 3

За последние 30 дней: 26

За всё время: 4,033