Перейти к основному содержанию

HP Envy x360 m6-w101dx Fan Replacement

Выберете то, что вам нужно

  1. HP Envy x360 m6-w101dx Fan Replacement, Keyboard Panel: шаг 1, изображение 1 из 1
    • Place the laptop so that the bottom panel is facing upwards.

  2. HP Envy x360 m6-w101dx Fan Replacement: шаг 2, изображение 1 из 3 HP Envy x360 m6-w101dx Fan Replacement: шаг 2, изображение 2 из 3 HP Envy x360 m6-w101dx Fan Replacement: шаг 2, изображение 3 из 3
    • Remove the screw covers using an iFixit opening tool.

  3. HP Envy x360 m6-w101dx Fan Replacement: шаг 3, изображение 1 из 1
    • Remove twelve 8 mm Phillips #1 screws.

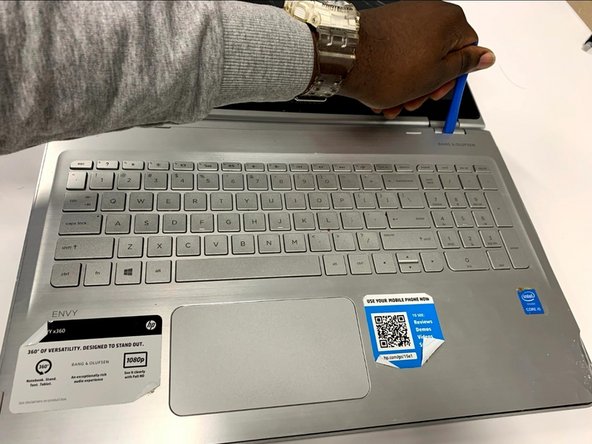
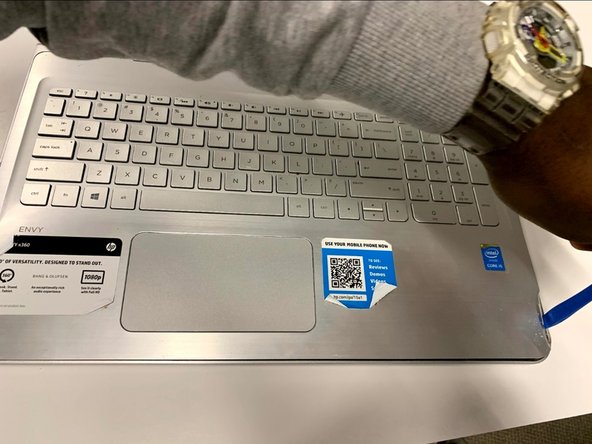
  4. HP Envy x360 m6-w101dx Fan Replacement: шаг 4, изображение 1 из 3 HP Envy x360 m6-w101dx Fan Replacement: шаг 4, изображение 2 из 3 HP Envy x360 m6-w101dx Fan Replacement: шаг 4, изображение 3 из 3
    • Pry open a gap in the edge of the keyboard with an iFixit opening tool.

  5. HP Envy x360 m6-w101dx Fan Replacement: шаг 5, изображение 1 из 1
    • Remove the keyboard from the laptop.

  6. HP Envy x360 m6-w101dx Fan Replacement, Fan: шаг 6, изображение 1 из 1
    • Remove the five 4.5mm Phillips #1 screws surrounding the fan.

  7. HP Envy x360 m6-w101dx Fan Replacement: шаг 7, изображение 1 из 1
    • Remove the three 4.5mm Phillips #1 screws from right side of the motherboard.

  8. HP Envy x360 m6-w101dx Fan Replacement: шаг 8, изображение 1 из 1
    • Detach the cable between the CPU and the motherboard.

  9. HP Envy x360 m6-w101dx Fan Replacement: шаг 9, изображение 1 из 1
    • Detach the cable between the battery and the motherboard.

  10. HP Envy x360 m6-w101dx Fan Replacement: шаг 10, изображение 1 из 1
    • Disconnect the cable between the SD card and the motherboard.

  11. HP Envy x360 m6-w101dx Fan Replacement: шаг 11, изображение 1 из 1
    • Disconnect the cable between the screen and the motherboard.

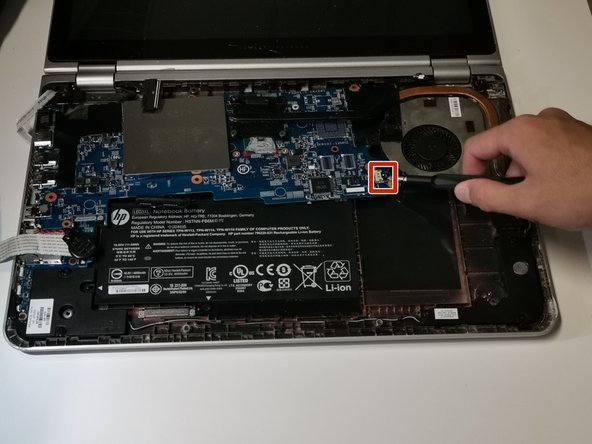
  12. HP Envy x360 m6-w101dx Fan Replacement: шаг 12, изображение 1 из 1
    • Detach the connection between the fan and the motherboard.

  13. HP Envy x360 m6-w101dx Fan Replacement: шаг 13, изображение 1 из 1
    • Disconnect the cable from the speaker to the motherboard.

  14. HP Envy x360 m6-w101dx Fan Replacement: шаг 14, изображение 1 из 1
    • Disconnect the cable between the CPU and the power interface.

  15. HP Envy x360 m6-w101dx Fan Replacement: шаг 15, изображение 1 из 1
    • Turn the connected motherboard and fan upside down and remove the four 4.5mm Phillips #1 screws from the middle of the back of the motherboard.

  16. HP Envy x360 m6-w101dx Fan Replacement: шаг 16, изображение 1 из 1
    • Disconnect the cable connecting the fan to the motherboard.

  17. HP Envy x360 m6-w101dx Fan Replacement: шаг 17, изображение 1 из 1
    • Remove the fan from the laptop.

Заключение

To reassemble your device, follow these instructions in reverse order.

Еще один человек закончил это руководство.

Wenxuan Zhang

Участник с: 01/21/20

255 Репутация

1 руководство автора

Команда

York University, Team S8-G5, Turner Winter 2020 Участник York University, Team S8-G5, Turner Winter 2020

YORK-TURNER-W20S8G5

5 членов

Автор 2 руководств

0 Комментариев

Добавить комментарий

Просмотр статистики:

За последние 24часов: 1

За последние 7 дней: 3

За последние 30 дней: 9

За всё время: 647