Перейти к основному содержанию

HP LaserJet P1102w Drive Belt Replacement

Выберете то, что вам нужно

  1. HP LaserJet P1102w Drive Belt Replacement, Left Side Panel: шаг 1, изображение 1 из 3 HP LaserJet P1102w Drive Belt Replacement, Left Side Panel: шаг 1, изображение 2 из 3 HP LaserJet P1102w Drive Belt Replacement, Left Side Panel: шаг 1, изображение 3 из 3
    • Flip printer on it's back. Using the plastic spudger, pry off front panel. There will be two main points to focus as shown.

    • Pry carefully to not break any plastic.

  2. HP LaserJet P1102w Drive Belt Replacement: шаг 2, изображение 1 из 2 HP LaserJet P1102w Drive Belt Replacement: шаг 2, изображение 2 из 2
    • Now that the pry points are free lift up the front panel.

  3. HP LaserJet P1102w Drive Belt Replacement: шаг 3, изображение 1 из 2 HP LaserJet P1102w Drive Belt Replacement: шаг 3, изображение 2 из 2
    • Unscrew the #1 Phillips screw 6mm on the back of the printer.

  4. HP LaserJet P1102w Drive Belt Replacement: шаг 4, изображение 1 из 3 HP LaserJet P1102w Drive Belt Replacement: шаг 4, изображение 2 из 3 HP LaserJet P1102w Drive Belt Replacement: шаг 4, изображение 3 из 3
    • Using the plastic spudger, remove the button housing from the top left of printer.

    • Pry carefully to not break any plastic.

  5. HP LaserJet P1102w Drive Belt Replacement: шаг 5, изображение 1 из 2 HP LaserJet P1102w Drive Belt Replacement: шаг 5, изображение 2 из 2
    • Once the housing is removed, remove the three buttons.

  6. HP LaserJet P1102w Drive Belt Replacement: шаг 6, изображение 1 из 3 HP LaserJet P1102w Drive Belt Replacement: шаг 6, изображение 2 из 3 HP LaserJet P1102w Drive Belt Replacement: шаг 6, изображение 3 из 3
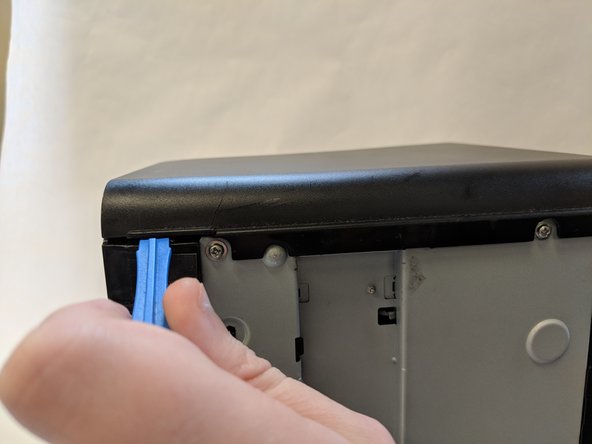
    • Use the plastic spudger to remove the side panel. There are three main prying points as shown.

    • Pry carefully to not break any plastic.

  7. HP LaserJet P1102w Drive Belt Replacement: шаг 7, изображение 1 из 2 HP LaserJet P1102w Drive Belt Replacement: шаг 7, изображение 2 из 2
    • With all pry points free, remove the side panel.

  8. HP LaserJet P1102w Drive Belt Replacement, Drive Belt: шаг 8, изображение 1 из 3 HP LaserJet P1102w Drive Belt Replacement, Drive Belt: шаг 8, изображение 2 из 3 HP LaserJet P1102w Drive Belt Replacement, Drive Belt: шаг 8, изображение 3 из 3
    • Refer to the prerequisite guide to take off the front panel off.

    • With a #1 Phillips screwdriver remove only the top Phillips 60mm screw.

    • With the spudger pry the side panel off. There will be four flanges to unhitch.

  9. HP LaserJet P1102w Drive Belt Replacement: шаг 9, изображение 1 из 2 HP LaserJet P1102w Drive Belt Replacement: шаг 9, изображение 2 из 2
    • With side panel removed, there will be four Phillips 60mm screws to unscrew using a #1 Phillips screwdriver.

  10. HP LaserJet P1102w Drive Belt Replacement: шаг 10, изображение 1 из 3 HP LaserJet P1102w Drive Belt Replacement: шаг 10, изображение 2 из 3 HP LaserJet P1102w Drive Belt Replacement: шаг 10, изображение 3 из 3
    • Remove top two big gears using tweezers.

    • Take note of gear placement.

  11. HP LaserJet P1102w Drive Belt Replacement: шаг 11, изображение 1 из 3 HP LaserJet P1102w Drive Belt Replacement: шаг 11, изображение 2 из 3 HP LaserJet P1102w Drive Belt Replacement: шаг 11, изображение 3 из 3
    • With the #1 Phillips screwdriver remove the 60mm Phillips screw holding the belt tension-er.

    • With the screw removed, pull tension-er out.

    • Use tweezers to remove the loose drive belt.

Заключение

To reassemble your device, follow these instructions in reverse order.

6 участников успешно повторили данное руководство.

Jerome Etten

Участник с: 10/04/18

709 Репутация

Автор 4 руководств

Команда

UW Stout, Team S6-G4, Ogden Fall 2018 Участник UW Stout, Team S6-G4, Ogden Fall 2018

UWSTOUT-OGDEN-F18S6G4

4 членов

Автор 10 руководств

Один комментарий

the tight side panel clips make this a difficult procedure, so take care both disassembling and assembling, for example make sure the power button is aligned with the level components behind before you push to clip the front home, as misalignment can break or dislocate internal parts.

Peter Taffs - Ответить

Добавить комментарий

Просмотр статистики:

За последние 24часов: 2

За последние 7 дней: 13

За последние 30 дней: 48

За всё время: 2,741