Перейти к основному содержанию

HP Pavilion 11-n010dx Hard Drive Replacement

Выберете то, что вам нужно

  1. HP Pavilion 11-n010dx Hard Drive Replacement, Battery: шаг 1, изображение 1 из 2 HP Pavilion 11-n010dx Hard Drive Replacement, Battery: шаг 1, изображение 2 из 2
    • Use the nylon spudger to remove the rubber pads near the hinge of the screen, then remove the screws under the pads.

    • Use the Phillips #0 to remove four 9mm screws.

    • Use the Phillips #0 to remove seven 6mm screws.

  2. HP Pavilion 11-n010dx Hard Drive Replacement: шаг 2, изображение 1 из 3 HP Pavilion 11-n010dx Hard Drive Replacement: шаг 2, изображение 2 из 3 HP Pavilion 11-n010dx Hard Drive Replacement: шаг 2, изображение 3 из 3
    • Use the nylon spudger to pry the back casing near the hinges for the screen.

    • Continue to pry along the edge of the back case until the back is ready to be removed.

    • Careful when beginning to remove the case. There is a cable attached between the bottom case and the motherboard that must be properly disconnected.

  3. HP Pavilion 11-n010dx Hard Drive Replacement: шаг 3, изображение 1 из 2 HP Pavilion 11-n010dx Hard Drive Replacement: шаг 3, изображение 2 из 2
    • Use the blue plastic opening tool to lift up on the white tab that is holding the cable in place on the motherboard.

    • Now carefully pull the cable out of place and remove the entire back casing.

  4. HP Pavilion 11-n010dx Hard Drive Replacement: шаг 4, изображение 1 из 1
    • Remove the five 6mm screws that hold the battery in place using the Phillips #0.

  5. HP Pavilion 11-n010dx Hard Drive Replacement: шаг 5, изображение 1 из 2 HP Pavilion 11-n010dx Hard Drive Replacement: шаг 5, изображение 2 из 2
    • Use the nylon spudger to pry away the blue/white wire that is positioned near your battery.

  6. HP Pavilion 11-n010dx Hard Drive Replacement: шаг 6, изображение 1 из 2 HP Pavilion 11-n010dx Hard Drive Replacement: шаг 6, изображение 2 из 2
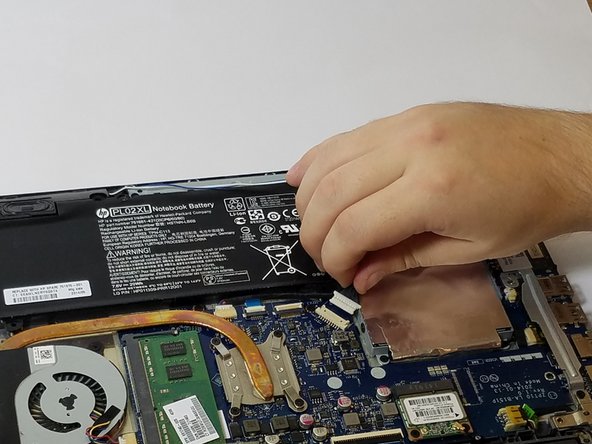
    • Disconnect the battery cable from the motherboard by carefully pulling on the black wire at the point closest to the white tab.

  7. HP Pavilion 11-n010dx Hard Drive Replacement: шаг 7, изображение 1 из 1
    • Remove the battery from your device.

  8. HP Pavilion 11-n010dx Hard Drive Replacement, Hard Drive: шаг 8, изображение 1 из 1
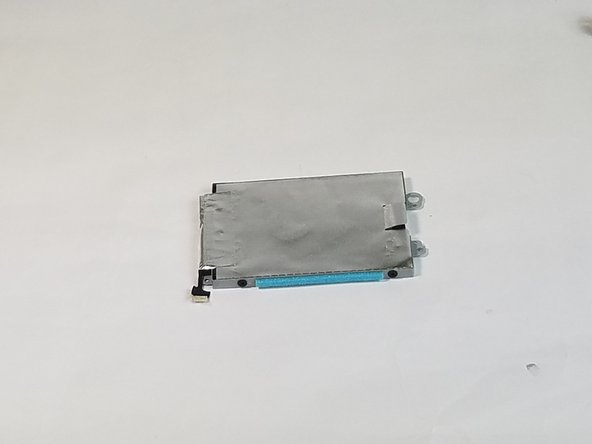
    • Use the Phillips #0 to remove the three 3mm screws holding the hard drive in place.

  9. HP Pavilion 11-n010dx Hard Drive Replacement: шаг 9, изображение 1 из 2 HP Pavilion 11-n010dx Hard Drive Replacement: шаг 9, изображение 2 из 2
    • Carefully lift the hard drive out of place using the tag.

  10. HP Pavilion 11-n010dx Hard Drive Replacement: шаг 10, изображение 1 из 3 HP Pavilion 11-n010dx Hard Drive Replacement: шаг 10, изображение 2 из 3 HP Pavilion 11-n010dx Hard Drive Replacement: шаг 10, изображение 3 из 3
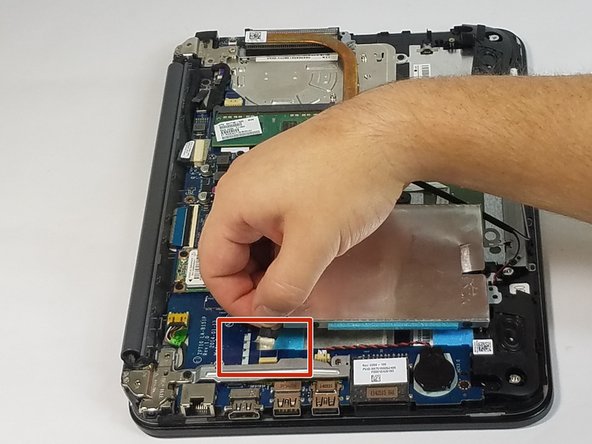
    • Gently pull on the cable connector to disconnect the hard drive from your device.

Заключение

To reassemble your device, follow these instructions in reverse order.

5 участников успешно повторили данное руководство.

Joseph Lintz

Участник с: 09/15/16

915 Репутация

Автор 5 руководств

Команда

USF Tampa, Team 11-5, Blackwell Fall 2016 Участник USF Tampa, Team 11-5, Blackwell Fall 2016

USFT-BLACKWELL-F16S11G5

3 членов

Автор 5 руководств

2 Комментариев

Thanks a lot Joseph ! Works well for the model 11-n000nf !

Nicolas - Ответить

Thanks Joseph-I was able to get it open, disconnect the battery and ordered a new battery. We’ll see if this corrects the problem. Computer was sleeping for over a year. Thank you for your pictures and easy to follow instructions.

Beverlyn - Ответить

Добавить комментарий

Просмотр статистики:

За последние 24часов: 0

За последние 7 дней: 7

За последние 30 дней: 30

За всё время: 5,485